Monday, October 30, 2023

Love Those Wreaths

 Hello and welcome on this beautiful Monday.  It seems like the weekend went way too fast and it's time to get back into the groove.  As promised, I'm actually sharing Christmas cards today.  I loved the Wishes All Around Bundle when I saw it in the Mini Catalog.  Especially the snowflake wreath die!  Woo Boy - it's just gorgeous.  So of course, that is the first item from that bundle that I'm sharing with you.

I've got to admit, I used a retired Season of Chic DSP to play around with the die and get a feel for how it cuts, etc.  I thought they turned out beautifully, so I had to share them with you.  So that's why there are 3 cards in the picture.  We are going to focus on the Night of Navy version first because all the items used are current.  Then we'll touch on the other two cards for a little bit at the end.

Aren't the three cards lovely though?  I wish you could see them in person and touch them.  They are just so pretty!! I like how airy the snowflake wreath looks!  It really is easy to cut and get all the little pieces poked out of the snowflakes.  Usually, I only had five or six little 'chads' to poke out after cutting.  Like I said, so easy.  I can't wait to play with the other dies to see what else I can create.


For this card, I decided to work with my favorite Christmas card color scheme - navy, white, and silver.  The base of the card is Night of Navy cardstock that measures 8 1/2" x 5 1/2".  It's scored and folded in half as usual.

The DSP that I chose to frame the snowflakes is from the Countryside Inn Designer Series Paper pack.  Yes, I know - that's not Christmas paper!  But I thought this print gave a feel of snowflakes falling with the Balmy Blue dots all over the design.  This measures 5 1/4" x 4".  It's attached to the folded navy card base using adhesive.

The snowflakes are die-cut from a piece of Basic White Thick.  I added a layer of the Adhesive Sheets cut to fit.  You can find this on page 138 in the Annual Catalog.  It's a great tool when die-cutting intricate pieces and trying to attach them to your card.  The adhesive is already there, so you just peel the backing and attach.  It's attached near the top of the card to leave lots of room for a sentiment.

There are single snowflakes dies in the Wishes All Around set also.  I cut three of these out of Silver Foil paper to add to the design.  It added a nice bit of shine to it.  They are each attached with a Mini Glue Dot in the center to hold in place.

The sentiment also comes from the Wishes All Around set.  This is stamped on a strip of Basic White that is about 3/4" wide.  It's stamped with Night of Navy ink close to the left side.  Then the right end is flagged with the Banners Pick a Punch.  It's then attached to the card front with adhesive at the left edge and a Dimensional under the right edge.  I liked it kind of lifting off the card as it went across.

A bow was made using the Silver & White Sheer Ribbon to highlight the extra silver snowflakes.  The bow is attached with Mini Glue Dots near the bottom of the wreath.

After looking at the finished card, I thought some small Clear Rhinestone Basic Jewels would add a touch more sparkle. They are added to the centers of the snowflakes that you can see, so only six were used.  But it does add a pretty touch.

Let me tell you about a problem I ran into so maybe you won't have the same problem.  Or maybe you will come up with a better way of doing this.  This was the first incarnation of the snowflake card idea.  The snowflake was still made of Basic White Thick cardstock, but I added a layer of the Foam Adhesive Sheets under this since I wanted some dimension.  After going through the cutting machine 4 times, it finally cut through the outer edges.  But when you look closely, you'll see that most of the inner chads on the snowflakes were absolutely impossible to remove.  Lots of poking to just get the outer circles empty.  So, that was just too thick.  Maybe it would work better with regular cardstock.  I don't know, I didn't try that.  I really liked the thickness of the snowflake wreath, but I don't think that out-weighed the hassle. 

The sentiment is from the Brightest Glow stamp set.  Same ribbon and silver snowflakes added and a few Rhinestone Basic Jewels to sparkle.

On this card, the retired White Velvet Specialty Paper was used on the snowflake wreath.  Love this.  The sentiment is from the Wishes All Around set and just fussy cut around it.  It's popped up with a Dimensional.  

For the bling on this one, something new was used.  These are the Adhesive-backed Glitter Sequins.  Oh my, they are so pretty and sparkly!  Again, the silver snowflakes were added along with the Silver & White ribbon bow.

Ok, there you have it - snowflakes in three versions.  I really love each one of these.  I wish that velvet paper was still current because it made lovely snowflakes.  But now that these are finished, I really need to make some cards using the wreath made from little trees.  I think that will be adorable.

Thanks for hanging with me for a little bit today.  Have fun trying out these creations as is or add your own special touch to the idea.  If you have an idea for something different to use for the snowflakes, let me know.  I love new ideas.  If you order, please use the Host Code shown at the top of the page.  Thank you!

Happy stamping and creating,
Sharon 

Friday, October 27, 2023

Wild Wheat Autumn Card

Hello there!  Hope you are all doing well on this gorgeous day!  I'm really getting into fall mode here.  Made my first pumpkin pie of the season.  So yummy!  It got me focused on fall themes again, so here we are with another Autum Leaves card.  This time I thought I'd try using Wild Wheat as the base of the card and pair it with the All About Autumn DSP.  Love it!  Wild Wheat is not one of the colors listed to coordinate with this paper, but for this print, I really like the looks.  Hope you do too.

Wow, in the picture it looks like Old Olive for sure.  But take my word for it, it really is Wild Wheat.  It seems to make everything look a little brighter and warmer than Old Olive, and I love how this turned out.  Let's get to the specifics!

Card base is Wild Wheat that measures 8 1/2" x 5 1/2".  It's scored and folded in half.  Next there is a 5 1/4" x 4" layer of Wild Wheat cardstock.  This is die-cut with the large maple leaf and one of the small ones too.  (Keep these for later use.)  I made sure I had room at the bottom for adding my sentiment later.  After die-cutting this layer, it was embossed with the Distressed Tile 3D Embossing Folder found in the Mini Catalog on page 75.  I love the tiled look, but the uneven distressed look really adds so much to the overall look.  After embossing, a Blending Brush and Wild Wheat ink was used on the edges to darken a bit and make the detail really stand out.

The next step was to add the layer of All About Autumm DSP behind the leaves.  For this I chose the print looking down on the colorful forest of trees.  The DSP was trimmed to about 3 3/4" x 4 1/4".  There was no point in covering the whole back of the layer when only a portion of it would actually show.  (Now I've got more to use on another project!)  I thought of attaching it to the card base and the Wild Wheat layer added with Dimensionals above, but changed my mind and attached it to the back of the embossed and die-cut layer.  This way it showed up better than having the shadows darkening it.

The veining for the large leaf was cut from the Oxidized Copper Specialty DSP.  I love the mottled look of this so the veining doesn't smack you in the face.  Used here, it's more subtle than a solid gold or copper paper.

A small maple leaf was die-cut from Cajun Craze cardstock.  This was added slightly off-set over the small maple leaf on the card front using just one Dimensional.  I didn't want to totally cover the DSP, but I also didn't want it to be just the DSP showing like the large one.  So this was a good compromise.  There was also a 4" x 1" strip of Cajun Craze cut for the card.  I had a piece of the DSP left over from another project that measures 3 3/4" x 3/4".  Figured this would make a nice band across the bottom of the card.  I planned on adding the sentiment over this, but you can see I changed my mind on that idea.  This strip was attached to the card front with "green glue" right near the bottom edge.  At this point, the Wild Wheat layer was attached to the card front with Dimensionals.

The inside of the card has a layer of Very Vanilla cardstock that measures 5 1/4" x 4".  This is left plain, but a little Blending Brush and Wild Wheat ink could be added here.  It was attached inside the card with adhesive.  There were two leftover leaves from die-cutting the front layer.  These had a little Wild Wheat ink added to them with a Blending Brush.  The sentiment from the Autumn Leaves sets was added across the large leaf stamped with Cajun Craze ink.  Both the leaves were attached flat to the inner layer.
The sentiment for the card front was inked with a Cajun Craze marker to get just a part of the sentiment.  It's stamped onto a scrap of Very Vanilla cardstock.  I used my Paper Snips to fussy cut around the sentiment.  It's added to the card front with Mini Dimensionals.

To finish the front of the card, the copper ribbon from the Copper & Natural Ribbon Combo Pack was tied into a smallish bow.  It's then attached to the card front with Mini Glue Dots.  

For the bling, three copper sequins were added.  They're from the Neutrals Adhesive-backed Sequins found on page 141 of the Annual Catalog.  These copper sequins have been a must-have embellishment for my autumn cards!

That's it for today.  I keep sneaking in more fall cards and I've been putting off really diving into my Christmas cards.  Since this is basically the end of October (yikes!!), I really need to get motivated on that!  I promise I'll get creating on them very soon!  Come back and see what's happening here and keep me focused on those Christmas cards!

Thanks for stopping in today.  Feel free to leave a comment.  You know I love hearing from you.  If you're placing an order soon, I'd appreciate if you'd consider ordering from me.  And if you do, please use the Host Code at the top of this post.  Thank you so much for your patronage!

Happy stamping and creating,
Sharon

Tuesday, October 24, 2023

Autumn Leaves Twofer

Hello friend!  I've been lured back to play with the Autumn Leaves Bundle again.  I can't seem to get enough of this fabulous bunch of products.  I love the shape and size of the leaves, the sentiments are great, and the DSP is just indescribably gorgeous!  Yes, do you get the feeling that I like this a bit?  The card I made for today started out one color, then I thought maybe it would look better in another color.  So, it turns out that you get to see both.  I'm still fond of both for differing reasons.  Let me know which one you prefer.

For this card, Old Olive cardstock was used for the card base and a layer.  This layer measures 5" x 3 7/8" and is embossed with the Exposed Brick Embossing Folder.  After embossing, I used a Blending Brush and a little Old Olive ink to darker the outer edges lightly.

Next a layer of Very Vanilla layer that measures 5 1/8" x 4" was cut.  This piece also has color added on the edges except this time I used Crumb Cake ink.  After adding the color, the Old Olive layer was attached with "green glue".  Then a 6" length of natural ribbon from the Copper & Natural Ribbon combo was wrapped around and attached to the back.  I thought the natural ribbon was a nice organic touch to this fall card.  Both layers were attached to the folded Old Olive card base using "green glue" also.

A Very Vanilla cardstock piece was die-cut using the smaller tag die in the Autumn Leaves die set.  The edges were darkened slightly with Crumb Cake and the Blending Brush.  Then the sentiment from the Autumn Leaves set was stamped in Old Olive ink.

I've got lots of smallish pieces of the lovely All About Autumn DSP pack.  It was so quick to die-cut the different sizes of leaves from these scraps and also from some Oxidized Copper Specialty Paper.  The veining on the larger leaves was die-cut from the same Oxidized Copper paper.  It was fun playing with all the different leaves to get a layout I liked.  Some leaves are attached flat with adhesive, and some leaves were popped up with Dimensionals.  The sentiment was added over the ribbon with Dimensionals.  

Even though the card already had a ribbon trim, I liked the look of a double Linen Thread bow that was added to the sentiment area.  It's attached with a Mini Glue Dot that's rolled to make it small enough to fit under the knot.  

For bling, I used the Adhesive-backed Speckled Dots in the Copper Clay color.  They seemed to show up nicely and didn't clash with the other bits of copper and gold already on the card.  Very subtle, but still noticeable.

Here is the Pretty Peacock version of the card.  As you can see, I followed the card layout pretty carefully.  There are a few minor changes.

First, the embossing folder used on this card is the Leaf Fall design.  The embossed leaves flow at a diagonal across the card. I thought it went nicely with the gorgeous leaves on the card.

The Very Vanilla layer and label both have a little Crumb Cake added with the Blending Brushes to the edges.  The embossed Peacock layer has a little Pretty Peacock ink blended onto the edges to darken it.

The leaf dies I chose to use are the same on both cards, but the All About Autumn DSP prints were different.  I used Old Olive and Copper Clay on this card and Pretty Peacock and Copper Clay on the other one.  I think all of these colors and prints are simply beautiful and any of them would work with this card design.  

This card also used the Copper Clay Adhesive-backed Speckled Dots.  I think they really stand out beautifully in contrast against the Pretty Peacock background.

FYI - in case you've been waiting for the All About Autumn DSP and the Copper & Natural Ribbon Combo should be coming back in stock at the end of October.  Be patient please!

So that's it for your two versions of this Autumn Leaves fall card design.  Thank you for stopping by to see what's been happening around here.  These cards just bring the scenic beauty I love inside and gives me an opportunity to share it with you.  

Happy stamping and creating,
Sharon

Saturday, October 21, 2023

Christmas Tag Fun Fold Card

Happy Saturday!  What a perfect day for sleeping in, so I did!  It was a rough night of no sleeping last night, and I really needed a few hours of sleep this morning.  Do you have no-sleep nights like this?  It sure messes up my day.  But the time wasn't wasted.  While I was awake, I watched a video by Connie Stewart that showcased this fun fold.  Thought it would be a great way to play with some new stamps and dies.  I finished a card during the middle of the night.  Since I was sleep-deprived, we'll hope this card is ok.   Let me know what you think of it. 

I have just gotten the Tiny Christmas Trees Die in the mail yesterday, so why not use it right away? I thought I'd keep it fairly simple, but then kept adding a little bit here and there until this card appeared.

It starts with a basic 8 1/2" x 5 1/2" card base using Garden Green cardstock.  It's scored at 4 1/4" and folded in half.  Next 3 pieces of Very Vanilla were cut to measure 5 1/4" x 4".  One is for the front of the card and the other two are for the inside of the card.  Taking one of them, I die-cut the trees over the entire card front.  A little Garden Green ink was blended onto the edges with a Blending Brush.  I kept this as light as possible.

This is backed with a layer of Gold Foil Specialty Paper that's cut to measure 5 1/8" x 3 7/8".  It makes the gold just barely smaller than the die-cut piece, but still covers all the trees.  It's a little tricky, but once I got the measurements down, it was a piece of cake.  I used "green glue" between the rows of trees to hold the gold paper in place.  Six Dimensionals were used to attach this to the card front.

The tags were cut with the Tailored Tags Die set.  The two middle sizes of the fancier tag were used.  The smaller one cut Very Vanilla and the next size up cut the Garden Green tag.  The vanilla tag was stamped with the single tree in the Forever Forest set.  It's stamped in Garden Green ink.  Then it's stamped two more times without re-inking to make the shadowy trees at the sides.  These two tags were put together at an angle with a small amount of adhesive.

On two 1/2" strips of Very Vanilla, the Merry from the Christmas Classics stamp set was stamped, once in Garden Green and once in Real Red.  These were punched with a 1/4" circle punch and layered over the two tags.  A red ribbon from the Real Red and Burlap Ribbon Combo was used to add a pretty bow.  Dimensionals were used to attach the green tag and Mini Dimensionals are under the ends of both of the merry tags to hold in place.

The inside has the two extra vanilla pieces stamped on with Garden Green ink.  The left side has the row of trees from Forever Forest.  The right side has a sentiment from Wishes All Around.  They are attached to the inside with adhesive.

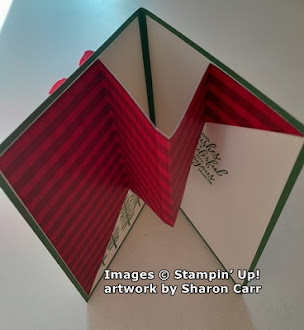
Now for the fun fold part.  A piece of red plaid from the Joy of Christmas Designer Series Paper was cut to measure 5 1/4" x 8".  It was then cut diagonally from bottom left to top right.  This gives you two pieces to make two different cards.  Because I used a plaid design, the second half got flipped around and both cards can be made the same.  Starting at the wider side, this piece is scored at 2", 4", and 6".  

Both the left and right sections are attached to the inside of the card and the center sections are v'd out.  Here's a good picture of the opened card.  Just something a little different to share with your family and friends for the holidays.

As you can see from the picture, I missed the mark when scoring one of the lines.  Make sure you pay attention to the measurements better than I did!  Did I mention sleep-deprived?  I guess this is what happens when you don't get any sleep!  Not so good!!

Thanks for stopping by today.  I know a lot of my Michigan friends are stamping and creating at an all-day crop today.  Miss all of you so much.  Hope you're having fun today sharing all your ideas with each other.

If you're wanting to order any of these items, please consider using the Host Code shown at the top of this post.  It is so much appreciated!  And leave a comment if you can.  I love hearing from you!

Happy stamping and creating,
Sharon

Friday, October 20, 2023

Magical Meadow Christmas

Hey there!  Boy, I can sure tell that autumn is here along with wet and cloudy days.  Brrr.  I know you probably don't think that 62 degrees isn't too cold but add in the rain and it's pretty chilly.  Sue and I started talking about soup this morning, so I thought I'd get some started in the crockpot - Chicken Tortellini.  Yummm.  Today is the perfect day for soup.  Anyway, I miss the bright sunshine we had yesterday afternoon.  It was a perfect day for my grandsons' cross-country meet yesterday.  The girls' team won top honors for the Regional Meet, but the boys' team only placed fourth.  Too bad, but everyone ran their heart out and did their very best.  That's all you can ask for, right?  What's that?  You didn't come here to talk about soup and cross-country races?  Where's the card???  Ok, let's buckle down and get to business here.

Here is today's card for you.  I love the different die-cuts in the Magical Meadow Bundle, and several of them are used on this card along with bits and pieces from some other sets.  Let's get on with the creating.

Start with a card base of Basic White Thick that measures 11" x 4 1/4".  It's scored at 5 1/2" and folded in half.  The first layer is Pretty Peacock that's cut to 5 1/4" x 4".  Next comes a layer of the new Tartan Foil Specialty Designer Paper that is 12" x 12".  I love this tone-on-tone Lost Lagoon plaid.  If you're looking at this on an angle, it's a very subtle plaid.  But with the light shining on it and looking straight on, it's so pretty!  Isn't it? This Specialty Paper is an Online Exclusive item and well worth getting.  The one side has a solid color diagonal plaid, while the other side is a straight-on plaid on a white background.  Either side is nice and of course you can use them together too.  For this card I used a piece that measures 5" x 3 3/4".  This is attached to the Pretty Peacock layer with adhesive.

A length of Silver & White Sheer Ribbon is wrapped around this and tied in a loose knot to the left side.  These layers are then attached to the folded card base using adhesive.

On to the good stuff - all the die-cuts!  First two images were die-cut from Pretty Peacock cardstock using the evergreen and berry die from the Magical Meadown Bundle.   Then the berry stem (?) die cuts the Lost Lagoon cardstock piece.  This one I cut into two pieces to fit them where I wanted.

I envisioned some snowflakes on the card and thought white would work.  Three of them were cut from the Wishes All Around Die set.  Love the look of those snowflakes, but I didn't like the color.  So, three more were cut from Silver Foil Specialty Paper.  Oh yes!  So pretty!

Next came the sentiment.  I wanted to use the sentiment from Night Divine.  Each of these sentiments are wonderful, but I wanted to use the "Glory to God in the highest".  After trying several different dies and punches, I decided on the Deckled Circles Dies.  I think this left enough room not to crowd the sentiment.  And the deckle edge added just a little sweetness to the look.

One of the sentiments from the Wishes All Around set was used for the inside of the card.  It's stamped with Pretty Peacock ink.  A small strip of the Tartan Foil plaid paper was attached to the bottom of the inside to carry the design inside the card.

Putting the card together, figuring the positioning of everything was first.  The two evergreen & berry die-cuts were attached with some adhesive just down the middle of each so the pieces were fairly loose. 


The berry stem needed something to make it stand out.  I had some white frost liquid from several years ago.  I added this to the sides of the berries.  It needed to be set aside to dry.  When dry, the bottom ends of the stems were attached behind the sentiment with adhesive.  Then the sentiment was added to the card front using multiple Dimensionals to hold all the pieces in place.

With everything else in place, the snowflakes were added to the design.  Each snowflake was attached with a Mini Glue Dot in the center of it.  That just left any extra bling that was needed.  The Adhesive-backed Glitter Sequins seemed to be the perfect little bit of bling.  The glitteriness (is that a word?) just made the card frostier and more wintery looking.

That's it today.  I've got to admit, I'm really loving the Pretty Peacock and Lost Lagoon used as Christmas colors.  It's surprising how much I love this since it is rather untraditional!  Normally I go either red and green, or navy and white for my own Christmas cards, but I'm giving these colors some serious thought.

Thanks for sharing some time with me.  If you're thinking of ordering, I'd appreciate it if you'd use the Host Code at the top of this blog page.  Each order helps so much to keep me going.  Love you all so very much!!

Remember to check out the Online Exclusives for the Tartan Foil DSP.  It's truly gorgeous in person.  Plus, there's many wonderful items that you can only find online including stamps & dies and Designer Paper that you won't find anywhere else.  Also check out the Clearance Rack.  There are new items added quite often.  You never know what treasures you'll find that you've been wishing you had ordered earlier.  Now's your chance!

Happy stamping and creating,
Sharon

Tuesday, October 17, 2023

Traditional Christmas Card

Hello friends, hope you're doing wonderful.  Are you spending some time outside in this lovely autumn weather?  I've been going to cross country meets as both my grandsons are running in this sport.  The parks they've been running at are really gorgeous this time of year.  I just love how the trees are showing off God's glory for all to enjoy!  Even though I'm so immersed in the fall weather at this time, it's really time to share another Christmas card with you.  This card is a traditional style of fold, nothing fancy.  But between the pretty Joy of Christmas Designer Series Paper and a few dies and embellishments, I think this is a very pretty card.  Sweet and simple.  That's what I like.

Like I said, it's a very traditional Christmas card that's quick and easy to make, but so pretty to look at.  These would be terrific for making a pile of cards to send out.  Just check out how quickly you can make them. 

The card base is Real Red.  It measures 8 1/2" x 5 1/2" and is scored at 4 1/4" and folded in half.  The gorgeous watercolor-looking print is from the Joy of Christmas Designer Series Paper.  I can't mention enough how much I love the prints in this paper set.  Each and every one of them is fabulous.  It's so easy to make a gorgeous card when you're starting out with this!  The measurements for the print are 5 1/4" x 4".  This was attached directly to the Real Red card base using adhesive.

Ooops, before we go any further, I forgot to mention that before putting the DSP onto the card base, I spattered it with Gold Wink of Stella that I have left-over from several years ago.  Taking the lid off and flicking the brush tip across this gives you a nicely spattered background.  If you've got any other type of gold paint (Pearl Ex, Gold Mist, etc.) just flick it over the DSP to give it a pretty sparkly shine.  It adds so much extra elegance to the finished card.

The sentiment used here is from the Magical Meadow stamp set.  I liked the idea of a sentiment going across the whole card, so I used the Nested Essentials Dies here.  The sentiment is stamped with Real Red ink onto the smallest size of this shape of die.  The Real Red cardstock was cut from the next largest size die.  I really like how they almost span the whole card front, but not quite so you can still see just a smidgen of that DSP on either side.  

Before adding the sentiment, turn it over and add a couple of strips of Tear & Tape to the back.  Then coil about 30" or so of the Simply Elegant Trim around the fingers of your hand.  (I never measure this first.  Just make sure it's big enough to show on the top and bottom of the sentiment.  I just wrap it until I'm happy - about 3-4 times wrapping it around usually gives me the look I want.  Add this to the back of the sentiment sticking it to the tape.  Then use a good number of Dimensionals to this so everything stays attached to the card and doesn't unwind.  Place on the card front above the center point.
The inside of the card has a layer of Basic White that measures 5 1/4" x 4".  This has the sentiment stamped with Real Red ink to match the front.  There's a 1/2" strip of the DSP that I had left over from a project, so that was tucked at the bottom of the white layer to bring the colors from the front into the card.

One last thing.  I felt it needed just a bit more bling.  I added just one of the gold Brushed Metallic Dots to the card front.  I liked the softer brushed look instead of a bolder sparkle since there was so much going on already.

There you have it.  Another Christmas card to add to my stash.  I'm so happy with the way this card turned out - quick and simple, but with an elegance to it.  Hope you get around to making some of these cards too.  Be sure to leave me a message and tell me what you think.  Thanks for stopping by and stamping with me.  If you're shopping, please use the Host Code at the top of this post.  I do appreciate it!  Make sure you look at all the Online Exclusive items and check out the Clearance Rack too.  You don't want to miss any treasures.  Right?  Hope you stop by again soon.

Happy stamping and creating,
Sharon

Tuesday, October 10, 2023

Moody Mauve Christmas

Hello everyone!  Hope you're having some lovely weather like we are here in Boiling Springs.  It's crisp and sunny with gorgeous blue skies.  I just love autumn!  But today we're sticking with some Christmas card ideas.  I made one of these in blues, then another.  Then I decided I really needed to use some different colors for Christmas and get out of my comfort zone.  There's just a serenity about blue and white that it seems to fit for this holiday.  But there are so many other options out there and today I'm sharing something different.  If you hang around to the end though, I will share the two blue and white cards that I made first.  And for those of you loyal Hostess Club members, you're getting this packet in the mail this month so you can make it too.

Aren't these colors just gorgeous?  Instead of a playful card, this time it's definitely more elegant.  But the fun fold is still so easy to do that you'll want to make this type of card often.

Start with a piece of Moody Mauve cardstock that measures 5 1/2" x 5 1/2" square.  On one side, score at 4 1/4" to make a regular size card when folded.  

There is a piece of the awesome Winter Meadow Designer Series Paper.  I just love the watercolor look of the prints - just my style!  I started with a piece that measures 6" x 5 1/4".  Then two strips of 1" each are cut from this to leave a piece that measures 5 1/4" x 4".  Just right for a card front.

One of the DSP strips is attached to the front flap using adhesive.  Remember this is the backside of the entire piece of DSP.  Open the flap and add adhesive to the inside of the flap.  This will hold the DSP in place for the card front.  Line up the edges nicely with the right edge of the card.

The Basic White sentiment piece is die-cut using the Deckled Circle Dies.  This is the 5th smallest die.  Use the next largest die to cut a Moody Mauve circle to frame it.  Stamp the sentiment that is from the Night Divine stamp set with Pretty Peacock ink.
Set these aside while the bits are all die-cut.

The branches are all from the Magical Meadow die set.  The larger evergreen die cuts both the Pretty Peacock and the Lost Lagoon branches.  The berry (?) is cut from Moody Mauve.  I debated about adding something in white and/or silver but decided to keep it understated.

Put adhesive on the back of the right side of the Lost Lagoon branch.  Curve this around the front of the sentiment circle and attach.   Add adhesive to the backside of the sentiment in that area and add the Pretty Peacock branch behind.  Angle the branch to be seen.

Attach the Moody Mauve die-cut circle behind this to frame it nicely.  I used adhesive for this.  Use Dimensionals to attach this to the card front close to the center of the card.  At this time, I added the Moody Mauve berry branch over the others using adhesive on the center stem and some of the right berries to attach it.

A bow is made from the Silver & White Sheer 1/2" Ribbon.  I used about 8" or so to make the bow.  It's attached to the card front using Mini Glue Dots.  With a bow this size and so sheer, I usually use 2-3 Mini Glue Dots to attach it securely.

The inside of the card is rather plain at the moment.  I couldn't decide on which sentiment to use for this card.  I'll come back to that later and use Pretty Peacock ink to finish.  If you'll notice, the second 1" strip that was cut from the DSP in the beginning is used here on the right side of the Basic White layer.  It coordinates nicely with the back of the DSP that shows from the card front.

Well, if you've stuck it out this long, I have a few more pictures to share with you.  Not too much dialog on them, but the dimensions and info are pretty much the same.

This uses a print from the same Winter Meadow DSP pack.  The cardstock on this is Misty Moonlight.  The circle die-cuts are the same as the first card.  

The holly and snowflakes are die-cut from the Snowflake Magic Specialty DSP in the Mini Catalog.  This paper is just beautiful!  There are also Misty Moonlight holly leaves tucked in for some contrast.  The holly die comes from the Magical Meadow dies and the snowflakes come from the Wishes All Around die set found in the Mini Catalog.

Ok, next one.  There are a few more changes on this one.  The biggest change was using Blueberry Bushel for the card base.  It's amazing how much this changes the feel of the card in person - much brighter and cheerful, I think.   

The die-cuts are still from the Magical Meadow die set.  One stem is cut from Basic White and the other is from More Dazzle Specialty Paper.  What a pop that gives this card.  There's also an evergreen stem from the same set cut from Basic White cardstock.

The bow is made from double strands of the Simply Elegant Trim in the silver color.  

Lastly, the gems come from the Adhesive-backed Sparkle Gems.  They are such a glittery addition that helps to make this card really sparkle.

Ok, I've given you several ideas for using this fun fold card.  It's funny I started out with the idea of making a fall card using this fun fold and you can see I went a bit off the rails here.  Hope you enjoy these ideas and make a card with your own choice of materials.  I think this fun fold is so perfect when you don't want to cover up the back of your DSP.  Some of these prints are so gorgeous I have trouble cutting into them!  

In case you didn't know, Stampin'Up! is have a 3-day free shipping fest on all orders of $75 or more.  It's only October 9-11th.  Hope you can take advantage of this!  Happy shopping!  Get a head start on your Christmas card making or get some of those special gifts for friends.

Happy stamping and creating,
Sharon

Friday, October 6, 2023

Friendship Friday Again

Hello friends!  I keep forgetting to make the Friendship Friday post on Fridays.  Seems like my sense of days has totally flown out the window this summer.  Guess that means I've been busy and that's a great thing.  Because it's been a while since I made one of these posts, there are quite a few cards to share with you.  Grab a coffee (or your favorite beverage, wine maybe?) and let's peruse this stack of cards.  Hope you find your card in here and also enjoy the fabulous selection of cards that have been sent to me!  These cards are not in any order, just how I picked them up.  Some are totally Stampin'Up!.  Others not so much.  Some are using all current products, but there are many of my favorite retired products too!  Enjoy!

created by Shirley Krone

created by Barb Eisenman

created by Kathy Hintz

created by Diane Wallace

created by Kathy Hintz

created by Sue Fabris

created by Barb Eisenman


created by Kathy Hintz

created by Sue Fabris

created by Barb Eisenman

created by Kathy Hintz

This card needed a second picture so you could see all of it.  Lovely!


I hope you enjoyed seeing the diversity of these cards.  I think it's amazing the beautiful cards all of you ladies make and share with me!  I can't explain how much it blesses my day when one of these cards come in the mail with a fun note to let me know what you're doing.  It's almost as good as sitting down with you for a chat while we're stamping.  Your cards seem to show up in my mailbox at just the right time when needed the most.  I can't thank you all enough for your love and caring!  It blesses me thoroughly!

Happy stamping and creating!
Sharon


Wednesday, October 4, 2023

More All About Autumn

Hello there.  I've been playing around with the All About Autumn Designer Series Paper again.  I find the prints so interesting that I keep wanting to go back and create with it some more.  And when you add in the Oxidized Copper Specialty Paper - wow!  Let me show you what I made this time.

I wanted lots of rich color along with the metallic look, and this is what resulted.  Aren't the colors fabulous?  They're even more glorious in person.  The card is sitting on my table now and the copper accents are just glowing because of the light shining on it.  Just beautiful!

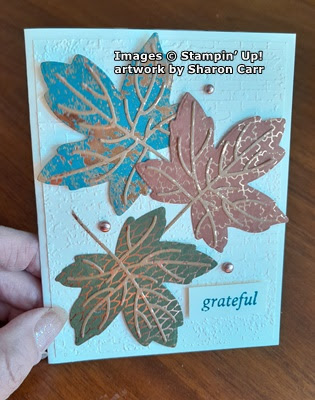
The card starts with Very Vanilla cardstock that measures 8 1/2" x 5 1/2" that's scored at 4 1/4" and folded in half.  Another piece of Very Vanilla was cut that measures 5 1/4" x 4".  This layer is embossed with the Exposed Brick Embossing Folder to give it a nice rustic texture.  It is attached to the card base using "green glue".   Set this aside for now and let's make these lovely leaves.

Every one of the All About Autumn DSP sheets have a coppery design on the back of them.  The copper is overlaid onto some lovely rich colors like the Copper Clay and Old Olive that I used here.  The Autumn Leaves bundle has a large maple leaf that was used to die-cut one leaf from each color.  The teal-toned leaf is from the Oxidized Copper DSP.  Isn't it gorgeous?  

The die set also has veining for the different leaf sizes in the bundle.  These three leaf veins were die-cut from the other color of paper in the Oxidized Copper DSP pack.  This print is a little more subtle so when die-cut it only leaves a tracery of copper throughout the veins.  The veins are attached to the leaves with adhesive.

The sentiment comes from the Cottage Wreaths set.  I wasn't sure exactly where it would end up on the card, so it's stamped onto a strip of Very Vanilla cardstock that could be placed anywhere.   Pretty Peacock ink was used to stamp it.  The sentiment is just trimmed up to a rectangle shape at this time.

Next, I spent a little time playing around with the placement of the leaves.  I wanted them connected but not overlapped so much you really couldn't see the lovely print.  Plus, there had to be room for the sentiment too.  In the end, each of the leaves are attached with a combination of adhesive and Dimensionals.  The top of each leaf has a couple of Dimensionals underneath to give it depth, but the stem end of each leaf is attached flat to the card front with adhesive.  The sentiment is attached with Mini Dimensionals.

With all the gorgeous look of the leaves, I had to be careful not to overdo the bling on this card.  It shouldn't overpower the fabulous look of the leaves.  Right?  The Brushed Metallic Dots in the copper tone were the perfect addition to the card.  Not too glitzy, but an extra bit of the coppery shine.

Here's just one more quick look of this gorgeous card.  I'm so happy with how it turned out.  It was just what I wanted to create.  Hope you like this card.  It's a simple straightforward card with not a bunch of layers, but I think it's quite elegant and I love it!!

Thanks for stopping by today and sharing a few minutes with me.  I'm so happy I get to share my ideas with you.  Hope you try out this Oxidized Copper DSP.  It really makes this card.  If you have any questions about this card, I'd be happy to answer them.  If you make something similar, let me know how it turns out.  I love to hear from you.

Happy creating and stamping,
Sharon


Monday, October 2, 2023

Magical Meadow Christmas

Hello friends!  Here it is another week gone and another month too.  Can you believe it's already into October?  Where have the months gone?  This means the holidays are coming up fast and furious.  I need to get serious about making these cards!  Today's card is something I envisioned before I even ordered this wonderful stamp bundle - the Magical Meadow.  Yes, this really does portray a magical meadow of possibilities.  I've done this card as a Christmas card, but with a quick change of colors I think it would be a gorgeous fall card.  I'll have to give that a try when I have time.  For now, let's just focus on the Christmas theme.

I totally love navy and white for Christmas card colors but have already done several with those colors.  It was time to use other colors even though I was sticking with a monochromatic color scheme.  I debated about purple or Pretty Peacock.  As you can see, Pretty Peacock won out.  I'm so happy with how the card turned out.  If you'd like to make one too, I'd be happy to share the instructions with you.

Start with a half piece of Thick Basic White that's scored at 4 1/4" and folded in half.  There is a layer of Pretty Peacock next.  This is cut at 4" x 5 1/4".  Then a layer of Basic White that measures 3 3/4" x 5".  Let's work with the white layer first before putting them together.

Using Pretty Peacock ink and a Blending Brush, add a soft background color from the bottom left up and out.  This fades out with about 1/4 of the cardstock having no ink on it at all.  Keep the color very light but add a little more in the bottom corner.  This picture is a little deceiving as the color added is a little darker than it shows.  

There are several greenery stamps in the Magical Meadow set.  I used two of them.  First I stamped the largest stamp (with the tiny berries) coming up from the corner using Lost Lagoon ink.  Another partial one was stamped angled to the side.

Then switching stamps to the smaller leafy one, this was stamped with Pretty Peacock ink.  It was stamped between the two Lost Lagoon branches.  Then it was stamped two more times with only part of the stamp on the card to fill it in somewhat.

There are also 4 extra greenery dies in the matching set that do not have a coordinating stamp.  Two of these were used on the card.  The leaf and berry branch was used to die-cut the truly fabulous Snowflake Magic Specialty Designer Paper twice.  I love how the snowflake design just gives highlights to the leaves and you can't really see the design at all.  The one on the left was fully used.  It's attached with adhesive.  The same branch on the right is cut down to fit the area.

To add a little sparkle, the evergreen type of branch was die-cut once from the More Dazzle Specialty DSP.  It was big enough that it was cut apart and made to look like there were two branches.  They were attached to the card front with adhesive.

At this point, a 7" strip of Silver and White Sheer Ribbon was attached across near the bottom of this layer.  It's attached in the back with a bit of Tear & Tape to hold it in place.  A Mini Glue Dot is placed under the area that the bow will be attached. 

Then the white layer is attached to the Pretty Peacock layer with adhesive.  This is then attached to the folded card base using Dimensionals.

The sentiment is from the Christmas Classics set.  First the Christmas was stamped on Basic White, then the merry was tucked in closely on top of it.  The sentiment was die-cut with the Deckled Rectangle Dies.  

To enhance the edge, the Blending Brush that I used earlier was lightly flicked on the edges.  This not only brought out the lovely edges, but it also helps the sentiment to stand out from the white card front.  Then it's attached with Dimensionals.

A bow was made from the same ribbon.  I actually needed two Mini Glue Dots to make the bow feel secure.  The pretty silver edging on the ribbon is so nice and delicate, a great addition for this card.

Lastly, there was a need for a little more bling.  The Adhesive-backed Glitter Sequins were the perfect choice.  The color fit in perfectly with the card and I love the glittery sequins.  As a plus, they're fairly flat for ease in mailing - no extra postage!  Hooray!

In many aspects this is a simple card just a few layers, a few stamps and some ribbon.  But I think it sure packs a wow.  I sure hope you give this monochromatic style of card a try.  I love the serene look of using just one color family but differing shades to give it depth.

Thank you for stopping in today so I could share this card idea with you.  If you're shopping, please use the Host Code at the top of the post.  I'd truly appreciate it.  There's so much going on at the Stampin' Up! website for you to peruse.  You'll find great Online Exclusive items that you won't find in either catalog, so don't forget to check it out.  As always, I love hearing from you.  If I can help you with your stamping needs, please let me know.

Happy stamping and creating,
Sharon