Showing posts with label Christmas Season. Show all posts

Tuesday, November 29, 2022

Peace & Joy Card

 Hello again!  I've just come in from feeding the chickens that were scratching around in my front yard.  Yes, I said chickens.  Let me be clear, there's really one rooster and four hens and they aren't mine.  The neighbors to the right and left of us both have chickens.  The chickens on the left are nicely penned up and we only hear them once in a while.  The ones on the right would be called 'free range' I guess, meaning that they're in our yard at least once a day now.  Should I be outside every day checking under the bushes in the front in case they lay any eggs out there?  I surely know nothing about chickens, except how to cook the eggs and meat I get from the store, but maybe I'd better start learning.  😄  Anyway, that really has nothing to do with my card today, unless I get out my Hey Chick stamp set and create something with that.  Which really wasn't my plan for today at all.  Instead, I have another Christmas card that uses a little bit of this and a little bit of that to come together in a pleasing finished card.  At least, I think so.  Hope you like it!

I've had a pile of 2 1/2" die-cut Mint Macaron circles sitting on my desk for a good long while.  I'm not sure why I have them, but this was the day I was finally going to use them!  So the card was essentially designed around them.  And this is just a sampling of the finished cards made with those circles.

The card base is Shaded Spruce to go with the Mint Macaron.  There is a layer of Basic White cardstock both inside and outside that measures 5 1/4" x 4".  The outside piece is embossed with the Merry Melody 3D Embossing Folder.  It needed to be defined a bit more, so I used a Blending Brush and Crumb Cake ink to lightly go over the notes.  Before attaching this to the card front, a piece of Soft Succulent 1/2" Satin Shimmer Ribbon was wrapped around it and attached to the back.  The color is a little different from the Mint Macaron, but I felt it blended well because of the sheen on the satin ribbon.  The layer was then attached to the card front using Tombow Multi Purpose Liquid Glue.

I looked through my stash of sentiment stamps to find one to fit the die-cut circle.  I came across the new Framed & Festive stamp set that is only available until the end of the year.  This had a longer sentiment with the words I wanted as part of it.  I placed it on the Stamparatus and used a Shaded Spruce marker to color only the words I wanted.  I needed to stamp it twice to get a decent enough image.  Then I stamped the single pine branch from the Christmas Season stamp set twice (on page 44 in the Annual Catalog).  I used Shaded Spruce ink, and off-stamped before stamping on the circle.

The holly leaves from the Christmas Season set were stamped with Mint Macaron ink onto Basic White cardstock.  Then the centers were stamped with Shaded Spruce ink.  The pinecone was stamped with Crumb Cake for the solid stamp and Soft Suede ink for the detail stamp.  These were also stamped on Basic White.  After stamping, they were all die-cut using the coordinating Seasonal Layers Dies.

To attach this to the card front, the tip of the two holly leaves were adhered to edge of the circle.  The pinecone was attached to this with a Dimensional.  The whole focal image was attached with many Dimensionals holding it up right over the ribbon.  There were three of the gold Festive Pearls added to the card for bling.  At this point, I knew it needed something more, but was having trouble deciding what it needed.  My daughter had stopped in and suggested adding a bow made of gold trim.  It was tucked in under the pinecone and attached with a Mini Glue Dot.  Just what it needed!

The last thing needed on the card was the Basic White layer for the inside of the card.  I used a sentiment from the Hope & Peace stamp set.  It's stamped with Shaded Spruce ink over on the left side.  Then a pinecone was stamped in the corner using the same colors as before.  The single pine branch was stamped with Shaded Spruce ink that had been off-stamped before stamping.  This was stamped several times to fill it in nicely.  Then it was attached to the inside of the Shaded Spruce card.  Another small batch of Christmas cards finished.

I hope you aren't getting tired of the Christmas Season stamp set yet.  This has truly become my favorite stamp set this year.  So sorry to keep going back to it again and again.  I promise to pick a different stamp set next time I go downstairs to create!

Just wanted to post the links for the retiring list for you.  Just click on either link below to see the lists of either retiring or carry over products.


Thanks for stopping by again today.  I appreciate the time you take to check out my blog.  Leave a comment if you can.  I'd love to hear from you.

Happy stamping and creating,
Sharon

Monday, November 28, 2022

Christmas Season: Take 3 or Maybe 4

 Hi ladies!  Today's post is going to be super short and to the point.  I've been having so much fun using the Christmas Season stamp set that I wanted to share the idea with different colors.  You really don't have to use these images just for Christmas either.  Check out how cool this color combo is...

I don't have lots of pictures to share of this card.  It's already in the mail, so I'm lucky I have one picture to share.  The color combo is a mix of cool colors - Smoky Slate, Orchid Oasis, Soft Succulent, Mint Macaron with Crumb Cake and Soft Suede thrown in for the pinecone.

I love this stamp set used with this layout.  It's definitely a go-to idea for me.  And it's amazing just how quick this card comes together.  The plan is to get all your stamps mounted and ready to go with the ink used placed with each stamp.  Then start in with the two Mint Macaron branches angled across from each other.  Add the two layers of the pinecone next - Crumb Cake and Soft Suede.  Then I stamped in the berry stems with Smoky Slate ink and tucked in the berries with Orchid Oasis.  Next was the single pine needle branch using Soft Succulent ink.  These are tucked in around everything else.  Some are full strength, and some are 2nd and even 3rd generation stamping.  Lastly, the speckles were stamped in with Smoky Slate ink.  It's layered up on Orchid Oasis and then a Smoky Slate card base.  The sentiment I chose is from the Lovely You set and fits just about anything you might need.  It's stamped with Smoky Slate ink on Basic White and layered with Orchid Oasis. The ribbon is the 1/8" Metallic Woven Ribbon in Orchid Oasis, and there are silver Festive Pearls added for bling.  

That's all there is to it.  Now think about the many color combos you might try on this set yourself.  I'd love to hear what color combos you've come up with to make with this set.  Good luck and have fun!

Just so you know, Stampin'Up! has posted their list of what is retiring in the July - December Mini Catalog.  To make it easier on us all, they posted a 'Carry Over List' also.  Both the links are shown below for your convenience.  Thanks for hanging out with me today.  Hope we can talk soon.  


Happy stamping and creating,
Sharon

Saturday, November 19, 2022

It's Christmas Season

Hello!  Hope you're having a great weekend so far.  I thought it was time to give the Christmas Season stamp set a little love.  I don't know why I've been ignoring it lately, but today is the day to change all that.  This set is a carryover from last Christmas and is found on page 44 in the current Annual Catalog.  It has a set of dies that coordinate with the stamps, but I didn't use them on the first card, just the second.  There is also a sentiment set called Christmas to Remember on the next page that works nicely with it.  In fact, it's the sentiment set that I used for both of these cards.  Yes, I have two versions of a simple card that feels like Christmas when I look at them.  Hope you like the ideas.

This is the first card done up in the traditional colors with a very traditional feel to it.  If you like the basic red & green of Christmas, this is for you.  I started with a card base of Crumb Cake cardstock cut to measure 8 1/2" x 5 1/2", then scored and folded in half.  There is a piece of Real Red cardstock cut at 3 7/8" x 5 1/8" to make a skinny frame around the Vanilla layer. There is a piece of Very Vanilla cardstock cut at 3 3/4" x 5" for the outside of the card.  Another piece of Very Vanilla was cut at 5 1/4" x 4" for the inside layer of the card.  

Let's get on to that stamping next.  I mentioned using the Christmas Season set.  The first part stamped was the larger branch of leaves.  It was stamped first up towards the left corner using Garden Green ink. It was stamped again downwards at an angle to the opposite corner with the stems overlapping a bit.  The third time the stamp was not re-inked but stamped pointed directly down.

The next piece to stamp was the pinecone solid stamp using Crumb Cake ink.  It was stamped just about in the middle of the green branches.  The detail pinecone was stamped over this with Soft Suede ink.  The small berry twig was stamped with Early Espresso ink.  Then the berries were added afterwards for placement using Real Red ink.

The pine branch was stamped next using Soft Succulent ink.  These were tucked in around the other stamped elements.  I stamped four with full strength ink, and another 3-4 times with off-stamped ink to give it more dimension.  Lastly, I tucked in some of the dots using Crumb Cake ink to fill out the look.  One last thing I couldn't resist adding was a spattering of Wink of Stella to add a touch of shimmer and glitz to the card.

This Vanilla piece was attached to the Real Red layer using adhesive.  Then it was attached to the folded card base also using adhesive.  Three Real Red Rhinestones were tucked in around the stamped images.

The sentiment is from the Christmas to Remember stamp set.  It's stamped on 3/4" strip of Very Vanilla cardstock using Early Espresso ink.  The ends were finished off with the Lovely Labels Pick A Punch.  Then it was attached to the card front using Dimensionals.  The bow is a sheer Real Red Ribbon that I believe is retired.  It's added with a Mini Glue Dot.

The inside of the card was finished to coordinate with the card front.  The sentiment is from Christmas to Remember and stamped with Early Espresso ink.  The berry stem was stamped with Early Espresso ink and the berries with Real Red ink.  The pine branch was stamped in multiple times using both full strength and off-stamped Soft Succulent ink.  I did add a skinny scrap of Real Red cardstock along the bottom edge to finish.

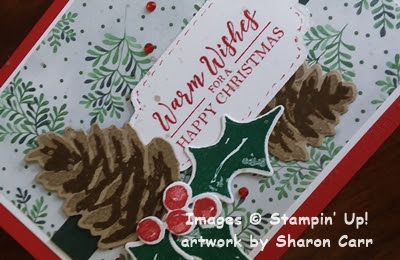
The second card I did with the same stamps and inks was turned on its side and is a top-fold.  This card version does not have the pinecone added but does have extra berries tucked in and around the design.  On this design, I moved all the stamping to be centered more in the middle of the layer.

This sentiment also comes from the Christmas to Remember set.  This time it's stamped with Real Red ink onto a label from the Seasonal Labels dies.  After die-cutting it out, I used a Sponge Dauber to lightly add a little Garden Green ink to the edges to make it stand out a little more.

I used another retired Real Red ribbon.  This time it's a ruffle-edged ribbon.  A few more of those cute little Real Red Rhinestones were added to this card also.

I didn't take a picture of the inside of the card as it's very closely resembled the first one.  I did use a different sentiment inside, but it's also from the same Christmas to Remember set.

Hope you liked these two versions of the card.  I do love the Real Red and Garden Green colors for a traditional style of Christmas card.  It's fun to get a little more modern sometimes, but I still prefer the old-fashioned basics.  Thanks for stopping by to see what's happening over here.  Let me know which style of card you prefer - modern or traditional?  And how about the card layout - which is better in your opinion?  I'll be looking forward to hearing from you.  😄

If you're placing an order soon, please consider using the current Host Code at the top corner of my blog page.  I really appreciate your orders and will be sending out thank-you cards as usual, in between the Thanksgiving and Christmas cards!  Thank goodness I love making cards!!

Blessings,
Sharon

Saturday, December 18, 2021

Peaceful Holly Card

Today I have a bold and bright Christmas card to share with you.  It took me awhile to get it right.   I shared the first version of this with my friend Ruth and my sister Connie.  They both agreed that it was way too busy and really needed help.  Connie and I brainstormed a bit, then I went down to my craft room, tore parts of it off, changed up parts of it and put it back together again.  Both ladies now gave it a thumbs up.  So here it is being shared with you today!

In person, it really is a bold, beautiful card with lots of layering and textures for all of you, like me, who are always 'touching' the cards that come in the mail.  I love the different textures and layers that make a card really stand out as different.

The card starts out with a base of Real Red cardstock that's cut at 8 1/2" x 5 1/2", scored and folded in half.  There is a section of the Painted Christmas 12 x 12 DSP that is cut to 5 1/4" x 4".  This is attached to the folded Real Red card base using MultiPurpose Liquid Glue.

Over this is a section of Real Red cardstock that is 2 1/8" x 4 1/4".  This has two pieces of the 1/4" Gold Shimmer Ribbon wrapped around it and attached on the back.  Then this is attached to the front of the card, just a little lower than center.  To give this area some texture and interest without becoming overpowering, I added a layer of Real Red cut 4" x 1".  Before attaching to the card front, this was embossed with the Tasteful Textiles 3D Embossing Folder.  I think this bit of extra texture really adds so much to the finished look.  If you don't own this embossing folder yet, you need to get one for yourself!  It's such a wonderful basic look that enhances just about any card you might make.

Now on to all the 'fun stuff'!  The sentiment label was cut from Basic White with the Seasonal Labels Dies.  The sentiment was stamped with Real Red ink and is from the Inspired Thoughts stamp set.  A Blending Brush and both Shaded Spruce and Evening Evergreen inks added a little color to the edges.

The holly, berries, and pine needles are all from the Christmas Season stamp set.  The berries were stamped with Real Red, the holly leaves with Shaded Spruce, and the pine needles with Evening Evergreen inks.  Each were die-cut using the coordinating Seasonal Labels dies.  This makes it so easy to add all those wonderful pieces!

All of the stamped and die-cut pieces were added to the card front at this time.  They were either tucked under the sentiment or were attached with Dimensionals over it into a pleasing cluster.  While arranging all the pieces onto the card front, I decided to add 3 of the Gold Holly Leaves.  This brought out the shine of the bands of gold ribbon across the card.

One last picture to show the finished inside of the card.  I had a couple extra holly leaves and one little berry left over.  I couldn't neglect them, so I just had to tuck them in right next to the sentiment.  This sentiment is from the Perfectly Plaid stamp set. I love the font on this Merry Christmas and it seems to be the perfect size to use on so many cards.  For this card, it was stamped with Real Red ink.

As a finishing touch, I had a 1/2" strip of one of the smaller prints from the Painted Christmas Designer Paper.  I thought it was a cute addition to add to the bottom of the Basic White layer and ties all the colors together.

That's it for today.  I know I'm cutting it really close to Christmas for sharing these cards.  But at this point in time, I'm really not making much of anything else.  I'm trying to get all my own cards out in the mail.  Unfortunately, at last count I'm about 15 cards short of my goal.  Guess I need to get back to my craft room and make a few more.  Hope you're farther ahead than I am and have all your Christmas cards out in the mail already.  Oh well, better late than never is going to be my motto this year.  I might even get around to making a cookie batch or two during the Christmas break for the grandsons and they can have some fun helping.  I don't think they'll care too much that the cookies weren't made weeks ago!

Christmas Blessings to you and your family!
Sharon

Tuesday, November 23, 2021

Christmas Pinecones

 Hey there.  Back again with a Christmas card to share today.  I love the Painted Christmas Designer Series Paper and thought it was time to make another card using the gorgeous prints.  After looking through them, I decided on the print with the small pinecone and pine needle clusters all over it.  With that picked out, the rest came together pretty easily.

The card starts with a base of Soft Suede cardstock cut at 11" x 4 1/4", scored at 5 1/2" and folded in half.  I wanted to make the sizing of the layers a little different than the usual, so the Crumb Cake cardstock is  cut at 4 3/4" x  3 1/2".  This way more of the card base shows up to frame the main images.  The DSP print is cut down to 4 1/2" x 3 1/4".   

There's a band across the card that measures 3 1/4" x 1 1/4" and is cut from Evening Evergreen cardstock.  Inside this band is a panel of another print from the same Painted Christmas DSP.  In fact, it's the back side of what I just used on the card front.  I love these two prints together.  I have a feeling I'll have used up all of these two prints before I make much of a dent in the other prints in this package.  Do you find you gravitate to certain prints in each package of Designer Series Paper and tend to use them up before you get to all the others?  Or is that just me??

At this point, the DSP has been attached to the Crumb Cake cardstock with adhesive.  The second print has been attached to the Evening Evergreen band, and this has been attached to the DSP layer with adhesive also.

I didn't want to cover up all the DSP and band, so I chose a smaller sentiment from the Tidings & Trimmings stamp set.  This was stamped on Basic White with Evening Evergreen ink.  It was punched with the Label Me Fancy Punch.  It didn't stand out from the background enough, so I used a Blending Brush and the Evening Evergreen ink to define the outside edge a little.  It was then attached to the card front using Dimensionals.

The pinecones were stamped from the Christmas Season stamp set.  They were stamped on Crumb Cake cardstock using Crumb Cake ink for the bottom layer and Soft Suede ink for the detail layer.  They were die-cut using the coordinating Seasonal Labels Dies.  When trying to get the placement right, I thought it needed a touch of gold to enhance the look.  The berry branch from the Christmas Trimmings Dies was used to die-cut a couple branches from Gold Foil Paper.  These are just tucked in around the pine cones and brighten the whole card up.  The large pine cone was attached with adhesive, but the smaller one was popped up with Dimensionals.  There is a small knot of the 3/8" Open Weave Evening Evergreen Ribbon to accent it.  That's attached with a couple of Mini Glue Dots to hold in place.

The sentiment on the inside was from the Inspired Thoughts stamp set.  It's stamped in Evening Evergreen ink onto a Basic White cardstock piece cut at 5 1/8" x 3 7/8".  The edges of this were also accented with the Blending Brush and Evening Evergreen ink.  It's then attached to a 5 1/4" x 4" layer of Crumb Cake cardstock. Finally it is then attached to the inside of the card, and the card is finished.  One more card down, ready to get addressed and sent out in the mail.  How many more of them do I need to make yet?  Who knows, but I think it's a great, big bunch of them!  Got to keep making those cards...

Hope this card layout gives you some ideas and gets you creating.  It's a similar layout to cards I did earlier in the October, but this time I used DSP instead of stamping underneath the band.  It's a great layout to use when you're stumped for ideas, and you can quite literally come up with hundreds of ways to use it with whatever papers and stamps you have on hand.  The sky really is the limit with this layout.

Just a reminder that if you're placing an order, I'd appreciate you using my Current Host Code tucked at the top right corner on my blog page.  Also, if you'd like to purchase a gift card for a friend or family member for Christmas, I'd be happy to make one up special for you.  Please do it soon, so I can make it and get it to you in the mail in time for Christmas!  We wouldn't want your gift sitting in the Post Office somewhere on Christmas Day.  So let me help you make someone happy for Christmas! 

Thanks for stopping by today.  It was a good day for stamping and sharing.  I need to get in as many ideas as possible before the time runs short.  Keep checking back often to see what's new.

Happy stamping and creating,
Sharon

Friday, July 30, 2021

Another Christmas in July Card

Hey!  Thanks for stopping by today.  Things are a little different today.  I was working with a layout that I hadn't used in a while and couldn't remember the sizes I needed.  So I was playing with retired DSP for the first card just to get a handle on the size I wanted to cut the layers.   Since there was nothing wrong with the papers and the size I cut, I decided to make up this card first and then go on to the Christmas card I wanted to share.  Here's the prototype:

The card base is Shaded Spruce and the DSP is from the retired Forever Greenery.  The plant pot is from the current Plentiful Plants, and the greenery is from the Forever Fern set.  I used the dies that coordinate with the stamp sets.  The ink used for the plant pot is Soft Suede, and Shaded Spruce & Granny Apple Green were used for the plants.  I tied a double Linen Thread bow as an accent.

Cutting for Layers:  2 different DSP prints 
each cut at   2 1/4" x 3 1/2"

This is a very simple layering technique and I've used it so often in the last 20+ years I've been making cards.  It's also a great way to use up some of those bits of DSP that are left over from all the other projects you've made!
Ok, that's nice enough, but let's get to making the Christmas card and using NEW stuff!

Again the DSP layering is a focal point and but those weren't  the color choices I actually used.  This card has a base of Early Espresso with a layer of Soft Succulent cardstock over it.  This is just attached with adhesive to lay flat.  

The two pieces of designer paper are from the lovely Painted Christmas 12" x 12" Designer Paper.  These both are more on the subtle side of the prints in the pack, but all of them are just really gorgeous!   Even though there is an extra layer of cardstock on this card, the two pieces are still cut at 2 1/4" x 3 1/2".  Decide which one goes under and which over, then attach with adhesive so it is still flat.

I'm loving the Christmas Season Bundle with the terrific hand-painted look to the images.  For the pinecone, I started with Crumb Cake cardstock and stamped the 1st image with Crumb Cake ink.  The detail stamp that goes over it was stamped with Early Espresso ink, then die-cut with the coordinating die.  

The larger bunch of leaves were stamped with Shaded Spruce ink and the smaller ones were stamped with Mint Macaron.  Like I mentioned, these aren't listed on the matching colors for the DSP, but I liked how they looked on the finished card.  The leaves were also die-cut with matching dies. 

 Let's put the card together now.  The pinecone is attached with a couple Dimensionals.  Both of the leaves were tucked in underneath and attached with Glue Dots.  A small knot of the Gold Fine Art Ribbon is tucked slightly under the pinecone also and attached with Glue Dots.  I liked the subtle shimmer of the ribbon to add just a bit of elegance.  If I were looking to make it more country in feel, I think I'd use Linen Thread, doubled and tied in a bow.  That would give the card a really different feel to it.  Three of the iridescent 2021-2023 In Color Jewels added just the right touch.  Both of the greens worked, but I chose the Evening Evergreen ones.

The inside of the card was finished with adding a layer of Basic White cardstock.  The bottom corner was stamped with a pinecone using the same colors as before, Crumb Cake first, then Early Espresso over it.  I masked this and stamped the smaller bunch of leaves using Mint Macaron ink.  

I love how simple this card was to finish and could see me making multiples of this for my own cards.  We'll see what else I can come up with before I make a decision on which card(s) to make for our family.  Decisions, decisions... but the sooner I get started, the better off I'll be.  Maybe I'll even get them in the mail early for a change.  Oh no, not a good idea - I have some friends who'd probably have a heart-attack if I mailed them too early!  *huge grins*

There's still a one day left to order some of the Designer Series Papers that are on sale.  It's a great bargain and I don't think you can ever have too much DSP!  shhh... But don't tell my hubby I said that!  If you are placing an order this month, please use my July Host Code.  I appreciate your orders greatly!
July Host Code
73KERJRP
Thanks so much for stopping by again today.  Are you ready for the new July - December mini catalog to start?  Just a few more days - August 3rd!  And don't forget about the 2nd around of Sale-A-Bration that also starts August 3rd.  Boy, good things are in store for you and I'll have lots of new ideas to share with you using the new products.  Have fun stamping this summer.  All this heat is a good reason to stay indoors and stamp!  *grins*

Happy creating!
Sharon

Tuesday, July 27, 2021

Merry Monday

 Hey there!  It's almost the end of July, so I wanted to get a quick "Christmas in July" card in while it was still July.  The card today uses a new stamp set and die bundle that will be available in seven more days when the new July-December Mini Catalog goes live on August 3rd.  This is the first set that really caught my eye when I saw the new mini catalog.  The images are bold and look just like I might have painted them by hand.  And there's dies to match!  Oh heavens!  I love how quick and easy it is to make all the components for my card.

This is just my first card using the set, but it definitely won't be my last.  I decided to use the Tidings of Christmas 6"x6" Designer Series Paper as a backdrop for these gorgeous images.  This one is soft enough that it doesn't fight with the images, but is quite substantial on it's own for other ideas.  I've already got an idea for it floating around in the 'gray matter" .  *grin*

The card base is Real Red cardstock folded in half.  There is a skinny layer of Basic White cardstock separating the print paper from the bold red giving it a nice frame.  An afterthought is the 1/2" strip of Evening Evergreen cardstock going across the card front underneath all the die-cut pieces.

All the images are from the Christmas Season set, and the dies are all from the coordinating Seasonal Labels Dies.  (Think savings with bundles!)  The 2 sizes of pinecones were stamped on Crumb Cake cardstock first with Crumb Cake ink, then the detail stamp with Soft Suede was used,  The 2 sizes of holly leaves were all stamped in Shaded Spruce ink.  The berries were stamped in Real Red ink.  The sentiment comes from the Best Year stamp set that is a carry-over from last year's catalog.  It has eleven sentiments that cover many occasions and both the inside and outside wordage for your cards.  Very versatile!  All the pieces were die cut.  Quick and easy.  The sentiment was stamped with Real Red ink.  It still needed something on it, so I used a Real Red Marker to add stitching lines outlining it.  Much better.  

The sentiment label was attached with Dimensionals then everything was positioned around it.  A few of the items were just tucked under and attached with adhesive.  The larger pinecone, two larger holly leaves, and the berries all have Mini Dimensionals attaching them to the card front.  

At this point, I decided to add some Wink of Stella to the card by flicking it on.  Make sure the brush tip is pretty loaded with the Wink of Stella, then tap it against the cover so that the fluid flicks off.  This will kind of go everywhere - especially places you don't want it to.  So always move things out of the way, or flick into a box to contain it!

The last addition to the card was the teeny tiny Red Rhinestones scattered about.  These are really small (only 3mm) so I actually put four on the card.  I'm still deciding about adding another one or two.

I really like how the card turned out.  It actually took three days to finish because I kept changing my mind about positioning the die-cut images, whether to add more or take some away.  That means I now have several more pinecones, holly leaves, and berries all ready for the next project.  Woo Hoo!

Thanks for stopping by to see what's happening here.  We've got a lot of coughing going on around right now.  The boys were really worn out when they got back from church camp last Friday and that has translated into coughs all around - me included.  Hate those summer colds and coughs.  They seem to be the hardest to get over.  But so far it hasn't stopped us from having fun!

If you're planning on placing an order yet this month, please use the code shown here:
July Host Code
73KERJRP

Miss you all so much and love hearing from you.  Be sure to leave me a comment and let me know how you like my cards.  Or let me know what you'd like to see me make, or any special products to use.  Call anytime with questions or just to gab.  If I can't talk right then, I'll be sure to get back with you asap.  Happy stamping and creating!
Hugs,
Sharon