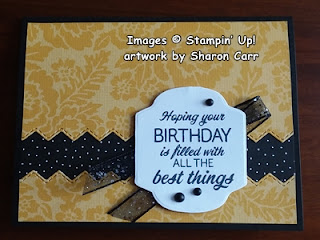
Hi there! Happy Sunday to you. Hope you're doing well and staying warm. This has been so crazy - leaving Michigan but having more snow here in the south than up there! Who would have guessed? Just goes to show that there are always surprises around the corner, and we need to expect the unexpected! I guess my card for today's post is kind of unexpected for me. I tend toward florals and pastels, and that sure doesn't describe this card! There are bold colors, and very simple lines and shapes on this card. These enhance the Pattern Party Designer Series Paper which brings it all together nicely. Simple but elegant.
The theme here was to be black and bold. The Pattern Party DSP has so many colorful and fun prints on one side and all black and white with more geometric type prints on the other side. They made a good contrast together with the Basic Borders Die set to add another dimension to the design. Both of these items are in the Annual Catalog.
The card design starts with a Basic Black piece of cardstock cut 8 1/2" x 5 1/2", scored and folded in half. The Crushed Curry DSP floral print was cut 5 1/4" x 3 3/4". The black with white dots DSP print was cut 5 1/4" x 1 1/2".
Using the stitched zigzag die from the Basic Borders Die set, cut between about 1" in from the edge. These two pieces will be split to put the black and white print in between. Make sure to keep the die straight while you're cutting.
Put adhesive on the back of the smaller Crushed Curry pieces along the stitched zigzag edge. Attach the black and white print under this near the die-cut edge, covering all the zigzag edges. Put adhesive on the rest of this and attach to the open edge of the card front as shown. Make sure to line up the three edges evenly. Put adhesive on the larger Crushed Curry piece all over and attach to the card front lining up the edges evenly with the piece you just attached. At this point, you've got a black band about an inch wide going across the card. Love those stitched zigzag lines - so nice and bold!
Since I wanted as much of the design to show when finished as possible, I looked for a sentiment to be the focal image and nothing else. This sentiment is from the Sunny Sentiments stamp set in the Annual Catalog. It's stamped on Basic White cardstock with Memento Tuxedo Black ink. After looking through my dies, I reverted back to the Seasonal Labels Dies from the just retired Mini Catalog. This die was just the perfect size and nothing else I had really worked well.

When I tried the sentiment label by itself, it didn't stand out from the card like I had hoped. After trying different solutions, I decided on the Black Glittered Organdy Ribbon from the Annual Catalog. The little glitter bits reminded me of the white dots on the DSP and also gave just a little bit of glitz and glam to the card. This was folded in half and attached to the back of the sentiment with adhesive. The whole label was then attached to the card front using several Dimensionals. The Dimensionals also helped to anchor the ribbon between the card and label.
After looking at the finished card front, I added three Matte Black Dots to draw the eye to the sentiment even more. Just the accent it needed.
Since the rest of the card looked bold, the sentiment inside needed to follow the look. The Biggest Wish stamp set fit this idea for the card quite well. First, the birthday stamp was placed on the Stamp-a-ratus and stamped with Crushed Curry ink. Then the happy stamp was positioned on the Stamp-a-ratus and stamped with Memento Tuxedo Black ink.
I loved the look of the zigzag edge so much, it was carried into the inside of the card to match. I used a strip of the same Crushed Curry print that was used on the card front. This was cut 5 1/4" x 1". The same die was used to cut it in two pieces. The wider part was attached over the sentiment and the smaller piece was attached along the bottom edge.
Hope you enjoyed today's card idea. It really is different from my usual. Just stamping outside my box! If you're like me and love your pastels, try bright and bold. Or if that's your preferred look, give pastels a try. You never know - you might just find something else that you really love! Keep creating and experimenting. Try for the unexpected today!
Wanted to give a big thanks to each of you that have been ordering from me. And those special calls from you that make my day. I can't tell you how much I appreciate each and every one of you!
Blessings and hugs,