Friday, October 29, 2021

Bits and Pieces Card

 Oh my goodness!  It's been a full week since my last post.  Hope you haven't given up on me yet!  This seems to have been a week when my mojo took a vacation or something.  It's definitely been hiding on me.  I haven't been happy with cards I've been making, so there's a pile of partial cards, odds and ends, and bits and pieces.  But nothing that I'd be happy to share with anyone else.  When I was poking through the pile today, I found some unused parts from three other cards, but they were all in the same color family.  Soooo...  After playing around with them, I finally have a card I feel worthy of sharing.  Whew!  I was getting a little worried there for awhile!!

The card focuses on the pretty Tidings of Christmas Designer Series Paper and very minimal stamping so it goes together rather quickly - when you know what you're doing anyway!

The card base starts out with an 11" x 4 1/4" piece of Thick White Cardstock which is scored at 5 1/2" and folded in half.  A 4" x 3" piece of the Tidings of Christmas DSP is attached on the bottom half of the card front.  Even though the paper has Christmas-y prints, I chose to not make this into a card for Christmas, but a general purpose card instead.  I just love the colors used together in this DSP, so why not use it for more than just Christmas?

Next the layers of cardstock were cut - Evening Evergreen is 3" x 4", and Soft Succulent is 2 3/4" x 3 3/4".  These were layered together using adhesive.  Then a smallish piece of the darker print from the Tidings of Christmas DSP was cut to 2 1/2" x 3 1/2".  It was then cut in half at the 1 1/4" mark and turned 90 degrees and cut in half again at the 1 3/4" mark.  So you end up with four pieces that are 1 1/4" x 1 3/4" if all my math is correct!  
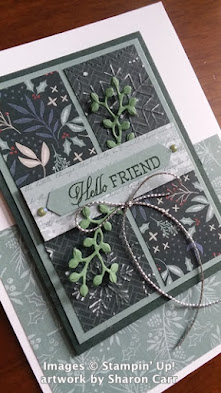
When the pieces are laid out again in the square, take two diagonal pieces and flip them to the other side so both of the prints are showing.  At this point, I took the two plainer prints and embossed them with the Wintry 3D Embossing Folder that has the snowy swirls.  It didn't show up quite as much as I'd hoped, so I remembered doing a little sanding on paper before to let the white core show through.  It worked out pretty well, so that's what I went with this time.  It's quite subtle, but does show up nicely.   

When you have the four DSP pieces ready to go, line them up the way you'd like then attach them.  I used Multi Purpose Liquid Glue for this so the pieces could be moved a bit after placement.  Then I added Dimensionals behind the layer and attached to the card front.

The sentiment comes from the Welcoming Woods stamp set.  It fit perfectly for my purposes.  I had a tiny, skinny 3/8" strip of Soft Succulent cardstock in that pile that I took for the words.  They just fit and were stamped with Evening Evergreen ink.  The ends were punched with the Banners Pick-a-Punch.  There was a 3/4" strip of Harvest Meadow DSP in a Soft Succulent print that was just hanging out in that pile of stuff, so I grabbed that too.  It was trimmed to 2 5/8" long and the sentiment was attached to it.  This was attached to the card front.

It was pretty just as it was, but I wanted to give it just a small amount of bling.  The 2021-2023 In Color Jewels were just the right touch.  I used two of the small Soft Succulent colored jewels, one on either side of the sentiment.  

In that stash pile, there were also two sprigs of berries, or seeds, or whatever.  Unfortunately I don't remember that I used to die-cut them out with.  I hate when I can spend an hour trying to figure what I used to make something because I didn't write it all down when I was actually using the dies!  And there is no telling just how long those little sprigs had been sitting on my table.  So, if you want to copy this, just wing it and use whatever is handy!

I added a single large bow made from Simply Elegant Trim in the silver tone.  It's attached with a rolled Mini Glue Dot.  That's it.  Hope you like it, even though you had to wait  whole week for me to finally get it made.  Thanks for being so patient with me!  You are all the very best and I so miss all of you!  When are y'all coming down here for a visit?  The door is always open for you!

Happy creating!
Sharon

Friday, October 22, 2021

Friendship Friday Again

 Hi there!   Hope you're all well and having a good Friday today.  My grandsons are out of school today and spending part of the day here with me.  And they're already on the electronics!  My goodness, whatever did we do with our days before there were all these electronic gizmos to take up our time?  Oh well, since they're occupied for a time, I thought it was time that I caught up on my Friendship Friday card sharing.  Remember these are all cards that have been shared with me by my friends and sometimes family.  Not all of the materials used are from Stampin' Up!  But I love them all and want to share their individual beauty with you.  I can't believe it's been two months since I did this the last time.  Definitely slipping up here, so let's get going!

created by Sue Fabris - a slider anniversary card


created by Jane Murphy - using a pretty foiled acetate layer by SU! that's now retired


created by Barb Eisenman - using 'found foil' and retired SU! stamps and dsp- love the idea!


created by Kathy Hintz - a cool fun fold card using retired SU! dsp


created by Barb Eisenman - using 'found foil' again and Seasonal Swirls Dies and In Good Taste DSP


created by Sue Fabris- lovely alcohol ink background with Artistically Inked stamp set


created by Gayle Jones - bold fall leaves and cool background


created by Kathy Hintz - collar card fun fold using Perfectly Plaid stamp set and retired SU! dsp.   First Christmas card idea shared this year!


created by Jean Mazurek - lovely card using the Beauty of the Earth DSP and gold foil leaves


There you have it.  Another batch of lovely cards that were made by you and shared with me.  It just brightens my day to have a card show up in my mailbox.  It's a wonderful feeling to know someone is thinking of me.  So that means I need to get on the ball here and start mailing out some more cards to you my friends.  I want to make someone feel good today too!   Thanks for stopping in to see what's going on here in my corner of the world.

Keep creating!  And definitely keep sharing!!

Hugs,
Sharon

Thursday, October 21, 2021

Time of Giving for Thanksgiving

 Hello friends!  Hope you're doing well and are able to be out enjoying this wonderful autumn weather.  I was lucky enough to go on a field trip today to a nearby plantation with the 4th grade classes my grandson is in.  I found it so fascinating.   Since coming from Michigan, I didn't grow up learning much about plantations and the way of life there.  So here I am, still learning and loving it!

The last couple of days I've been using the Time of Giving Bundle to create some fall cards.  This has been too much fun!  I've been using lots of textures and colors to get the feel of fall.  First I have a darker, maybe more elegant card for Thanksgiving to share with you.  And then a bright and happy Thanksgiving card.  Both are simple card layouts, but have a totally different look and feel to them.  Enjoy!

The materials for this card start out with a base of Crumb Cake cardstock cut at 11" x 4 1/4", scored at 5 1/2" and folded in half.   Next is a layer of the wonderful Beauty of the Earth Designer Series Paper.   I chose to use the print that is a mix of olive green tones.  This is cut at 5 1/4" x 4" and is attached to the very top of the folded card using Multi Purpose Liquid Glue.

Then comes the fun layer of Early Espresso cardstock cut at 4 3/4" x 3 1/2".   This layer has all the magic going on.  The oblong pumpkin die from the Giving Gifts Dies was cut out about 1 1/4" up from the bottom edge.  After it was die-cut, the layer was embossed with the Timeworn Type 3D Embossing Folder.  Looking at both sides on the layer, I decided I liked the backside of the embossing for this card.  So it was attached over the green DSP layer again right to the top edge of the card using Multi Purpose Liquid Glue.

The sentiment is from the Time of Giving stamp set.  The block-style letters looked nice on a clean cut 3/4" strip of Crumb Cake cardstock.  It was stamped with Early Espresso ink.  Then trimmed down to 2 1/2".

I tried several different things to layer behind the sentiment and finally went with the gold from the Gold and Rose Gold Metallic Specialty Paper found on page 135 in the Annual Catalog.  The brushing on the gold paper softened the color and made it the perfect accent for the card.

Lastly was the ribbon wound around the inside of the card and tied in the front with a bow.  This is the Gold Fine Art Ribbon that is a cross between country and chic because of it's golden fibers woven in with the linen.  Just Perfect!  Oh yes, we can't forget a few of Champagne Rhinestones sprinkled across the front.

Now for the next version...

Way different!  This card starts off with a base of Bumblebee cardstock cut at 8 1/2" x 5 1/2", scored and folded in half.  The first layer is Early Espresso cardstock cut at 5 1/2" x 4".  Next comes a layer of Pumpkin Pie cardstock cut at 3 7/8" x 5 1/2".  I left both layers longer than needed so they could each be ripped off on the bottom edge when ready.  Before that, I stamped the 3 leaves from the Time of Giving stamp set multiple times over the Pumpkin Pie cardstock using a VersaMark ink pad to give a very subtle print pattern.  Then it was embossed with the Tasteful Textile 3D Embossing Folder to give it some texture.  I love the subtleness of both the stamping and embossing on here.  It adds so much interest, but doesn't scream at you.  At this point, both layers were ripped to fit the card front and then attached with adhesive.


When I first got the Time of Giving Bundle, I wanted to see what the dies looked like after cutting, so I had this sample of the pumpkins cut out of Early Espresso cardstock.  It was just the accent piece needed for this card.  To add more contrast to the die-cut image, I tucked a small strip of one of the Harvest Meadow Designer Series Papers behind it.  Then it was popped up on the lower part of the card using Dimensionals.

For the sentiment, the Word Wishes dies were used.  Before die-cutting, the Early Espresso cardstock had a strip of the Adhesive Sheets attached to the back.  It was run back and forth twice through the Stampin' Cut & Emboss Machine to make sure it was cut through.  Then the words had the backing taken off from the adhesive and added to the card front.  So very easy to attach the words this way!  The words were curved a little when attaching.  

It needed something more, so I die-cut the smaller leaves of the die set from the same piece of Harvest Meadow DSP used behind the pumpkins.  They were tucked in around the card front and I loved the look.  They were attached with adhesive.  A few Champagne Rhinestones were also tucked in the design on this card too.  Just a side note - I was really surprised how different the rhinestones looked on the two cards even though they were the same color.  The rhinestones really pick up and enhance whatever color they are placed on.  Who knew?! 

Thanks for taking time out of your busy day to stop in today.  Hope these two very different looking cards will give you some ideas to get you crafting and creating.  It's always fun to see what different things you can create using the same tools but changing up the color.  That's one of my favorite things about stamping - you can always get something different from the items you have on hand.

Remember, if you're planning on ordering this month, please use the Current Host Code at the top corner of my blog site page.  It's much appreciated!  Thanks!

Many hugs,
Sharon

Saturday, October 16, 2021

More Merriest Moments Cards

Hi all!  Here I go again.  I just couldn't help myself!  Making yesterday's card was so much fun.  I got to thinking that I really needed to make a Christmas version of the idea, because it really is a Christmas stamp set.  So after that, I went back downstairs and tried a red and green version.  Loved it so much I tried another version.  That one is in blues, grays, and silvers.  Oh, my goodness!  That's it!  I have to stop making this card layout for now.  This style of card has become absolutely addicting!  I made my self stop at the two versions, but I still have visions of maybe one or two more color combos.  Maybe rich and dark color combo, and maybe a more whimsical non-traditional color combo.  We'll see if I come up with anything else that I just have to share with you!

Here's the first Christmas card.  Because the sentiment is so long, I had to flip the card on it's side.  But the basic idea and layout are the same.  Let's start...

Card base is Old Olive cut at 8 1/2" x 5 1/2", scored and folded in half.  The first layer is Real Red cut at 5 1/4" x 4".  The Basic White stamped layer is cut at 5 1/8" x 3 7/8".

For stamping, I started out the same way with a pencil line lightly drawn across the middle of the card.  Again, the evergreen branches were stamped first with Old Olive ink.  This time I spread them out further and only stamped 3 (and a half-ish) on the top and bottom of the pencil line.  The color for the leafy branch was Pear Pizzazz ink.  It's close in color, but there is enough difference to show.  This time the speckles are stamped in Crumb Cake ink.

The sentiment is on a 1 1/8" x 4" strip of Basic White cardstock.  It's stamped with the Old Olive ink pad.  This is layered onto a Real Red cardstock strip that is 1 3/8"  x 4".  Behind this is a layer of the Be Dazzling Paper from the previous Sale-a-bration.  Come on ladies.  I know you all have some left and you're tucking in a little bit here and a little bit there.  This paper is so pretty that sometimes it only takes a small bit to make a big impact.  Oh yes, I used Mini Glue Dots to attach this behind the Real Red cardstock.  I wanted to make sure it stuck!  Then I used Dimensionals to attach it to the card front.

I wanted to add something a little different on this card, so 2 small holly leaves from the Merriest Moments set were stamped in Old Olive and die-cut with the matching dies.  The Sequins for Everything pack has these lovely bright red sequins that were perfect for the holly berries.  Both the holly leaves and the sequins are attached with Mini Glue Dots.  Ok, one down, on the the next.

Ok, you've already got all the dimensions for the card because it's the same as the red version.  This time around I'll just give you the color changes instead.

Card base - Night of Navy
1st Layer  - Smoky Slate
2nd Layer - Basic White

Inks used on this card are Night of Navy, Shaded Spruce, and Smoky Slate.  It was all set up the same way and stamped in the same order.

The small holly leaves were stamped with Shaded Spruce.  The holly berries are from the same Sequins for Everything pack.  They were in the silver and gold section.  The silver ones are all flat and almost look like a mirror.  Love those Sequins!

Tip:  If you have a Take-A-Pick Tool, make sure you use it with the sequins.  They are so static-y  that they want to stick to everything - including your fingers.  It's a joke trying to get them off your fingers, work table, and everything else!  But they're so pretty, they really are worth it!

Ok, that's it for today.  Honestly, I need to look at something else besides the Merriest Moments stamp set.  Not sure what I'll move on to next.  It's a surprise - to me too!

If you're planning to place an order soon, please consider using the Current Host Code. You can always find it now up in the right corner of my blog post.

Hope you give this card layout a try soon.  You'll be amazed how easy it is to use.  And it always comes out looking so pretty.  So this is a fabulous layout for making multiple cards for Christmas and any other time you need lots of pretty cards quick.

Happy stamping and happy Saturday too!
Sharon


Friday, October 15, 2021

CASE-ing a Gorgeous Idea

 Hi there!  Hope you're having a great day today.  Can't believe another week has just flown away.  I need  things to slow down a little so I can catch up.  Do you ever feel that way?  Here it is halfway through October and we just put out our Halloween decorations.  We'll have to turn right around and take them down again in another two weeks.  And that means autumn is in full swing, so that's what we'll be focusing on today.  A few days ago (or maybe more!) I chanced on a lovely card idea by Jacque Williams in New Zealand.  It just got the wheels cranking in my brain.  Here's the link to her card.  Loved her cards and the colors were fabulous, but I was envisioning something more in tune with fall.  So here's how I CASEed (Copy And Share Everything) her card...

Isn't this a pretty card and the layout is a great, easy, go-to layout to work with.  I stayed with the same stamp sets she used, the Merriest Moments Bundle for the greenery, and the Heartwarming Hugs for the sentiment.  I just love how these colors make such a warm and friendly card with ease.  Here's how it's made...

I started out with a card base of Old Olive.  This is cut to 8 1/2" x 5 1/2", scored at 4 1/4" and folded in half.  First layer is Mango Melody cut at 5 1/4" x 4".  In case you haven't noticed, this color is turning out to be my favorite fall color this year.  The next layer is Very Vanilla cut at 5 1/8" x 3 7/8" so there is only a small amount of the Mango Melody actually showing when the card is put together.

To make the section of stamped area, I measured down about 2" from the top on both sides, then drew a light pencil line as a base for the images.  The evergreen branches actually overlap the line a bit when stamping.  I used Old Olive ink, and stamped about 3-4 branches on each side of the line to start.  Then I switched to the leafy branch and the Mango Melody ink to stamp these in between the evergreen branches.  These are shorter than the evergreen, so they were not overlapped on the pencil line.  After this come the speckles.  I thought I'd use Crumb Cake ink for these, but changed my mind and went with Coastal Cabana ink instead.  This just brightens up the whole look.

The next part to make was the sentiment banner going across the card.  The Very Vanilla strip is  cut to 1 1/8" x 3 7/8".  The sentiment from Heartwarming Hugs stamp set was stamped across the center with Early Espresso ink.  It was layered onto a 1 1/4" x 4" strip of Mango Melody cardstock.  As a gorgeous accent, a strip of Gold Foil Paper was cut at 1 1/2" x 4".  This just took the card up a notch in elegance.  After these were all layered together using Multi Purpose Liquid Glue, they were layered onto the card front centered over the pencil line we started with.  It was popped up with Dimensionals for a little extra attitude.

The inside of the card was layered up the same with Mango Melody and Very Vanilla cardstocks.  I added a few of the evergreen branches and sprinkle of the Coastal Cabana speckles to tie it all together.   At the very end, I added a few of the gold Gilded Gems to dress it up to impress.  I hope you like my autumnal take on Jacque's lovely card.  It's amazing how different a card design can look by just changing the colors.  Give it a try and see what kind of card treasure you can make!

Reminder - the current host code is tucked in at the top of the blog page.  If you will be ordering, please use the host code provided.  Thank you kindly!

Thanks for taking time out of your busy day to see what I've been up to lately.  I love to share my card ideas with you, so thank you for doing your part in looking at them!  We have sunshine and wonderful weather back again that I'm thoroughly enjoying.  In fact, the colors on my card remind me of just exactly what I'm seeing outside.  Take time to enjoy the gorgeous fall weather, maybe by picking out some pumpkins or getting some cider and doughnuts.  Hmmm...  I need to find me an apple orchard around here.

Blessings and cinnamon-y hugs,
Sharon

Tuesday, October 12, 2021

Tale of Two Cards - part 2

Ok, are you ready for what I made with the leftover parts from yesterday?  Remember I had used the Blending Brushes on a piece of Very Vanilla cardstock to make a circle of Mango Melody.  I also had seven leaves in different sizes and colors made with the Love of Leaves stamp set and coordinating dies.  I also thought it would be fun to use a different fun fold to make this card.  So that's just what I did.

I hadn't made a book binding fun fold in forever, and thought this would work well with the pieces I had too work with.  I started out with a card base of Cajun Craze cut at 11" x 4 1/4", scored at 5 1/2" and a second score line at 6 3/4".  After folding on the scored lines, I folded in half.  Then opened on the side to put Multi Purpose Liquid Glue on the space between the two scored lines, and closed it up.  When it dried, it now opened like a book with the binding area on the left.  Great start.


The Very Vanilla cardstock that had the Mango Melody soft circle on it was up for the chopping block next.  The piece was 5 1/4" x 4".  I cut off the 4" that included the Mango Melody circle to end up with a 4" x 4" square for the front of the card.  That left a piece 1 1/4" x 4" that I trimmed down to 1" x 4".  I had a lot of fun playing with the stamp that looked like alcohol inking yesterday, so I tried it again on that 1" piece.  This time I used Mango Melody, Daffodil Delight, Old Olive, and Cajun Craze inks.  Granted there were only small portions of each color, but it gave me the look I wanted.  

The leaves I had to work with were all inked with a rock 'n roll technique using mixtures of Mango Melody, Pumpkin Pie, Old Olive, Cajun Craze, Bumblebee, and Crumb Cake.  Each leaf has at least two colors and some have three.  After shuffling them around on the Very Vanilla square of cardstock, I found I had two problems.  One, the background space was too bare.  To fix that problem, a Blending Brush was used to add some Mango Melody on the outside edges with a bit of Pumpkin Pie added in.  The second problem was solved by die-cutting a branch from Soft Suede cardstock using the Harvest Dies.  I love using that branch (as a whole or cutting pieces from it) to tuck in some interest on so many cards.  It's a natural addition for florals, but it works well for a Halloween special effect too.

Here is the card standing up so you can see how it's put together.  

The sentiment was stamped on the small strip of Very Vanilla cardstock.  The words are from the Love of Leaves stamp set and I used Cajun Craze ink to stamp it.  The Banner Pick-a-Punch was used to trim the left edge.  I added a bit of Mango Melody and Pumpkin Pie ink to the edges with the Blending Brushes.  Have I mentioned how much I love those things?!  This was added to the card front with Multi Purpose Liquid Glue and  Dimensional on the left edge to keep it straight.

A double bow of Linen Thread was added to the tag with a Mini Glue Dot.  The same Linen Thread was wound around the book binding part of the card four times and tied off with a bow.

The last thing to do was finish the inside of the card.  Another 4" x 4" square of Very Vanilla was cut to fit.  The Blending Brushes came out again with Mango Melody and Pumpkin Pie inks to add a good amount of color all around the edges.  It was then attached inside the card with Multi Purpose Liquid Glue.  There was just one small leaf left over from the stash I was working with.  So it landed in the corner here.

After much thought and deliberation, this has ended up being a bling-free card.  It just seemed like it was already beautiful with all that bright, glorious color.  What more could be added to make nature even better?

It was fun doing these last two projects.  They truly didn't end up the way I envisioned either one when I started out, but that surely does keep things interesting.  Creating cards is a process where many things can end up going sideways instead of forward.  And this is how we learn as we go.  I once read that either you continue to learn something new each day, or you die.  So I'm planning on doing lots more learning for a good long time!   *big grins*

If you're thinking of placing an order soon, please use the Current Host Code that you'll find in the upper right corner of my blog post.  Thank you in advance for all your support.  I'd love to hear from you, whether it's a question or comment about any of my projects, or just to let me know that you're hanging out with me.  If there's something you'd like me to tackle, just ask.  Not sure if I can always figure it out, but I'll give it a try.  Thanks for stopping by again.  I miss all of you, my friends.  Hopefully I can get myself up to Michigan again soon and see you.

Happy creating and stamping,
Sharon

Monday, October 11, 2021

A Tale of Two Cards

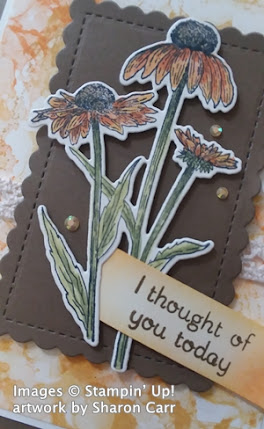
 Hi there!  Welcome back to my stamping room where ideas run amuck, or something like that...  It's been a little frustrating in my stamping room the last two days. I've got ideas galore, but when I start putting all the components together it's kind of a ho-hum deal.  Yesterday I had a great idea to make a blending brush sort of halo background and play around with the Nature's Harvest Bundle again.  I just love the way the stamps and dies play so nicely together, but can stand on their own just fine.  Ok, I did the Blending Brush background in the upper middle of a piece of Very Vanilla cardstock using Mango Melody for a gorgeous soft golden-orangey color.  Turned out great, and is perfect for fall.  Next up I stamped the coneflower bouquet on Very Vanilla using Memento Tuxedo Black ink.  Colored in the images with the Stampin' Blends alcohol markers.  That turned out nice too.  Putting it together?  Not so much.  Really pretty dog-gone boring at this point.  So I set that all aside overnight to come back to later.

Today, the idea of using the Artistically Inked stamp that looks like a cool alcohol ink background (or maybe just a long smudge) to color a fall background and add some of the really bold Love of Leaves images to make a really bold fall card.  Yes, I did the background and loved it.  Then stamped seven of the leaves with multiple fall colors and die-cut them.  Good so far.  When I tried putting it together, it was all so busy together it gave me a headache.  Set that aside too.  So now these two bunches of card parts were just sitting there.  And that's when inspiration struck - why not switch out the backgrounds and see what happens!  So here is one of them.  Tomorrow you'll get the second one.  Hope you like...

This shows the background using the Artistically Inked stamp.  Isn't is awesome?  The background piece of Very Vanilla has three different inks - Mango Melody, Daffodil Delight, and Bumblebee.  My Bumblebee ink pad is so juicy I had to off-stamp to get a decent color, likewise with the Mango Melody pad.  The inks were stamped to cover, but not really overlapping, the cardstock piece that is 5" x 3 3/4".   It's really fun to see how these stamps quickly make this alcohol-inked background.

After stamping, this was layered onto a piece of Very Vanilla cardstock that is 5 3/8" x 3 7/8".  It just needed a little sliver of Very Vanilla to go between the colors and the dark card base I wanted to use.  I chose Soft Suede for this which is cut to 8 1/2" x 5 1/2", scored and folded in half.  Each layer here was attached with the Multi Purpose Liquid Glue.


Like I mentioned earlier, the coneflowers were stamped with Memento Tuxedo Black ink and colored with Stampin' Blends.  The colors used were Mango Melody D, Pumpkin Pie L&D, Cajun Craze L, Old Olive L, Mossy Meadow L, and Crumb Cake D.  After coloring, it was die-cut using the coordinating die from the Harvest Dies.

To have these pretty flowers stand out from the background, I die-cut a piece of Soft Suede cardstock using the Stitched So Sweetly Dies.  It is a perfect foil for the flowers.  They are attached using Dimensionals and Mini Dimensionals where needed.

The sentiment comes from the Love of Leaves stamp set.  It was stamped on a strip of Very Vanilla cardstock using Soft Suede ink.  The one end was punched with the Banner Pick-a-punch.  One end was tucked under a flower stem and attached with adhesive.  The other end has a Dimensional popping it up.  

As I was putting the layers together, I noticed a piece of the Diamond Weave Ribbon that had been cut, but never used.  Hmmm...  I liked how it looked with the rest of the card, so why not?  I just used adhesive to attach it to the center of the card and then attached the focal piece to the card with Dimensionals.  Of course, I felt it needed just a little bling.  I used the 2021-2022 In Color Rhinestones that matched nicely.

The inside was finished simply with a little stamping with the same alcohol-ink stamp and some off-stamped Mango Melody ink and a little bit of the Daffodil Delight ink.  This is on the Very Vanilla layer and attached to the card base with the Liquid Glue.  

I figured this card would be used for one of my many notes I mail out to friends, so there are no sentiments stamped inside.  That's up to me to provide.

Well, that's it for the first installment on a Tale of Two Cards.  Hope you can see that the creative process doesn't always go smoothly, but you can usually do something with the unused parts and pieces.  It might not be exactly what you envisioned in your pretty little head.  But you never know, it might just be better!

Just a quick reminder that the current host code is on the top right corner of my blog post.  Thank you for your orders.  They are so appreciated, and so are you!  Enjoy your day, and don't get frustrated when your stamping projects don't turn out quite as planned.  You can always shuffle the pieces around and come up with something totally different.  There are no mistakes!  You can even pull the pieces of a card apart and start over.  And if there is absolutely no saving it?  Throw it away - it's only paper!  (OMG, did I say that?)  Start fresh and have fun!  That's what it's all about.

Blessings and many hugs,
Sharon