Oh, my goodness! I've been having so much fun with a new Sale-a-bration bundle. Yes, you heard correctly there. After you spend $100 in regular merchandise, you can choose to get this bundle. It has an awesome stamp set with 13 photopolymer stamps to start with that includes 3 sentiments. And it has a gorgeous 12 x 12 set of Designer Paper that coordinates with it! They're my sort of colors too - more on the brighter pastel side. Woo Hoo!! Can you tell I'm just a little excited?
Here's the first one I made with both the Friendly Hello stamp set and the Friendly Hello matching Designer Paper. It's turned out such a bright cheerful green as the main color on the print I used is Granny Apple Green. It just screams 'spring!' to me. To make this card, I started with a card base of Garden Green for some contrast. This was cut 11" x 4 1/4", scored at 5 1/2" and folded in half to make a top fold card. The layer of DSP is cut 5 1/4" x 4". It's attached to the card front with adhesive. I wanted as much of this to show as possible, so I looked for a die that wouldn't be too small for the sentiment. But it shouldn't cover the whole card front either. The die from the Tasteful Labels Dies was just the right size and a pretty shape with a little outline detailing too.
The hello friend sentiment from the set was stamped with Garden Green ink more to the right side of the label. That left lots of room on the left side for the pretty flowers that are part of the set too. These were stamped with Garden Green ink onto a scrap of Basic White cardstock. I also stamped 5 solid leaves with the Garden Green ink on the scrap of white.
The flowers were just lightly accented with some water and a Water Painter brush to soften the shading lines inside each flower. It actually makes the centers look like Granny Apple Green. Who knew...?
The flowers and leave were all fussy cut because there are no dies or punches. Surprisingly, it took almost no time at all to cut the 6 pieces. It was time to position all the pieces around the sentiment. The flowers were attached only on the edge of the label die-cut. Several of the leaves were tucked underneath the flowers. The label and flowers were attached to the card front using Dimensionals. The last two leaves were attached flat to the card front with adhesive. This gave the flowers cluster more depth.
Looking to finish off the card front, I added a length of the new 3/4" wide Frayed Ribbon wrapped across the top of the card and tied into a square knot. There is a bit of extra fraying going on with the ribbon edges on purpose. I liked the shabby chic look of the fraying. This ribbon is pretty thick though, so I'll probably need to add extra postage when I mail it.
The flower centers looked really bare, so I added some Genial Gems which are found in the 2021-2022 Annual Catalog. There are some green gems, but they didn't look nice with the greens already going on here. So I used the Pale Papaya ones instead. These added just a bit of color without being overpowering. The two flower centers are the larger gems. Then I couldn't stop myself and added 3 of the smaller gems to highlight the sentiment.
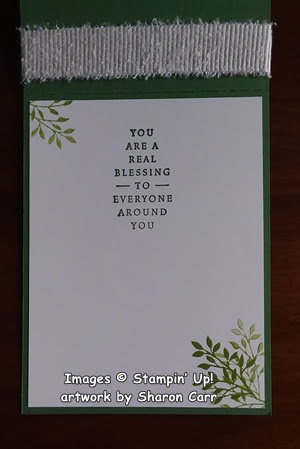
The inside of the card got some special treatment too. The sentiment is from the new Blessings of Home stamp set. It is stamped on a layer of Basic White cardstock with Garden Green ink to match the front.
The Friendly Hello stamp set has a leafy branch that I thought would be a good accent. It was stamped with Granny Apple Green in the top left corner and the opposite bottom right corner. On the bottom corner, it was stamped once at full strength and then off-stamped two more times to fill it in. I also like the look of the frayed ribbon wrapping around on the inside of the card. Just an added benefit.
Thanks for stopping in today to see what's happening. I'm enjoying playing with the new stamp sets I've already purchased from the 2022 January - June Mini Catalog and the Sale-a-bration bundle I received free. It's always interesting to see how people interpret using the new sets. Yes, I've been hanging out at Pinterest to see what others are doing. It seems to jump-start my own creativity to see what's out there. If you're like me and need a little push to get going, I hope my ideas will jump-start your creativity! If there are any questions you have, feel free to contact me. I'm here to help you be the very best stamper you can be - and have fun doing it!!
Happy creating and stamping!
Sharon


.jpg)
No comments:
Post a Comment