Showing posts with label Dainty Delight. Show all posts

Friday, April 28, 2023

Dainty Delight in Greens

Hello Friends, hope you're enjoying your day today.  Today I'm sharing a card with some old, retiring items and some that are going to hang around for a while longer which is a good thing in my humble opinion.  I'm using both the Dainty Delight Bundle and the Quiet Meadow Bundle which are both very versatile.  I look at these two sets as basics because both the floral images and the words are very nice, and the matching die sets are truly fabulous and can be used just about anywhere.  Give it a look.

Here's my last hurrah for Pear Pizzazz too.  I'll miss this color so much!  But there are other green colors that I'll soon love just as much.  For this card, I started out with a base of Pear Pizzazz cardstock that measures 8 1/2" x 5 1/2".  It's scored and folded in half.  

Next a layer of Old Olive cardstock was cut.  It measures 5 1/4" x 4".  I used the largest die in the Meadow Die set to cut into the center of this piece.  (thrifty!)  Both of these pieces were set aside until I was ready for them.

That lovely gold-printed paper is called Naturally Gilded 12" x 12" DSP.  There are 6 sheets with 3 patterns, so you get two of each.   This design is gold on ivory, there are silver on white and copper on white designs too.  Simply gorgeous!  The number is #161639 and can be found in the Online Exclusives for $10.  It's worth every penny!

Here you can see how the ivory background was changed to green.  I used Pear Pizzazz ink and a Blending Brush to just swirl color on it until it was as dark as I wanted.  I actually went over it about three times to darken it enough, otherwise the gold print got lost in the green.  I love how you can totally change the look of this paper just by blending in some color over the design.  Just think of the possibilities!  After I was done, this layer was attached to the Old Olive layer that was already cut.  I used adhesive to attach these together.  

A little more die-cutting was needed.  The two thin branches were cut from Mossy Meadow cardstock.  After trying a few different colors including some different gold papers, I ended up with a Glimmer Paper that's been retired for awhile.  It's a lovely green that showed up nicely.  For this piece, I used a die from the Dainty Delight set.  I thought it looked cute here.  All of the die-cut pieces were attached with adhesive.

One last piece was die-cut.  It was the label from the Meadow Dies.  This is cut from Very Vanilla cardstock.  The sentiment is also from the Quiet Meadow stamp set and fits in the die-cut piece perfectly.  It is stamped with Old Olive ink.  Two Dimensionals were added to the back at this time.

Instead of just wrapping a ribbon around for an accent, I cut a 4" piece and a 6" piece of Parakeet Party 1/8" Metallic Woven Ribbon.  Add tape on the back where you want the left side of the ribbon to be.  Thread the ribbon through the center hole then wrap to the back and attach to the tape.  Thread the 6" ribbon through the other side.  Take off the backing from the Dimensionals and center them over the stems.  Then wrap the ends of the ribbon to the back of the right side and attach.  To finish, tie a small bow from the same ribbon.  Use a Mini Glue Dot to attach this where the right ribbon connects to the label.  

All of this is attached to the folded Pear Pizzazz card front using Dimenisonals.   A piece of Very Vanilla was cut to fit inside the card and it was finished.  With the gold printed DSP, sparkly Glimmer Paper and metallic ribbon, I didn't think it needed any more bling.  Now if you're a real 'bling-aholic', you could always add gold sequins or rhinestones.  There are several choices that look really elegant with the card.  Your choice.

Have you been keeping track of all the different colors of green that were used on the card?  I think it's wonderful how so many of the colors blend nicely together.  If you want to know, there are 5 different greens on the card.  Pear Pizzazz, Old Olive, Mossy Meadow, Parakeet Party, and the Mint Macaron of the Glimmer Paper die-cut.  Wow!

That's it for today.  Hope there are a few ideas you might have picked up on here.  Be inspired and be creative!  And have fun!!!

Happy stamping and creating,
Sharon

Friday, March 10, 2023

New Card Template

Hello Friends!  Hope you're all staying warm and dry.  We're back to colder weather and rain again.  But a least there's no snow coming around here.  I've been talking with friends in Michigan and Maine.  Sounds like both states are getting slammed with cold weather and lots of snow.  That's something that I'm not missing at all.  Now my friends, I'm missing those a lot!  Wish I could drag you all down here for a long visit.  Just think of how much stamping and chatting we could do!!  Oh well, that's just wishful thinking on my part.

Today I wanted to do something a little different.  How about a template you can use over and over again to make as many cards as you'd like?  I've made two cards with this template and it's an easy template to use.  There aren't too many pieces that need to be cut or scored.  Just enough to make it interesting.  Here goes...

Here are the basic cardstock measurements:
card base   -  11" x 4 1/4"  scored @ 5 1/2"
DSP layer  -  4" x 5 1/2"
white layer -  3" x 5"

If you only have these three components, you can make a different card every time you sit and stamp.  For this card, I used Balmy Blue for my card base.  The DSP layer is one of the prints from the Country Floral Lane DSP.  It's found on page 9 of the January - April Mini Catalog.  I have used most of the prints in this paper pack for Valentine cards.  I thought this blue print would make a pretty birthday card though.

Before doing any stamping on the Basic White layer, I used one of the Basic Borders dies to cut a fancy edge at an angle.  Isn't that a cute addition?  I chose the birthday sentiment from the Happy Thoughts set.  I really like the size of the fonts for this sentiment.  It fits the card just like I wanted.  It's stamped in Balmy Blue ink to match.  

Two leafy stems from the Dainty Delight dies were cut from Mint Macaron cardstock.  They were trimmed a little on the bottom edges to fit the white layer in a nice curve.  Multi Purpose Liquid Glue was used to attach the stems to the left side.  The three flowers and bud were die-cut from Pale Papaya cardstock to match the dots on the DSP.  These were attached with Mini Glue Dots along the stems.

Before attaching the layer, a Pale Papaya ribbon was tied around the card front and tied into a knot on the side.  I know it's a retired ribbon, but it worked so nicely with the card.  Besides, this is to give you a card template for your use, not really showcase any particular stamp set.  After adding the ribbon, the main layer was attached to the card front using Dimensionals.

At this point, I planned to add rhinestones to the card.  I wasn't happy with the rhinestones, or the Iridescent Pearls, or anything else I tried.  Everything I tried was just too pale.  Imagine me saying that!  LOL Time to go raid my retired stash of embellishments.  These gold pearls are from a set of gold and silver pearls.  They're nice and tiny and can easily be used for the flower centers.

I had so much fun making this card, I went right ahead and made a 2nd card using this same template.  After changing up the colors, it sure does look different.


For this one, I started out with a base of Blackberry Bliss cardstock.  I used some of the Favored Flowers that were a Sale-a-bration freebie that I just love.  It's so rich and elegant looking.

The ribbon was changed to the White Crinkled Seam Binding Ribbon.  The Blackberry Bliss Light Blends was used to color the ribbon.  Such an easy way to get ribbon in any color you want!

The sentiment is from the Beauty of Friendship stamp set.  It's stamped with Blackberry Bliss ink.  

I changed the die used to cut the edge of the white layer to a retired set called Ornate Border Dies.  I like the lacy delicate look with the darker colors on the card.  It still has that elegant feel to it.

The two sets of flowers tucked over and under the sentiment layer are parts of the Favored Flowers DSP cut with my Paper Snips.  They just fit right in, don't they?

The bling used on this card is the Iridescent Rhinestone Basic Jewels.  Love, love, love these gorgeous jewels!  They tend to fit right in with anything you want to add sparkle to and make it shine.  I tried just three on the card, but that wasn't enough.  So I sprinkled on two more.  Yes!

Just wanted to share a picture of the inside of the card too.  The Basic White cardstock is cut to measure 5 1/4" x 4".  There is a 1/2" strip of coordinating DSP added to the bottom to match the front of the cards.  For this card, I chose a sentiment from the Irresistible Blooms stamp set that is an Online Exclusive.  Make sure you check out this set and all the other options online when you're ready to order.  If you have any trouble seeing them, call me and I'll try to help.

That's it for today.  Hope you give this card template a try.  It's a good idea to have some go-to templates to work with when you're stuck for a quick idea.  I know I find it helpful.

Thanks for stopping by to share a part of your day with me.  Feel free to leave me a message.  You know I'd love to hear from you!  If you're planning on ordering soon, please consider using the Host Code at the top right corner of this post.  Thanks so much!

Happy stamping and creating,
Sharon


Friday, February 17, 2023

White on White, Sort of

Hi again.  I know I just posted my Friendship Friday cards, but I just had to get this post out right away.  I was strolling around on Pinterest and came across a card that was all white-on-white.  Truly elegant.  But not so much me.  Plus, it didn't use anything I owned.  So, I had some fun turning it into my kind of card.  There's lots of white still, but it's overlaid with some pretty pale pastel shades that just make me happy to look at!  Wish you could see this in person.  My goodness!

The card starts out with a Basic White Thick card base that measures 8 1/2" x 5 1/2".  It's scored and folded in half.

Next there is a layer of Basic White that measures 5 1/4" x 4".  This layer is run through my Stamp & Emboss Machine using the Split Card Textures Dies.  I used the one that reminds me of geometric flowers.  The sentiment from the Dainty Delight stamp set was used with Soft Succulent ink to stamp in the bottom right area.  The layer was then centered on the card base and attached by using adhesive.  

I love all the dies in the Meadow Die set.  There are so many lovely silhouette shapes of flowers and greenery to choose from, plus butterflies and a tag and label too.  Lots of goodies!  I chose three of the dies to cut the flower/greenery stems from Basic White cardstock.  Then I cut one of each of the butterflies also.

Using my Blending Brushes and Fresh Freesia, Highland Heather, and Soft Succulent inks, I added color very lightly to the flowers, stems and butterflies.  This color is fairly light on all of the pieces.  The Highland Heather on the carnation(?) and the butterflies ended up a little darker than I had in mind, but I think it works great now that it's finished.

Each of the flower/greenery stems were attached to the card front with adhesive.  All of the stems were a little too long, but they were easily trimmed with my Paper Snips before attaching to the card.

The butterfly on the front is attached with a small strip of the Dimensionals.  This is put on the body area only so the wings are free.

Iridescent Pearls were added to the butterfly body for an accent.  Another three of the pearls were scattered around the card front.

For the inside sentiment on this card, I chose a favorite from the Charming Sentiments set.  It's stamped with Soft Succulent ink to match the front.  The extra butterfly I made is attached next to the sentiment.  The adhesive is only under the body, so the wings are somewhat loose.

Like I mentioned earlier, I wish you could see this card in person.  The soft colors and how they blend together is gorgeous.  I'm so happy with this card.  It's sort of white on white with a blend of soft colors to enhance it.

Thank you for hanging out with me today.  I hope you had a chance to see all the lovely cards that have graced my mailbox in the last few weeks.  If not, check the post that's directly before this one.  It's worth it to see these wonderful cards.

Oh yes, there is a new Host Code available for you to use too.  If you're placing an order, I would greatly appreciate you using the code.  Thank you so much!

Happy stamping and creating,
Sharon

Tuesday, January 3, 2023

Dainty Flowers Bouquet of Cards

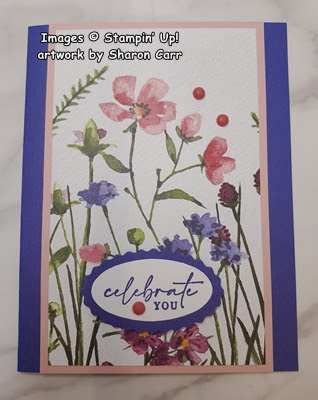
 Hi Friend!  Glad you made it back here today.  I'm so excited to share an assortment of cards that are made using only one sheet of the new Dainty Flowers Designer Series Paper.  And guess what?  The DSP is free and only available during Sale-a-bration!  My suggestion is to make sure this is your first pick of Sale-a-bration items.  It's simply gorgeous and I'm thinking it probably won't be available for the full two months of Sale-a-bration.  In other words, it's gonna sell out sugah!  (That's said with a southern accent.)  Silliness aside, it is really a winner!  Let me show you my first session with this gorgeous paper.

This is using just one sheet only, and there's even a strip of DSP left over to make another card or two.   Love it!  The flowers are done with watercolors and have a nicely realistic look.  It feels just like walking through an English country garden.
I'll start out with the very easiest one to make.  The sheet of DSP was cut at 5 1/2" x 12" first.  Do this to cut both sides and you have a strip of DSP from the middle for other cards, or you could make smaller strips to go inside your card.  Then cut the large pieces into 4" sections.  Thus 6 card pieces ready to go as is or make a few adjustments as needed like I did with the other cards.  Let's create!  

The first two pieces I used seemed to have the largest amount of Rich Razzleberry in the flower colors.  I cut the Rich Razzleberry cardstock to measure 8 1/2" x 5 1/2" for each card, scored and folded in half.

The DSP was attached to the card base with adhesive.  The Double Oval Punch was used to punch both Basic White and Crushed Curry pieces for the sentiments.  Some of the sentiments used are from the coordinating stamp set Dainty Delight.  This one is not - it's from the Botanical Layers set found on page 93 of the Annual Catalog.  It's stamped in Rich Razzleberry ink.  The sentiment is popped up on the card with Dimensionals.  A sprinkle of Rhinestone Basic Jewels was added, and it was done. Ok, that's two cards made. Can't get too much quicker for card making than that, can you?

The next two cards have a base of Crushed Curry cardstock this time.  I added a 5 1/4" x 4" layer of Old Olive on these two cards.  That necessitated trimming the DSP 1/4" on one side and the bottom to fit.

Don't remember what set this sentiment comes from.  I was just looking for something long and very skinny here.  It's stamped on a 1/2" strip of Basic White with Mossy Meadow ink.  The one end was flagged with the Banner Pick a Punch.  A 3/4" strip of Vellum was also flagged on the end and attached under the sentiment to help it stand out more.  This time some of the Brushed Brass Butterflies were added to the card for interest.

The other Crushed Curry card used a different sentiment from the Dainty Delight set.  It was stamped on Basic White with Mossy Meadow ink and punched out with a retired ticket punch.  This is layered on a Crushed Curry scalloped oval that was punched with the Double Oval Punch.

For these last two cards, I changed up the cutting again.  I started with a card base of Orchid Oasis cut at 8 1/2" x 5 1/2".  A layer of Blushing Bride was cut at 5 1/2" x 3 1/2".  That means the DSP layer needed to be made smaller and now measures 5 1/4" x 3 1/4".  It's attached to the card base with adhesive.  On this card the Double Oval Punch was used again to punch out both the Basic White oval and Orchid Oasis scalloped oval.  The sentiment is from the Dainty Delight set and stamped with Orchid Oasis ink to match.

The bling on this card is the 2022-2024 In Color Matte Decorative Dots found on page 141 of the Annual Catalog.  These Dots have gradient colors, and I chose the lightest of the Sweet Sorbet colors.  They matched nicely with the rosy-hued flowers on this section of the DSP.

Ok, that's it.  All six cards made in one short afternoon.  I think they're all lovely and I will have no problem mailing these out when needed.  I love how the color changes with the cards and the sentiment changes too really make the cards interesting.  As I have them all sitting here in front of me, it's hard to remember they all came from one sheet of Designer Paper.  Like I said earlier, make sure you choose this for your Sale-a-bration freebie early on.  It only requires a $50 purchase and it's yours.  Happy shopping!  And when you shop, please consider using the Host Code shown at the top of the blog page.  I really appreciate that.  Everyone that places an order with me will be getting a card to thank you.  I'll leave the inside blank so you can use it yourself!  Thanks so much!

Happy stamping and creating,
Sharon