Showing posts with label Stitched Greenery Die. Show all posts

Sunday, March 19, 2023

Sweet Citrus Lemons

Hello and a happy Sunday to you.  My goodness it's cold around here.  It was only 32 degrees when I got up this morning and I've been chilled ever since.  Brrrr.  My grandsons and family are in Atlanta for a baseball tournament the boys are playing this weekend.  Wish I could be there with them.  They are playing well and have won most of their games so far.  Yay team!!  What's that you said?  You didn't come here to hear about boys and baseball?  Oh, okay, we'll go back to talking card-making, all right?  

It all started when my friend Diane sent me a card last week that was just covered with lemons.  It was so darn cute it inspired me to get out my Sweet Citrus Stamp, Dies, and Hybrid Embossing Folder to create yesterday.  That was so much fun!  That suite of products is wonderfully coordinated, and you can find them all on page 49 of the January - April Mini Catalog.  You can use just part of it, or all 3 parts of it together.  Hope you like the card I made and get inspired to stamp some lemons too!

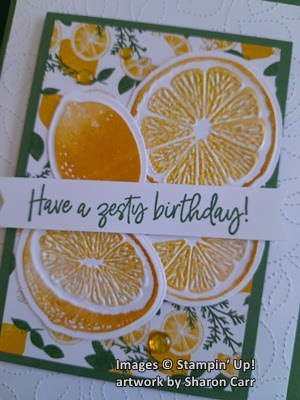
Here's my citrus-y card I'm sharing today.  I love how it turned out, especially the shine on the cut edges of the lemons.  It really is hard to get a picture of a shiny finish, but take my word for it, it has just enough shine to look juicy.  Almost makes my mouth pucker!!

I remembered one of the prints in the Tea Boutique Designer Series Paper (in the Annual Catalog) has lemons on it.  I thought it would be the perfect backdrop for these lemons I was going to stamp.  The colors I chose are those listed for the DSP, so it was an easy pick.

The card base is Garden Green and measures 8 1/2" x 5 1/2".  It's scored at 4 1/4" and folded in half.  The first layer is Basic White that measures 5 1/4" x 4".  I cut two of these, so I'd have one for the inside also.  The piece for the card front is die-cut with the Stitched Greenery Die to give it an all-over subtle design.  When it was attached to the card front with adhesive, the rough side (back) of the embossed paper is face-up.  This is for one of the shut-ins at church that will have her 90th birthday in a couple of weeks.  I've been told most of these shut-ins like to feel the cards, so layers and textures are a big deal.  I guess I'm still learning stuff every day!

The next layer is Garden Green again.  It measures 3" x 4 1/4".  The lemony layer of Tea Boutique DSP is cut at 2 3/4" x 4".  The two pieces are attached together with adhesive. 

Now comes the lemons!!  Since the DSP listed Crushed Curry as the yellow color on the paper, that's what I went with.  The outside of the lemons was stamped first onto Basic White cardstock using the Crushed Curry ink.  It looked kind of dark to me, so the inside of the lemons was stamped with Daffodil Delight to be a lighter color than the rind.  I really like how it turned out.  It's still darker than a real lemon, but the colors worked well with the DSP print.

For the cutting and embossing, I placed the die inside of the embossing folder.  It just nestles in there perfectly.  Then looking through the folder, the stamped images were lined up.  I used some washi tape to hold it in place, then ran it through the die-cutting machine.  I was so tickled when I had those cute little lemons in my hands.  They are so cool!  

After cutting the pieces, they are arranged onto the DSP layer.  After getting them placed how I like them, they were attached with just adhesive.  At this point, I used Wink of Stella on just the juicy areas on the lemons.  Can you get a look at the shininess a little better here?  I love how it shines when the light hits it just so.

The sentiment is from the Sweet Citrus stamp set also.  It's stamped with Garden Green ink on a 5/8" x 3 3/4" strip I had left over from some other project.  The ends of this were punched with the Banners Pick A Punch to finish them nicely.  There are four Dimensionals behind the strip to attach it to the focal layer.  Then this whole layer was attached to the card front with Dimensionals too.

Definitely needed some special bling for this card.  I used three of the Glossy Dots Assortment found in the Annual Catalog.  These are the Daffodil Delight color and look great with the colors on the card.  These dots are not faceted but pack a big shine factor, so seemed just right for this card.

The card is finished off inside with the extra Basic White piece I cut earlier.  I had a 1/2" wide strip of a different print of DSP from the same Tea Boutique pack.  I love that it's the same color as the front, but the loose plaid look is a great contrasting accent piece.  

The sentiment is from the Charming Sentiments on page 38 of the Annual Catalog, but I didn't used the dies that coordinate with it this time.  It's stamped with Garden Green ink to match the card.  And that's it.

I'm so tickled with the way this card turned out.  I hope the lady that receives the card will enjoy it.  And a big thanks to my friend Diane who inspired me to make some lemons into lemonade!  It really hit the spot!!

Thank you for sharing some of your day with me.  It's been a quiet day with not much going on.  These relaxing days are just perfect for me to get a card posted on my blog.  When the days are too crazy, I can't seem to think straight enough to make sense when I write.  And that's when I make mistakes.  If you ever find a mistake, please be sure to let me know so it can be fixed.  And I'll apologize now for any mistakes you may find.  I usually re-read the post 2-3 times to catch any problems.  But you know how those pesky little mistakes like to hide until it's too late.

Have fun stamping and creating,
Sharon

Thursday, March 10, 2022

Sweet Bunny Card

Hello Friends!  Hope you're having a great day today.  It's gray and rainy today, so I thought I needed to share something soft and cuddly with you.   This sweet little bunny just makes me smile, and I hope you like it too.

When making this card, I was planning on it being an Easter card.  But now that it's finished, I think it would make a terrific card for a little girl's birthday or even for a new baby.  The colors just shout out to me babies and little girls.  What do you think?

The card starts out with a cardstock base of Petal Pink that's cut to 8 1/2" x 5 1/2", scored and folded in half.  The next layer is Mint Macaron that's cut 4" x 5 1/4".  To give this layer some added interest, it was die-cut with the Stitched Greenery die.  I love the delicate stitched lines that remind me of the stitching designs in quilting.  This would be so pretty on a quilt, wouldn't it?  It's adds such a great background for so many different types of cards from outdoorsy to sweet.  Just changing the cardstock used makes all the difference in the world.  
After running it through the machine, it was added to the card base using Dimensionals. 

Next is a layer of the Friendly Hello Designer Series Paper that was available during Sale-a-bration.   If you were lucky enough to get this DSP and stamp bundle, I hope you're enjoying it.  It's definitely a big favorite of mine!  This print is Petal Pink and white and just the sweetest look.  I paired it up with the Stitched So Sweetly dies for this card to get a lovely, scalloped-edge layer.  This is the 2nd largest die in the set.

To match this, the next smallest die was used to die-cut a Basic White piece.  This is the perfect size to stamp this sweet bunny.  The bunny is from the Easter Friends stamp set in the 2022 January-June Mini Catalog and is found on page 36.

The bunny was stamped with Gray Granite to keep it a soft look.  A little Basic Black Stampin' Blends was dotted in on the eyes to make them more defined.  And just a small touch of Petal Pink Stampin' Blends was added to her little twitchy nose.

I decided to angle the two layers instead of putting them on straight up in the middle to give the card a more playful look.  The DSP layer is added with adhesive, but the white layer is popped up with Dimenisonals.

This little bunny wanted a pretty pink bow to dress her up a bit.  I used the Petal Pink ribbon from the 1/8" Cotton Ribbon Combo Pack on page 43 of the Mini Catalog.  (The Misty Moonlight ribbon is very nice too and will be shared with you soon.)  The ribbon was tied into a small bow and attached at the bunny's neck with a Mini Glue Dot.

I decided not to do anything on the inside yet. I can't seem to decide just what occasion I'll be using this sweet bunny to commemorate.  But I'm sure it will be for a girl!  Maybe I should make another card right away for Easter like I was thinking of making in the beginning.  What a good idea!

Don't forget about the fabulous sale going on for the Mini Stampin' Cut & Emboss Machine at 20% off.  And the 13 different stamp and die bundles that are 20% off also.  Love the spring savings to get you going this month, but only this month!  Orders need to be placed by March 31st to get these savings.  And when placing your order, please use the Host Code shown at the top right corner of my blog page.  It would be greatly appreciated.

Hope you've been energized and inspired to get your stamps and papers out to make some pretty cards.  Isn't this the perfect card to share on a gray and rainy day?  Hope it adds some sweetness to your day.

Happy creating and stamping,
Sharon

Saturday, January 15, 2022

Another Floating Layers Card

Hello friend!   Glad you stopped by today.  We're just staying in waiting for the expected freezing rain and snow that should be coming tonight and tomorrow.  The experts have changed the forecast a few times over the last several days.  We have no idea how normal this is for the area as we weren't here last winter.  It's all going to be an exciting surprise! Just hope we don't lose power.  That's one reason why I'm working on the blog now while I still can!  Today's card is connected to the "floating layers" card I posted last Wednesday.  When I die-cut the layer from the floating layers piece I made last time, there was some left over.  I thought it was too pretty to just throw away, so...

There was just enough of the "floating layers" prepped piece left to die-cut this piece from it.  It was a tight fit to get that die on there, but I love how it turned out.  The die is from the Tasteful Layers Die set, one of my favorites.

Because of the colors on the floating layer piece, I chose Mint Macaron for the card base.  It's cut 8 1/2" x 5 1/2", scored at 4 1/4" and folded in half.  For the building layer, Crumb Cake cardstock was used.  I used a quarter sheet and die-cut it using the largest of the Scalloped Contours Dies to put the pretty lace on the edges.  Then the Stitched Greenery Die was used to make the delicate stitched detail on the layer.  This was attached to the card base using Dimensionals.

The flowers and leaves in the Friendly Hello set seemed to be the right size to use as an accent here.  I stamped the double flowers, the leaves, and the little accent flower on a Basic White cardstock scrap using Memento Tuxedo Black ink.  The coloring was done using Stampin' Blends:  Highland Heather Light & Dark, Mint Macaron Light & Dark, and Daffodil Delight Dark.  After coloring, all the pieces were cut out with Paper Snips.

The next problem was how to incorporate the "floating layer" into the card design.  (Remember, the "floating layer" is made with strips of cardstock attached to a Window sheet then die-cut into a shape.)  I checked all kinds of stamped sentiments and die-cut sentiments too.   I didn't care for anything current, so I plundered my retired stash of die-cut sentiments to find just the right one.  This is from the Well Written Framelits and was just the right size to fit the layer like I envisioned.  Every once in a while, things actually turn out the way I planned.  Woo Hoo!  Basic Black cardstock was used to die-cut the sentiment.  Multi Purpose Liquid Glue was used to attach the sentiment to the "floating  layer".  

Now that all the components were ready to go, it was time to play around with placement.  When I had a layout I liked, the "floating layer" was attached first with Mini Dimensionals placed only under the cardstock strips to hide them.  This was placed on the right side so the large flowers could be arranged to the left side.  The flowers were attached with Dimensionals.  The leaves were tucked underneath and attached with adhesive.  The small flower was tucked under the sentiment layer at the top right as an accent and attached with adhesive.

Now for the bling.  I had planned on using Black Matte Dots, but they seemed kind of heavy for the card.  I tried several rhinestones and pearls and really wasn't impressed with anything.  Then I remembered the Subtle Shimmer Sequins from the Winter Mini Catalog and tried those.  Just the soft, but not too shiny, look I wanted.  So sorry, that's two retired things I used on the card.  Yikes, I'm trying to stick with current items, but you know how it is - sometimes you just can't find what you really want for your creation in your current stash.

Guess that's enough for today's post.  I hope you give that "floating layer" technique a try.  It's really easy and fun.  And it gives a nicely different look to your card.  

Remember that Sale-a-bration is going on right now.  It ends February 28th, but don't wait until the last minute as products do sell out and you can't get them.  I'd hate for you to be disappointed and not be able to get what you'd like for free.

Well, we're still waiting to see what this winter storm is going to be like.   The rain was supposed to have started a couple of hours ago, but everything is still dry.  Hope that means it won't get too bad. While we're waiting, maybe I'll get myself downstairs and see what else I'm inspired to create.  It's always a good time to create and stamp.  Right?

Stay warm and cozy,
Sharon

Friday, November 19, 2021

Thanksgiving Leaves

 Hey there!  Hope this finds you doing well and enjoying your fall.  I can't believe it's almost time for Thanksgiving already.  Where does the time fly?  Before I get all my Thanksgiving cards sent out, thought I'd better take a picture or two and share the ideas with you.  Let's get right to it.

Staying with some warm fall colors, I started with a card base of Cinnamon Cider cardstock cut at 8 1/2" x 5 1/2" folded in half.  The next layer up is Bumblebee cardstock cut to 5 1/4" x 4".   The next layer is Very Vanilla cardstock cut to 5" x 3 3/4".  This layer was die-cut with the  Stitched Greenery Die that doesn't actually cut, but gives this lacy, leafy, stitched look.  I had used this die before, but wasn't ever really impressed because I just left it plain.  Well, this time I used my Blending Brushes and first Bumblebee ink lightly over all, and then a bit of Cinnamon Cider ink more on the outside edges.  Wow!  This added color just totally popped the stitching and I love the look!  I'll have to try this a lot more often now that I know how cool it really can be.

After adding the color, this layer was attached with MultiPurpose Liquid Glue to the Bumblebee layer, and then attached to the card front with the glue also.

I thought the bold leaves from the Stitched Leaves Die set would be a wonderful contrast to the smaller leaves of the greenery I just did.  The largest leaf was die-cut from Cinnamon Cider cardstock.  Love how the stitching on the leaves mimic the background.  I then die-cut two of the medium leaves using the 2021-2023 In Color Shimmer Specialty Paper.  This is a pretty colored vellum with a subtle shimmer on one side.  I used the Pale Papaya color and it adds a lovely shimmery look to the card.  

I wanted to add a darker color to the mix, so I die-cut two leaf sprays with the Eden Dies and Cajun Craze cardstock.  I think they create a fun addition to the mix.

The sentiment is from the Sparkle of the Season stamp set.  It contains several fall and Christmas sentiments that I've used quite often lately.  This is stamped on a  1/2" scrap of Bumblebee cardstock using Cajun Craze ink.  Then just trimmed down on the side edges with Paper Snips.

Before attaching the sentiment, I colored a length of the White 1/4" Crinkled Seam Binding Ribbon using the Dark Cajun Craze Blends.  I colored it with just a few swipes of the Blends and it dried super quick so I could use it right away.  I used about a 4" strip and folded in half then attached it under the sentiment.  The sentiment was then attached to the card using Dimensionals.

I did make several of these cards because I liked it so much.  On some of them I changed up the sentiment to this.  It's one of the sentiments in the Love of Leaves stamp set that coordinates with the dies I already used for the leaves.  I just love it when everything comes together and works out nicely without a bunch of fuss.  Now I just need to get these in the mail before it's too late!  😏

If you're placing an order soon, please consider using the Host Code shown at the top of my blog page.  It's greatly appreciated!!

Thanks for stopping by to see what I've been making.  Hope you're inspired to get out your stamps, ink, and paper and have some fun!  Just enjoy yourself and create.  It's much better than therapy and cheaper too!

Happy Autumn!
Sharon