Friday, February 16, 2024

Rocker Fun Fold Card

Hello to you on this fabulous Friday.  What a busy but very fun week it's been here - Bible study, Valentines Day, and lunch with friends.  What a jam-packed week and I loved every minute of it.  Too bad all weeks can't be as much fun!  Of course, if I was off running around every day, I'd never get anything accomplished at all!  And I really need creative time scheduled in almost every day to keep the creativity alive.  Do you find that if you are too busy to create for days on end, when you finally sit down, there's just no creative mojo anywhere to be found?  Is this just me???  Anyway, it has been a great week creatively for me, so I have another card to share.  I'd seen several rocker card ideas on Pinterest that piqued my curiosity and I had to give it a try.  For some reason I was in the mood to make a card with a little bit of quirkiness.  I need more birthday cards soon, so that's how this whole card got started.  Lucille, this one's for you!  Hope you enjoy...

Don't you love this sweet little bee?  And the movement on this card is awesome!  You've got the curved bottom, so it rocks.  Plus, the bee is on a wiggly base.  So cute!  When you try making a rocker card, I think you'll be surprised how easy it is and will want to make many more.  And one of the best parts about the card - it fits into a regular A2 envelope with no problem!

To make this card, I would really suggest having the Deckled Circles Die set.  This makes it so easy to get all the pieces die-cut to the right dimensions.  Let me give you a list of pieces to die-cut before we get started.
2nd largest - 1 pc of Basic White
8th largest - 1 pc of Basic White
11th largest - 1 pc of Basic White
13th largest - 1 pc of Basic White for the sentiment

Next, I cut the pieces of DSP for layering.  This lovely textured-looking print is rather overlooked.  It's from the Softly Stippled Designer Series Paper that is one of the Sale-a-bration free choices when you spend $50 or more.  If you haven't gotten this yet, you really should if you like soft and subtle patterns.  I've used several of these prints already and I find them very easy to work with.  Cutting sizes for the DSP is as follows:
3rd largest - cut only 1/2 of the circle to layer on the front
9th largest - 1 pc of DSP

Let's do the stamping before putting the card together.  On the second smallest white die-cut, stamp the stems from the Bee My Valentine stamp set using Parakeet Party ink - largest in the center and smaller one on each side.  Stamp the larger flower on the center stem using Sweet Sorbet ink.  Stamp the two smaller flowers on the side stems with Sweet Sorbet ink also.

On a scrap of Basic White cardstock, stamp the oval with Lemon Lolly ink.  The stripes on the bee are stamped with Memento Tuxedo Black ink.  (I had to stamp mine twice to get really good coverage.)  Punch out with the matching punch.  Then the solid wings were stamped with Pool Party ink, then the outline was stamped with the Memento Tuxedo Black ink over the Pool Party.  These were punched out also.  Lastly, I stamped the heart with Sweet Sorbet ink and the antennae with Tuxedo Black ink.  Both of these pieces were punched out with the heart part of the matching punch.  

The birthday sentiment was stamped on the smallest die-cut using the Tuxedo Black ink.  The sentiment is from the Darling Details stamp set that I've used repeatedly.

Time to put this card together.  Fold the largest white circle in half to make the card base.  Measure the 1/2 circle of DSP to fit on this and trim off the top flat area if needed.  I ended up trimming about 1/4" on mine to make it fit nicely.  At this time, I would suggest stamping the inside of your card.  I waited until it was put together and that made it harder to do.  I had an old non-SU! stamp that had a cute sentiment that fit this card, so I used that.  It's stamped with Tuxedo Black ink.

Layer the smaller DSP onto the middle Basic White die-cut.  I used "green glue" so I could get it all centered properly.  Next, attach this to the folded circle card base.  Make sure you add the tape to only the bottom half of the circle, so it only attaches to the front half of the card.  I used Tear & Tape for this because I wanted a strong, heavy bond.

The bee is attached to the card front with a wiggly base.  These can be found online, or you could just use Dimensionals to give it some height.  If you have Wink of Stella, it would be perfect to add on the wings to make them appear more sheer and sparkly.  I ran out, so I'll add it later after I can get it ordered.  (Sheesh!  How could I have ever run out of Wink of Stella?!)

The sentiment circle is attached with a Dimensional on the left side.  One of the hearts I stamped is added under the sentiment with a Mini Glue Dot.  There are three pink sequins from the Adhesive-backed Sequin Trio added to the card.  One is the larger flower center in case you can't find it.  😉

That's my version of a Rocker Fun Fold card.  I'm sure there are many ways that you can make them, but this is my first attempt.  And I love this cute little card.  I was surprised by how simple it was to make.  As long as you have the Deckled Circles Die set, it's a breeze.  Don't forget about the Softly Stippled DSP that is a Sale-a-bration item.  This paper set is truly versatile, and you'll be reaching for it on many different projects.  Thanks for visiting.  If you have any questions, feel free to contact me.  Thank you!

Happy stamping and creating,
Sharon
email:  sharoncarr50@gmail.com

Tuesday, February 13, 2024

Painted Lavender Bouquet

Hello, hello.  I can't believe the sun is finally shining again after several rainy days in a row.  I've had more than enough rain this winter.  Of course, in the middle of a dry, hot summer I'll be praying for some of that rain, won't I?  And instead of whining about the excessive rain, I should be thankful it wasn't all snow!!  Seems like we're still adjusting to things down here, but certainly loving it.  Thinking ahead to spring, I was ready to make a card with the Painted Lavender Bundle.  These pieces make a up a bouquet in no time at all.  

I haven't made a gatefold card in awhile, so that was my plan.  For a summery feel, I chose a card base of Garden Green.  This measures 8 1/2" x 5 1/2", and it's scored at 2 1/8" and 6 3/8".  Folding these two sides in should give you a nice gatefold card as your base.

There are two pieces of Soft Sea Foam cut to layer onto the sides.  These measure 2" x 5 1/4".  To add some interest to these panels, they were embossed with the Softly Sophisticated Embossing Folder which is one of the Sale-a-bration items.  I love the delicate design on this embossing folder.  Can't tell you how many times I've used it already!  After embossing, the panels were attached to the card front using "green glue" making sure they lined up top and bottom.

Next, the Basic White panel was die-cut with the Perennial Postage dies.  I used the 2nd largest die, but it was still too wide for what I wanted to do.  Taking the largest die, I placed it over my die-cut piece and lined up the postage edge cutting off about 1/2" from one side.  This worked out pretty well.  I used two bits of washi tape to hold it in place while cutting.  A second piece was cut and left the full size to go inside the card for the sentiment.

On the trimmed down die-cut piece, first there is some Soft Sea Foam ink that is added to the center of the white using a Blending Brush.   The leafy stem was stamped with Garden Green ink in this area of the card at least twice and several times using 2nd and 3rd generation stamping to fill in a bouquet shape.  This gives a good base for all the die-cut stems that are coming next.

The die with the two flower stems was used to die-cut most of the pieces.  Stems were cut from Gorgeous Grape and Fresh Freesia cardstock.  There were also a set of stems cut from the Soft Shimmer 12" x 12" Specialty Paper in the Bubble Bath color.  A smaller die was used to cut stems from Highland Heather cardstock.   A Granny Apple Green Blender Pen was used to color the stems in-between the flowers.  

They were layered up in this order: 2 Gorgeous Grape stems, 2 Fresh Freesia stems, 2 Bubble Bath Shimmer stems, and the one Highland Heather stem last.  They were all staggered as they were added so they weren't lined up like soldiers. The stems were attached only on the bottom two-thirds of each stem using "green glue".  This kept the tips of the flowers looser and more natural looking.  After all the flowers were added, the stem ends that were off the card were given a trim with Paper Snips.

Butterflies from the Painted Lavender set were stamped with Gorgeous Grape ink on Basic White cardstock.  They were die-cut with the matching dies from the set and attached with Mini Dimensionals.  The sentiment from Darling Details was stamped with Gorgeous Grape ink onto a Basic White strip.  The smallest Perennial Postage die was used to cut it out.  

The left half of the lavender bouquet label has two strips of Tear & Tape added to the length.  Then it's attached to the center of the card front.  Make sure there is no adhesive on the right side of the label, or it will be glued closed.   And you don't want that!  The birthday label is attached with Dimensionals under the left side only so it's free on the right edge.


The 2nd die-cut label has a faint blush of Soft Sea Foam ink added to the center with a Blending Brush.  Now it's ready to stamp.  I used a sentiment from Everyday Details stamp set.  It is stamped with Gorgeous Grape ink.  Those butterflies that were used earlier are now stamped inside the card with Highland Heather ink, so they are lighter than the sentiment.  The layer is attached in the center of the card with "green glue".
The final touches on the card are the Purple Fine Shimmer Gems.  These are so pretty and there are three different colors of purple in this set.  I used one of each of the colors on my card.  They all matched with the multiple purples I used for the lavender stems.  Can you find them tucked in the design?  There is also a double bow made from Linen Thread.  It's attached with a Mini Glue Dot.

That's my first attempt at creating with the Painted Lavender set.  It's kind of funny that there's almost no stamping on the card, but still a lot going on.  I'll have to try stamping those gorgeous lavender stems the next time around.

Thanks for stopping in to see what's new.  If you're looking for a demonstrator, I'd love to fill the position.  Don't forget the month of February is almost half over so that means Sale-a-bration is almost over too.  I don't want you to miss out on one of the fun Sale-a-bration items for you to earn free.  If you don't know how that works, feel free to contact me.  I'd love to help.  

Hope you enjoyed and were maybe inspired to give this idea a try.  It was fun creating with all of these purple shades on one card, and I love how they look together here.   Today was definitely a creatively fun day!

Have fun stamping and creating,
Sharon

Sunday, February 11, 2024

Diagonal Split Card

Hello my friends on this dreary Sunday afternoon.  It's been so nice lately, well cold but nice anyway.  We've been spending a little time outside looking at all the work that needs to be done in the spring.  I noticed the squirrels have been digging up my iris bulbs, so I don't really know what we have left from all that we planted last year.  I have to say, the squirrels around here are certainly well fed.  They watch for us to put out the seed for the birds and get munching on it before the birds even notice it.  Needless to say, their antics are keeping us entertained.   So, all was that said to let you know I've been slack on getting these posts out lately.  In case you haven't noticed!  😉  Ok, enough with the silliness and on with the card making.  I'm sharing two cards today, because this technique gives you two cards for the time and effort of making only one.  

These two cards are made with the lovely Sale-a-bration freebie - Softly Stippled Designer Series Paper.  I hope you've gotten your hands on this paper because it's gorgeous!  The colors are soft and bright and make up into eye-catching cards.  Let's make these two together.  First I'll share the Wild Wheat card on the right and finish with the Lost Lagoon card on the left.
The card base is Wild Wheat that measures 5 1/2" x 8 1/2".  It's scored and folded in half. Next up are the DSP layers.  I cut two pieces of the stippled blue and green design the same size which is 4" x 5 1/4".  I put them back-to-back for cutting the diagonal piece.  Measure up 2 1/2" from the bottom left.  Cut from that mark to the corner of the bottom right.  Now you have a choice to make - switch the two pieces so you have one floral print and one fairly solid piece in both sizes, or flip the one set over to have the diagonal going in the opposite direction.  I didn't like the combo with the larger solid piece and the floral print smaller piece, so I turned them over and made the other card.
 
The two pieces are attached to the folded card base with "green glue" making sure that the pieces are straight and meet on the cut line.  I thought the design needed more definition to separate the layers, so a 1/4" strip of Pretty Peacock cardstock was attached over the diagonal seam.  This is also put on with "green glue".

The focal point items used for this card were the Perennial Postage stamp set and dies, Stippled Roses stamp and die set, and the Heartfelt Hexagon stamp set for one of the sentiments.

First the postage die was used to cut a Basic White piece.  Then a piece of Pretty Peacock cardstock was cut 2 1/8" x 2 7/8" to closely frame the die-cut.  The sentiment from the Heartfelt Hexagon stamp set was stamped on this with Pretty Peacock ink.  It's positioned a little higher than the middle so there's plenty of room for the rose.

The rose and extra leaves are from the Stippled Roses set.  They're stamped with Pretty Peacock ink onto Basic White cardstock.  I used a Blender Pen to define the rose some in the shadows and to add a bit of Old Olive ink very lightly to the leaves.  I didn't want to lose the Pretty Peacock edges on the leaves.  After stamping they are die-cut with the matching dies in the Bundle.  

The sentiment was attached to the card with Dimensionals.  Then the leaves were attached under the rose with adhesive.  Then the rose was attached to the label with adhesive and a Dimensional was placed under the leaves to hold them up.  The three little sequins are Pretty Peacock color and come from the Adhesive-backed Sequins Trio found in the Annual Catalog.

I made several changes while creating this card.  The card base was changed to Lost Lagoon.  Because I liked the floral print being the larger part of the card front, the diagonal goes in the opposite direction.  The layers were attached the same and the 1/4" strip of Pretty Peacock is the same.

For the focal point, I chose a smaller die from the Perennial Postage die set to fit the sentiment.  The sentiment this time is from the Perennial Postage stamp set.  It's also backed with Pretty Peacock cardstock and stamped to match.

The leaves are cut from both Lost Lagoon and Pretty Peacock cardstock.  The dies are from the Stippled Rose Die set.  These pieces have so much detail on them that they make quite an interesting accent.  The two larger pieces are attached behind the label, with the bitty piece attached on top.  The label is attached to the card using Dimensionals.  

The pretty faceted gems are one of the Sale-a-bration items also, but it's very easy to miss.  I love this soft Pool Party color as an accent on this design, and the facets give the gems a surprising sparkle.  

Hope you enjoy this way of making your Designer Paper really take center stage as the main attraction.  Sometimes these prints are just too pretty to hide behind a lot of layers and doodads.  At least, that's my humble opinion and I'm sticking to it.  

I had fun making these two cards.  It's not quite how I had planned to make the cards.  The second card really should have had the mostly solid print on the top and only the small triangle for the floral print.  After playing around with the design, I'm so happy I flipped it over and went in this direction.  Give this a try with one of your favorite DSP prints and let me know how it worked out for you.

The month of February is almost half over already.  Where does the time go?  If you've still got plans to get some of those Sale-a-bration items, don't put it off and get disappointed.  

Thanks for stopping in and sharing your time with me.  It's always wonderful to read any comment you might want to leave for me.  I love hearing from you.  Hope your Valentine cards are all made and in the mail.  Hope all my cards arrive in time so you know I'm thinking of you!

Happy stamping and creating,
Sharon


Tuesday, February 6, 2024

Gorgeous Garden and Bird Card

Hello, hello!  What a fabulous day today!  We had so much fun last night at "Groovy Grans".  Last night, I helped twenty-some ladies make the Valentine cards for the shut-ins from church.  Everything was cut, punched, stamped, and ready to put together.  Most of the ladies had never put a card together or even knew how to use a tape-runner or Dimensionals.  Oh boy!  The whole experience was interesting to say the least.  But everyone had fun and the cards were all made, signed, and in their envelopes by the time we were finished.  Many of them said how much fun it was, and they'd like to do this again some time.  What a wonderful feeling it is to introduce friends to the magical art of turning plain paper into beautiful cards!  

Anyway, let's get back to today's card.  Yesterday I shared the framed window card that has a die-cut window.  So, what do you do with those pieces you cut out?  There is absolutely nothing wrong with them.  In fact, they are wonderful labels that need a little love and should be used for something special.  Here's what I did with yesterday's leftovers.

Here's the finished card.  I think the softer Bubble Bath, purples, and greens on the card make a striking contrast to the Blueberry Bushel card base.  The look of this card just perks me right up.  To make this card, start with a piece of Blueberry Bushel cardstock that measures 5 1/2" x 8 1/2".  It's scored and folded in half. 

 A quarter sheet of Basic White cardstock was die-cut with the Gorgeous Garden dies.  After cutting, a small amount was trimmed from each side so the frame looks equal on all four sides.  The top and bottom go right out to the edges of the card.  Small amounts of "green" glue were used to attach this to the card base.

Now we come to those labels that were leftover.  These come from the Scalloped Contours Die set.  The Bubble Bath label has the sentiment stamped on it using Blueberry Bushel ink.  This sentiment comes from the Softly Sophisticated stamp set that is one of the Sale-a-bration items.  Love, love, love this set!  This layer is attached to the Basic White layer with adhesive.

The bird is from the Flight & Airy Designer Series Paper that is a Sale-a-bration item too.  These little birds are all adorable.  One of the pieces of the DSP is covered with water-colored birds like this one.  There isn't a die for them, but they're easy to fussy cut.  I sat down and cut one full sheet of birds so now I have a whole pile of birds to choose from when I need an accent.  I thought this little guy's coloring went perfectly with the Bubble Bath and Blueberry Bushel used on the card.

Here's where it gets a little confusing.  Right now, SU! is offering for purchase an add-on die set if you're a Paper Pumpkin subscriber.  This die set is such a perfect little set.  The word 'love' is one of the pieces, and these leafy branches is another die.  There is also a label and a daffodil in the set.  Just perfect for spring.  If you're thinking on trying a Paper Pumpkin kit for spring, now is the time to sign up for it.  And then you can purchase this little add-on set too.  

I die-cut two branches from Soft Sea Foam and one from Shaded Spruce cardstock.  The light green was just too light for me.  So with a Blending Brush, a little bit of Shaded Spruce ink was added to the tips of the leaves to add some extra color.

The branches were arranged on the label and then attached with adhesive.  The bird was attached with several Dimensionals.  Then the labels were attached to the card front with more Dimensionals.

For added bling to really make this card pop, three of the Iridescent Basic Jewels were added.  These are found in the Annual Catalog on page 140.  These rhinestones tend to pick up any color you're using and really draws your eye in to the design.

The inside of the card is finished off with a layer of Basic White that measures 5 1/4" X 4".  The sentiment is another from the Softly Sophisticated stamp set.  It's stamped with Blueberry Bushel ink.

The little flowers at the bottom of the page are a two-step flower from the same set.  The greenery is stamped with Soft Sea Foam ink and the flowers are tucked in and stamped with Bubble Bath ink.

That's it for this sweet card.  I was really happy with how the mix of colors turned out together.  It's funny how I can try several colors and they just don't really catch my eye.  Then I run across a color that just sings to me.  I love stamping and creating.  Most times I have an idea of what I'm making when I sit down to stamp.  Sometimes I follow directions to a T and know exactly what I'm getting in the end.  Other times, hmmm.  Well, let's just say by the time it's finished most of the idea was thrown out the window and I have something so much better.  I think the whole creative process is so much fun.  You never know just what the finished card will be!

Thanks for reading through my rambling today.  I should blame it all on the sunshine - I want to be putzing outside!  Hope you have a glorious day and find some time to be creative!

Happy stamping and creating,
Sharon

Monday, February 5, 2024

Framed Open Window Card

Hello there.  Last week a friend asked me to explain how to do a Framed Open Window card.  After trying to explain it, I figured it would be easier to actually make the cuts for the card and text her the pictures.  That was fine, but I had this card base ready to go and it was just sitting there.  So, today was the day I finished up the card.  I figured I might as well post it in case anyone else doesn't know how to make it.  There are probably other ways to make this, but this is what I have found to work.  Hope it all makes sense to you.

This is where I start making the Framed Open Window card.  This measures 4" x 5 1/4" on the outside edge.  The inner part is die-cut with the 2nd largest die from the Scalloped Contours Die set.  Carefully center this on the layer before cutting.  I used two small pieces of washi tape to hold the die in place.  After die-cutting, the piece was embossed with the Softly Sophisticated Embossing Folder which is part of a free Sale-a-bration item.  I love the delicate design on this embossing folder and have used it very often already.
The next step is to place the die-cut layer onto the folded card base.  For this I used Bubble Bath cardstock.  It's already folded so I have the parameters for placing the white layer.  The 3rd largest Scalloped Contours die is placed inside the window and centered inside the white piece.  This die was also tacked down with washi tape to hold it in place while cutting.

TIP:  Sometimes washi tape can be too sticky to remove easily after using.  To help this, I usually tack it to my jeans 2-3 times to lessen the stickiness.  This helps when removing the tape, so it doesn't rip the cardstock.

After all the die-cutting and embossing is finished, the layer was attached to the Bubble Bath card front using "green" glue.

For finishing my card, I used the Darling Details Bundle found on page 68 in the Annual Catalog.  The large fluffy flower and the daisy-style flower were both stamped with Bubble Bath ink.  First the detailed layer was stamped with the ink full-strength.  Then the solid layer was off-stamped before stamping it over the flower details.  The leaves were stamped with Lost Lagoon ink.  The three-leaf cluster solid stamp was off-stamped first, then the veining was stamped full strength over this.

The tiny flowers which are also part of the set were stamped with Boho Blue and Berry Burst inks.  These colors were off-stamped to keep them a lighter tone to blend with the rest of the card.  Everything was die-cut with the matching dies in the bundle.  

All of the flowers and leaves are positioned on the rim of the opening.  The two larger flowers are attached first using Dimensionals in the center of each flower.  The single leaf is cut apart from the other two.  They are tucked in under the flowers.  The little flowers are tucked around the arrangement and attached with Mini Glue Dots.  

The inside of the card has a 4" x 5 1/4" layer of Basic White cardstock.  The sentiment from the Courage & Faith stamp set was stamped inside the window using Basic Gray ink.

The butterfly comes from the Paper Butterfly Accents in the Mini Catalog.  These are so pretty by themselves, but I decided to add a little color to the outer edges of the wings.  Using a Blender Brush and Berry Burst ink, the color is added very lightly and built up to the intensity that I wanted.  The center stayed white.  It was added to the card front using two Mini Glue Dots in the center.

For the finishing touches, the Iridescent Pearl Basic Jewels were tucked around the floral accent.  Three extra pearls were added to define the butterfly body.  

So, I still have the cut-out pieces from this card.  That will have to be the next project on my to-do list.  Still thinking on what I should make using those pieces.  

Don't forget about all the offerings available now for Sale-a-bration.  Time is fleeting and you don't want to miss out on those fabulous choices.  I've been loving both the Flight & Airy DSP and the Softly Sophisticated stamp and embossing folder bundle.  I tend to grab both of those often when the creating bug hits.  Both are turning into must-have items for me.

Thanks for hanging out with me today.  If you haven't made one of these cards before, you should give this a try.  You can use any shape of die for the window, as long as there are two consecutive sizes that work together.  A really good set of dies for this type of card would be the Stylish Shapes Dies.  Let me know if you try these.

Happy stamping and creating,
Sharon

Saturday, February 3, 2024

Simply Elegant Card

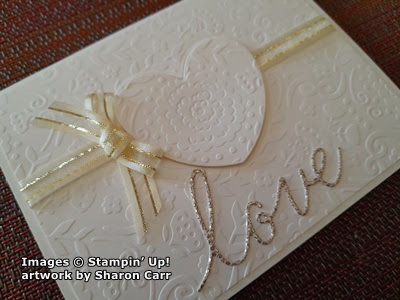
Hello friends!  Here we are in February and it's already sneaking on by.  I need to slow things down somehow so I can catch up.  It's a gorgeous day and we had the grandsons overnight.  Such fun playing UNO and dominoes with them.   Lots of silliness!  Before they came over yesterday, I was working on another card that could be a Valentine, or wedding/anniversary card.  I think it turned out really nice and elegant looking.  I hope you like this card and give it a try.  Believe me, it's very simple to make but packs a nice wow.

I think Very Vanilla always looks more elegant on cards, but that's my humble opinion.  So that was the starting place.  The card base is Very Vanilla that measures 8 1/2" x 5 1/2".  This is scored and folded in half.  Another piece of Very Vanilla was cut at 4" x 5 1/4".  To give this layer some texture and interest, it is embossed with the Countryside Blossoms Embossing Folder.  I tried to keep the central flower right in the center of the piece.

After embossing, I die-cut the heart out from the center using large heart from the Hooray for Suprises Bundle (pg 36 in Mini Cat).  This open-work die was perfect for seeing where to line up the embossed design inside the heart.

Next, I took a 6 1/2" length of the Gold & Vanilla 3/8" Ribbon and laid this across the front of the card and attached the ends in the back.  This makes the ribbon go across the cut-out heart shape, but it'll be hidden behind the heart.

The entire layer was attached to the folded card base using "green glue".  I wanted to make sure the layer and ribbon stayed in place.  The die-cut heart was centered over the hole and attached with several Dimensionals.  A length of the same ribbon was tied into a small bow then attached right next to the heart using a couple of Mini Glue Dots.  

Lastly was making the sentiment.  The love comes from a Paper Pumpkin add-on called The Love of Spring.  If you're a Paper Pumpkin subscriber, you can order this right now.  If you'd like to become a subscriber even for only a month so you can get this die set, I can help you with that.  Or there is a section on the Online Store where you can sign up.  Gotta tell you, I love this little die set and will probably use it often.

I die-cut the sentiment from a specialty paper called More Dazzle.  This can be found in the Annual Catalog on page 127.  The sparkle of this paper makes a lovely accent.   After die-cutting, I just peeled the backing and attached it to the card.  Easy Peasy!  

Can you believe that's all it takes to make this 'love'-ly card?  It really doesn't get much simpler than this.  Plus, you're getting this elegant card when you're done.  

Hope you liked this simply elegant card today.  Let me know if you try making this either as is or with your own special twist to it.  I love to hear from you!

Just a reminder about the added items available during Sale-a-bration.  If you haven't seen them yet, go to the previous post for the listing. Time is running out, but I bet you already know that.  Let me know if you need help with anything.  I'd be pleased to help you out.

Happy stamping and creating,
Sharon

Friday, February 2, 2024

More, More, and Even More!

Hello my friends.  Great news today.   I mentioned that Stampin'Up! was going to make changes to the Sale-a-bration free items and did they ever!  There are 10 more items added to the list for you to choose!  Check it out down below.  If you have any questions, feel free to contact me through email at sharoncarr50@gmail.com.  Or you can text me at 313-407-0750.  Please don't call as I don't answer any calls that I don't know the number because we've been totally inundated with spam calls lately!  Thank you!  Have fun shopping...