Thursday, February 27, 2025

Pick A Season Card

Hello stampers!  I've got to get a quick post in today.  I wasn't going to share these, because I'd just quickly made them for my own use.  But since the Pick A Season stamp set is a Sale-a-bration freebie, I wanted to let you see these before the set is no longer available.  Like I said, these cards were for my own consumption for a couple of ladies in Sunday School who have been under the weather. I used several items that are retired, so you get a mix of old and new.  There is nothing out of the ordinary about them.   But I did have a small problem.  It seems I don't have any St. Patrick's Day stamps, so this little tree is stepping up and letting me decorate it for the holiday.  So that's why these little cards are being shared today.

Even though these were super quick to make, I think they turned out cute.  The card base is Shy Shamrock cardstock.  Quite fitting I'd say!  The size is 8 1/2" x 5 1/2".  It's scored and folded in half.  

The watercolor wash looking layer is a piece from the Bloom Impressions Designer Series Paper which is another Sale-a-bration item.  Cool, two items on one card.  The DSP piece measures 4" x 2 1/2".  

It's layered onto a piece of Shaded Spruce cardstock for definition between the two colors. The Shaded Spruce cardstock measures 4 1/4" x 3".  They are layered together with "green glue".  Then this is layered onto the fold card base right about across the center.  It's attached with "green glue" here too.

The focal piece is stamped onto a piece of Basic White cardstock.  This measures 3 7/8" x 2 5/8".  You could make the piece a little bigger if you don't like dealing with the odd 1/8" measurements.  This is just a piece I had in my "cut pieces stash".

The first item stamped is the trunk of the tree.  It's stamped with Pecan Pie ink about 3/4" from the bottom.  (The next one I made, I put this a 1/4" higher to not leave quite so much white on top and give you more room for the grass.)

Next, the leaves were stamped above the tree truck.  They're stamped with Shy Shamrock ink.  While I had the Shy Shamrock ink out, the grass was stamped multiple times to give it a base for the tree.

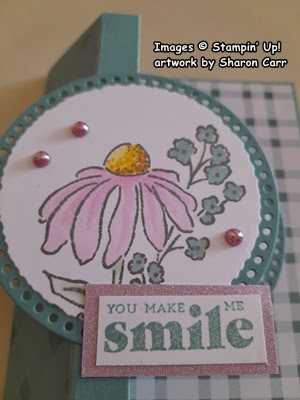
The stamp with 3 clover leaves is part of the set.  These were stamped with Shaded Spruce ink, so they show up nicely among the leaves.  Don't they fit in the open spaces just right?

I didn't have a current sentiment to use on the card, so I dug the Lovely Friends set out of hiding and used it once again.  This little stamp fit so nicely in the open area.  It's stamped with Shaded Spruce ink to match.

At this point I was planning on putting a layer underneath the white layer.  After trying several ideas, I realized I liked it just plain and simple with no more layers.   Sometimes less is the better option.  It's attached to the center of the card using Dimensionals for lift.

I remembered these teeny tiny flower accents from a year or two ago.  I seem to have a bazillion of these little flowers, so why not use them.  I thought they would be a good accent for this all green card.  I love the addition of both the color and interest.  Each of these tiny flowers were attached with a Mini Glue Dot.  What a lovely finish to my St. Paddy's Day card.

After making two of these, I thought they turned out cute enough to send to the shut-ins from church.  So, I've cut enough cardstock and DSP for another 22 cards.  We'll be getting together next week to make these.  Hope all the recipients with enjoy them.

And I hope you liked this card idea.  When I saw this Sale-a-bration item, I knew I had to get it.  I love that it has an assortment of stamps to fit the openings in the leaves.  This means you can do everything from hearts to flowers and shamrocks to eggs.  There are even some extra leaves if you just want a plain tree.  What fun!  Lots of possibilities.  I've always enjoyed these types of stamps that you can change around to cover several seasons.  Very versatile.

Thank you for sharing your time with me today.  If you haven't got this set yet and you really want it, you only have until the 28th.  So, hop to it and don't delay!  (hmmm, maybe I could add a bunny under the tree?)  But I digress.  I do appreciate your time and also your orders.  Thank you so much!

Happy stamping and creating,
Sharon

Wednesday, February 26, 2025

Toadstool Gardens DSP is Leaving

 Hello, my stamping friends.  I don't know about you, but mushrooms are not my favorite food.  In fact, I can't stand them.  Yuck!  But, this Toadstool Gardens DSP that is a Sale-a-bration item is another story.  The colors on the prints are so cute and happy.  They just make me want to smile.  What's not to love about this?  There's only one problem that I can see.  It won't be around for you to get after the end of February.  That's it, folks!  So, before it's time to put away, I wanted to share one of the cards I made using this paper.  The card also showcases the Everyday Arches die set that's available as an Online Exclusive item.  The lovely arched dies are a fun change-of-pace from all the rectangles and circles.  Just something different to use to play and create.

I chose to make an easy fun fold card that showcases two of the prints available in the pack.  Fresh Freesia cardstock was used for the card base.  It measures 7" x 5 1/2".  Then it's scored at 4 1/4" and on the score line.

Next comes the Toadstool Gardens DSP.  The cute little print on the card front measures 5 1/4" x 2 1/2".  After cutting, this was attached to the front flap with "green glue".

There is an inner layer of Basic White cut that measures 5 1/4" x 4".  And an inner piece of DSP that measures 5 1/4" x 1 1/2".  

The striped DSP strip is attached to the Basic White cardstock piece.  It's lined up carefully on the right edge so none of the white shows.

The sentiment is found in my favorite set, Hugs for Love.  This is stamped with Fresh Freesia ink onto the white section of the layer.  Then it's attached inside of the card with "green glue".  Make sure the top and bottom edges match up with the front layer.

As you can see, I fussy cut three different mushrooms from another one of the print pages.  They don't exactly match the front DSP images, but they fit in ok.  They're all attached to the bottom of the white layer using "green glue".

Now, let's go back to finish up the front of the card.  I liked the idea of the front flap being one of the arch die-cuts.  The 5th smallest die was used to cut a Basic White piece for the sentiment layer.

The sentiment used here is from the Softly Said stamp set.  It's stamped with Fresh Freesia ink.  I like how it filled up most of the space on this layer.  

I tried several different ribbons, twines, trims etc. to add to the layer, but most of the ribbons just melted into the background and didn't give the card a striking look.  Then I tried this black & white checked ribbon.  It was thin enough and packed just the pow the card needed.  A length is wrapped around the arch and tied in a small knot in the center.  I don't usually tack down my ribbons.  I like them loose.  But this time, the ribbon really needed to stay exactly where it was.  A Mini Glue Dot was tucked under the knot of the front and another one tucked in the middle of the ribbon in the back.

Carefully place Dimensionals under the layer only on the left side that will attach to the card front flap.  (I marked the backside of the flap lightly with a pencil to give me an idea where I wanted the Dimensionals)  The curved right edge comes to almost the right edge of the card when closed. 

The last step is adding the pretty gems.  These are the 2024-2026 In Color Shimmer Gems.  I thought they were the perfect accent.

There you go.  This is such a quick and cute fun fold.  Any shape would probably work for the label on the front.  Just find one that fits your sentiment or special images you want to add to the front.

So that's it for the Toadstool Gardens DSP.  I'll be using it more myself as I've made it a goal this year to start using my stash of DSP because I keep buying more!  If the prints weren't so doggone cute, I wouldn't be having such a problem of way too much DSP on hand.  Such a problem - having too much of a good thing.

Thank you again for spending time with me.  Hope you enjoyed this idea and will give it a try.  I'd love to hear which DSP you used to make your creation.  The possibilities are pretty much endless once you get started.  That's one of the lovely creative aspects of stamping.  You find an idea you like and start making changes to it to make it your own idea!

Happy stamping and creating,

Sharon 

Monday, February 24, 2025

Focus on Designer Paper

 Hello and welcome.  I've been spending more time focusing on the beautiful landscape prints to create my cards.  The prints are so gorgeous, I want to walk right into them and stay there!  Silly, I know.  But the prints are so special and really need to be the main theme.  So, I have a series of cards for you today.  Two of them feature the Splendid Autumn DSP and the other three I used the retired Meandering Meadows DSP.  There's no point in hanging on to these papers just so I can look at them and enjoy them.  They need to be used and enjoyed by others too.

The first card is a symphony of daisies contrasted with lavender.  It uses one of the prints from the Splendid Autumm DSP.   I just love this card!  And it's so easy to make with the whole focus on the DSP.  I had a piece of this paper that measured 6" x 3".  The width was trimmed down to 5 1/2" to fit the card base.

Highland Heather was used for the card base.  It measures 8 1/2" x 5 1/2" when cut, then was scored and folded in half.  I needed a bit of extra color to define the DSP.  Gorgeous Grape worked great for this. The piece measures 5 1/2" x 3 1/2".
The DSP was attached to this with adhesive and then both were attached to the card base.

The sentiment comes from the set called Hugs for Love.  This set has some of the nicest sayings that I've been using quite often.  This time it's stamped with Gorgeous Grape ink onto a 5/8" wide strip of Basic White.  After stamping the edges are trimmed close and attached with Dimensionals.  There are three of the darkest Purple Adhesive-backed Sequins that are a Sale-a-bration item. 

Like I said, easy peasy.

This card is very similar but uses a print from the Meandering Meadow DSP.  The card base is Granny Apple Green the accent color is Daffodil Delight to pick up the colors of the print.  The measurements of the DSP are 5 1/2" x 3 1/2".

I don't remember which stamp set the sentiment comes from - sorry.  Anything like that would do.  It's stamped with Granny Apple Green ink.  A small bow is made from the Daffodil Delight 1/8" ribbon found in the January-April Mini Catalog.  It's attached with a Mini Glue Dot to hold in place.  There are several yellow sequins scattered among the flowers for an accent.

Next up is another print from the Meandering Meadow pack.  Isn't it lovely and tranquil?  The card base for this one is Bubble Bath cardstock.  A quarter sheet of Melon Mambo was used to die-cut the scalloped frame around the print.  For this I used the retired Scalloped Contours Dies set.  I liked the look of the lacy frame behind this scene.  The DSP was trimmed to fit just inside this frame.

The sentiment is from Changing Leaves set and is stamped on Basic White with Melon Mambo ink.  The die for this is also in the Changing Leaves set.  This was attached to the card front with Dimensionals.  Three pink sequins are snuggled in among the flowers to add a little bling.

This design is another from the Meandering Meadow DSP pack.  I have so few pages of these gorgeous prints left over that I'm trying to make the most of each of them.  This one has a card base of Garden Green to match the greens in the print.

The die used on this print is the Celebration Labels Die which is retired.  It's such a pretty shape and has the stitching on the edges that I like, so I bring this one out of retirement every once in a while.  For this card, I backed the DSP with a layer of Basic Beige to give the DSP a little more rigidity.

The sentiment is the same as the 2nd card, and I still don't know which set it came from yet.  I know as soon as this is posted, I'll run across it and be frustrated with myself.  That's what I get for not writing everything down as I'm creating.  BTW, it's stamped with Garden Green ink onto a Lemon Lime Twist cardstock piece.  There is also a Daffodil Delight bow made from ribbon in the current Mini Catalog.  And there are three retired yellow/green sequins scattered in the flowers.

This last card was a little more involved than the others, but I love it!  So worth the few extra steps to make it.  I used Washi Tape across the back of two Countryside Corners dies to hold them together.  Then the DSP print was die-cut.  Keep both the frame and inside piece.  Then with the dies still together, I die-cut Mossy Meadow cardstock twice to make the "frame" thicker.  The inside pieces were put aside for some other project.   Layer the three frames together with "green glue".

The Mossy Meadow cardstock for the card base was cut then scored in half.  Open it up and emboss only the front half.  I used the 3D Basics Embossing Folder with the crosshatch design.

I found that adding the "frame" to the card front first, then tucking in the center flat inside the frame worked best for me.  This way I was able to get the frame pretty well centered on the card front.  

This picture gives you a much better picture of the "frame" being thicker than the center of the design.  This was easier for me to do than adding Dimensionals around the entire "frame" to raise it up.  

After adding the "frame" and center piece, I used the edge of the die to figure the angle to cut the card to match up with the design.  The card was lightly marked with a pencil then cut to match on all four corners.

The butterfly comes from the Beautiful Butterflies Die set.  This was cut from Silver Foil paper.  It's added to the card with a Mini Glue Dot.  

The sentiment and label both come from the Beautiful Butterflies Bundle too.  It's stamped with Gorgeous Grape ink before die-cutting.  The label is attached to the front with Dimensionals.  Two Purple Fine Shimmer Gems in the lightest color were added to the sentiment with another one added to the butterfly for an accent.

The inside of the card has a Basic White layer that's been die-cut with the matching die from the front of the card.  After cutting, a 1/2" strip of the same DSP was attached along one side with the mottled purple side showing.  After attaching, the ends of the DSP were cut to match the white layer.  Then this was attached inside the card with adhesive.

Well friends, I hope there's enough inspiration here to keep you busy for a while.  I hope you try your hand at making any or all of these designs.  And don't stop with the prints I've used, there are so many gorgeous scenic prints to keep you busy for a good long while.

Just a quick reminder that Sale-a-bration ends on February 28th at midnight.  There are so many wonderful items still available to choose from that will get your imagination fired up and humming along.  Feel free to claim me as your demonstrator if you'd like.  Please use the Host Code at the top of the page when you're ordering if your order is less than $150.  Then you want to get Host Rewards for yourself

Thanks so much for stopping by today.  Hope you find time to create something beautiful today.  I've heard that creativity is good for the soul.  I know it makes me happy!

Happy stamping and creating,
Sharon

Thursday, February 20, 2025

Storybook Moments Trio

Hello my friends.  I've been happily crafting with the designer paper as the focal point of the cards.  It's been fun and very relaxing to take a break from fun folds and themed cards.  I had gotten the new Storybook Moments Designer Series Paper but hadn't found the time to play around with it.  I figured it was time and just played for most of two days (in between organizing my stamp room).  These are simple cards with mostly just cardstock, ink, and paper without a lot of fuss and bother.  Hope you enjoy these simple and quick cards.

First card up is so sweet and reminds me of my storybooks when I was young.  Yup, way back in the dark ages! I kept the colors warm and soft to create the cozy feel of cuddling up and being read a Beatrix Potter book at bedtime.

I started by choosing the DSP print with all the adorable cottages.  It's trimmed to 5" x 4".  About 1/4" is ripped from the right edge.  Then that edge is distressed and curled to look old and well-used.

Next was a layer of Pecan Pie.  This was cut to 5 3/16" x 4 1/4".  This was also ripped about 1/4" from the right edge and distressed to fit nicely under the print.

Basic Beige cardstock was cut to be the card base and measures 8 1/2" x 5 1/2".  It seemed like it needed another layer on the design, so a layer of Crumb Cake was added between the Basic Beige and Pecan Pie layers.  This wasn't ripped or distressed.  Using adhesive, each of these layers is attached to the one behind it.

The little mouse was an image from another print from this Storybook Moments DSP pack.  Isn't he adorable?  He was fussy cut from the paper and added to this friendly neighborhood.  He's been popped up with Dimensionals.  

The flowering plant was another image that this design needed to round out the design.  It's also fussy cut and added close to the mouse.

The sentiment is from the Wonderful Thoughts stamp set.  It's stamped with Pecan Pie ink onto a Basic Beige 1/4" strip of cardstock.  The right edge was flagged and tucked in under the mouse.  It needed some extra color, so it was pulled out and a Blending Brush added a little Pecan Pie ink on the edges.  It's tucked back in and secured with a couple Mini Dimensionals.

A length of the Wild Wheat Rustic Ribbon was wrapped around the card front on the left side.  This was tied into a knot.  I liked the look of the ribbon along with all the other earthy colors on the card.  Lastly, three tiny Brass Butterflies were added flitting around the neighborhood.  One card design down, on to the next design.

This card seems to throw off a totally different vibe for me.  I can just see this little bunny boy saying "Hey, look at me!  I just found this huge radish!  It must be the biggest in the whole world!"  And of course, he needed a picture taken to record this trophy, so we have it in a frame to display it.

The frame is one of three in the Storybook Friends Bundle.  This is die-cut from Old Olive cardstock.  The bunny was cut from the DSP print with just enough excess to attach to the back of the frame with adhesive.  There's also a small plant and a small mound of blue flowers that were cut out and attached to the bottom corner of the frame with adhesive to decorate it.

The base is Old Olive cardstock that measures 8 1/2" x 5 1/2" and is scored and folded in half.  A blue & green plaid from the Timeless Plaid DSP was chosen for layering on the card.  It needed a little extra definition between the Old Olive and the print.  A piece of Boho Blue cardstock was attached behind the plaid.  

Some of the Wild Wheat Rustic Ribbon was wrapped around the two layers and tied in a knot.  This was attached to the card base using Dimensionals.

The sentiment is from the Storybook Friends set.  It's stamped on a Basic Beige cardstock strip about 5/8" wide using Boho Blue ink.  The left end of the tag is flagged then attached to the right edge of the card using Dimensionals.  

The framed bunny is the last addition to the card.  He's attached with Dimensionals to make sure he's the focal point of the whole card.  If you are looking for a new baby boy card, wouldn't this one be perfect with just a small change of the sentiment?

That's two down and only one more to go.

This last one is super simple because it is totally the DSP doing all the work.  There's no extra die-cuts or anything.  There is a sheet of the DSP prints that is laid out in blocks of different prints.  These can be cut and used separately, or you can forget about this side entirely and just use the all-over green print on the back which is quite nice.  I kind of like these type of print blocks.  They're usually a bit of a challenge to me to use them on cards.  For this card, I used two of the blocks. 

I love the strawberry print as a stand-alone but then couldn't decide what I wanted to use with it. I found a cute little kitten carrying a plate with one large strawberry on it that worked with the strawberries.  The frame was a nice way to add her to the design.  

The base is a 11" x 4 1/4" piece of Old Olive cardstock that's scored and folded in half.  To frame the strawberry print, a piece of Moody Mauve was used.  This measures 5 1/2" x 2 3/8".  The strawberry print was attached to this with adhesive, then it's attached to the side of the Old Olive card base.

The little kitten was fussy cut then she's popped up on the Old Olive frame block. The frame is attached to the right side of the card front using Dimensionals.  To give the DSP paper some rigidity, I cut a piece of Basic Beige cardstock a little smaller to attach behind the frame.

For the embellishment on this design, I used three of the Iridescent Foil Gems.  The kitten needed some glitz, but not too much.  With the iridescent glitter in the gems, there are times you get a flash of pinky-purple that enhances the Moody Mauve layer.

I haven't added sentiments to the inside of any of these three cards yet.  They can be used for many different occasions.  On this last card, I played around with the inside just a little though and like how it turned out.  These little strawberry and flower sections were from the piece I trimmed off to fit my card.  They were fussy cut and added to the corners for fun.  Even if it's just a tiny bit of DSP that you've had to cut off, you might still be able to use it in your design.

Well, I don't know about you, but I had fun playing with this pack of DSP.  I really need to do more of a deep dive into the stamp set too.  I wasn't sure about this set when I first saw it.  It gave me the warm-fuzzies because of childhood memories, but could I use it now.  The answer is turning out to be yes, I can.  And now I need to get going and stamp some more.

Thanks for stopping by today.  As usual, it's appreciated that you spend time here.  Why not leave me a comment so I know who's been here?

Don't forget, there's only 8 more days left to take advantage of all the free items available during Sale-a-bration.  After February 28th it will be no more.  This is always one of my favorite times of the year.  It's so fun to get something free, right!?  Take advantage of this sale while you can.  If you have questions, feel free to contact me through my email - sharoncarr50@gmail.com.

Happy stamping and creating,
Sharon

Monday, February 17, 2025

Spring Corners Card

Hello friends!  Just a quick post today.  I just got the Spring Corners Bundle delivered over the weekend and just had to sit down to play.  I kind of made it a little hard on myself by setting a couple of parameters to this project.  First of all, I wanted to use one of the Mixed Media Florals Designer Series Paper that I hadn't used yet as a backdrop for this card.  Secondly, I have a small stack of precut scalloped edge rectangle tags that I've been trying to use up.  This is a product that Stampin'Up! sold at one time.  I'm not going to even guess at how many years ago that might have been.  No wonder my hubby thinks I keep way too many retired things for way too many years.  But as I always tell him, "You never know when you might need that very thing."  Just like right now.  So on to making the project.

Here's the finished card.  I followed the guidelines I set for myself, and it turned out very nice.

Start with a card base of Shy Shamrock cardstock.  This time it's 11" x 4 1/4" and is scored in half at 5 1/2" to make a portrait style card.  I decided on this print from the Mixed Media Floral DSP pack for my project. I loved the greens/blues with the pop of peachy coral for the flowers.  It's so cheerful and bright.

The Basic White rectangle measures about 2 1/4" x 4".  The sentiment in the top corner is one of many from the Spring Corners stamp set.  The cross-hatched lines are another stamp from this set.  They are stamped in opposite corners using Memento Tuxedo Black ink.

The center image is from the Courage & Faith stamp set.  I had a difficult time finding an image that would fit into the area nicely.  If I was starting out from scratch and not using this precut piece, I would choose to go a little wider on this piece for ease in working.  But this is what I had, so this is what I used.

The coloring on this was done with Stampin' Blends which are my favorite coloring tool of choice.  The flowers were done with Calypso Coral Light blended in with Dark at the bottom of the petals.  To add just a bit more darkness, Poppy Parade Light was added sparingly.

The leaves started with a layer of Pool Party Light first, with Shy Shamrock Light & Dark added for interest and blended in.


At this time, I realized I needed another layer between the DSP and the cardstock base.  After trying a few choices, I picked Pool Party to use for the layer.  This measures 5 1/4" x 4".  The DSP layer is attached to this with adhesive.

A Pool Party ribbon is wrapped around the layers and tied into a knot.  Then the layers are attached to the card base with Dimensionals.  The finished focal point was added to the front of the card using Dimensionals to pop it up over the ribbon.

There were gems added to the card for a little bit of bling.  These are the Shy Shamrock colored ones from the 2024-2026 In Color Shimmer Gem.  I like how them added a little more color and shine to tie everything together.

I haven't decided what sentiment to use on the inside of the card yet.  There is a Basic White layer cut for it.  And there is a 1/2" strip of the DSP print to go across the bottom to bring the design and colors into the card.

The Spring Corners set is one of the unique stamp and die sets that are available online in the Stampin'Up! store.  There are so many fabulous items there that you won't find in any of our catalogs.  Make sure you find time to peruse all the products available.  The interesting designs in the Mixed Media Floral DSP pack are only available as an Online Exclusive also.  Some of the very best items show up only there.

Don't forget about Sale-a-bration either.  This special yearly sale will be ending on February 28th.  There have been new items added to the Sale-a-bration free items shown in the brochure.   You can choose your favorite free item when your order reaches $60 before tax and shipping.  Please don't delay in getting yours before it's too late.

Thanks for stopping by to visit.  Let me know what you think about the projects I create.  I'd love to hear from you.  Hope you get a little inspired by my projects and want to try them too.  If you run into any problems or have questions, feel free to email me.

Happy stamping and creating,
Sharon
sharoncarr50@gmail.com
  

Friday, February 14, 2025

One Last Valentine

Hello friends,  I had made this card a week or so ago, but I never got around to posting it.  You know how life gets in the way sometimes?  So, after all my cards were in the mail, I figured I wouldn't be showing off this card.  But after giving it way too much thought and waffling back and forth, I figured why not?  So here it is.  The last Valentine of the season.  Hope you like it.  There are aspects of the card that I want to translate into another card in the near future.  So, if you're so-o-o-o done with Valentines, just skip over this post and ignore this poor little card if you must.

See?  There's just so many good things going on with the card, I think it deserves a showing.

When sending out my Valentine cards, I realized that over half of them were either a majority of Fresh Freesia or Highland Heather.  That really surprised me.  And as you can see, this one is a mix of Fresh Freesia and Petunia Pop.

Let's start with the base which is Fresh Freesia cardstock.  This was stamped with a stamp from Hearts of Elegance and Fresh Freesia ink in an overall pattern.
Then I started die-cutting hearts from both Fresh Freesia and Highland Heather cardstock.  I used the different sized heart dies in the Hearts of Elegance set.  When playing around with the layout, I got rid of the Fresh Freesia hearts and used them for a different project.  They seemed to blend into the background too much.  So, I stuck with the Highland Heather hearts.  The heart with the stitched design in it was darkened even more with a Blending Brush and a little Petunia Pop ink.

The larger heart was speckled with Petunia Pop marker to give it some interest.  That was still too blah, so it was spattered with the Wink of Stella pen to add some pretty shimmer specks.  That worked out well. 

The heart in-between those two sizes die-cut a piece of DSP.  Sorry, I don't remember where it's from and I forgot to write it down.

Next was trying to figure out the layout of all the hearts on the card front.  It still needed something more to define it.  A piece of Vellum was dry embossed with the Eyelet Embossing Folder and laid between the card base and all the hearts.  Viola!  Just was it needed.  

The little sentiment is from the Hugs for Love set which is one of my favorites for cute sentiments.  It's stamped on a small piece of Basic White cardstock using Highland Heather ink.  It's tucked under the hearts and attached with adhesive.

The design still needed a little more contrast to it.  In my punch stash, there is a very small heart punch that was close in shape to the other hearts.  I punched three Basic White hearts and tucked them in amongst the larger hearts.

Lastly, three of the purple Adhesive-backed Sequins in almost a white color were added.  These are one of the Sale-a-bration free items when you spend $60 or more.  Seemed like the perfect ending to this purply Valentine card.  I'll get to work on the other idea I have that will be similar to this card.

Thanks for stopping by to see what's new today.  I promise, this will be the very last Valentine I make for at least another 9 months.

Happy stamping and creating,

Sharon

Friendship Friday - Valentine Cards

 Hello, hello!  And happy Valentine's Day to you all!  It's a beautiful and sunshiny day here.  Of course, it's only 35 degrees.  So that means it's a perfect day if you're staying inside and looking out a window.  😉 That's my take on it.  You might not agree and that's ok too.  Since this is a Friday and it is Valentine's Day, I thought it would be appropriate to share the lovely Valentine cards I received in the mail as of this morning.  There is a wide range of styles that reflect each person that made them.  And I appreciate each and every one.


created by Diane Wallace
In case you can't tell, the hearts and butterflies are die-cut from Red Velvet Paper.  So gorgeous!
Thanks for all the Bible verses you wrote on the back showcasing true love!

created by Shirley Krone
I love all the different embossing that highlighted the design.  And miss that cardstock color!
Thanks for the lovely letter too!!

created by Jean Mazurek
At first, I was taken aback by the snowflakes.  Then I realized with all the snow you were getting in Michigan; it was the perfect backdrop!  Great creating "out of the box".

created by Jan Hollmann
Just love this background of die-cut hearts!  And the die-cut love and larger heart are the perfect additions.  So modern and fun!

created by Sue Fabris
Love that 'lacy' looking layer behind the hearts.  Perfect touch to the bold hearts.  This is so pretty.

created by Barb Eisenman
This fun fold card is so unique and lovely.   All the gold foil paper, gold embossing and the die-cuts on the inside make it so special.

created by Connie Juengel
This card is unusual because of the size.  It's 8 1/2" x 3 1/2".  What a fun size and it fits those three hearts across the front panel just right.


Thank you to all of you that sent cards to me at this time of year.  I sent out so many myself that it's a treat getting something in the mail too.  You all are an absolute blessing from God to me!

Sending all my love and many hugs,
Sharon


Monday, February 10, 2025

Heart Shaped with Lavender

Here it is February 10th already.  I need to get the rest of my cards is the mail and quit making any more valentine cards.  I just couldn't resist trying out another card using the Heart Shaped Bundle though.  The pieces of this stamp set are fabulous, and I'll be using this set throughout the year for so many reasons.   Why quit using hearts when Valentine's Day is over?  

This is so weird trying to type a post without the cards sitting right here in front of me.  I just put them in the mail, so I'll be going off the pictures for all the info.  Hopefully I can remember exactly what I did and used.  

If you look closely at these two cards, you might notice that the heart wreath on the left has a lot more of the greens showing, and the heart on the right has more tones of purple/rose and also beige.  These were die-cut from different prints in the Perennial Lavender Designer Series Paper set which made a lovely difference when putting the cards together.  Let's start from scratch.

This design starts with a base of Crumb Cake cardstock that measures 8 1/2" x 5 1/2" that's scored and folded in half.  The DSP print was chosen next.  I love this delicate print of lavender on a beige-y background.  To frame the print and make it stand out, I chose to use Gorgeous Grape cardstock.  The print and Gorgeous Grape layers were attached together with adhesive.  Then they were attached to the folded card base using adhesive again.

The circle die is from the Deckled Circles and cut a piece of Basic White cardstock.  To frame this, I cut a circle from Gorgeous Grape cardstock using the largest circle die in the Everyday Details set.  This showed off the deckled edge of the white layer and also has the pretty circle dot edge itself.  Love the contrast on these.  So pretty together.


In the center of the white circle, the heart wreath from the Heart Shaped set is stamped with Gorgeous Grape ink as a base for the die-cut wreath.  Next the prints were chosen for cutting the wreaths.  The print for this one has lots of shades of purple from the lavender shown on it.  The beige-y background also shows up here.  After die-cutting, I used dots of "green glue" along the center stem to attach to the white layer.  And the two layers of circle were adhered together also.

A flower die from the Heart Shaped set was used to cut Gorgeous Grape and Highland Heather flowers.  Also, one of the flowers is die-cut from a scrap of the Perennial Lavender DSP to get three different purple flowers.  A butterfly was cut from that same print as the flower.  

The flowers and butterfly were all attached with Mini Glue Dots.  Then the circle layers were attached to the card front with Dimensionals.

The inside of the card is a layer of Basic White.  The heart wreath from the set is stamped with Highland Heather ink.  Then the sentiment from the Hearts of Elegance set was stamped over this using Gorgeous Grape ink.

A very skinny strip of Gorgeous Grape cardstock was added along the bottom edge to bring more of the purple color inside the card.  Then it's attached inside the card with adhesive.

Here's more of a close-up of the wreath using a different DSP print.  You can tell this print has more green in it and gives a slightly different look.

On this card, everything is put together the same way.  About the only other difference is this butterfly is cut from the flip side of the background print used on the card.  This is a bit darker than the previous card.

For the gems on both cards, I chose to add the Iridescent Foil Gems as these have little flecks of lavender shine every once in a while.  The smaller size gems fit atop each flower just right.

The butterflies seemed to need just a bit more bling.  So, they each received a trio of the small Rhinestone Basic Jewels along their bodies for a little glitz and glamour.

I totally forgot to mention the sentiments on the card fronts.  They are another stamp from the Heart Shaped set.  And that lovely little label is one of the dies in the set.  Don't you love that sentiment?  It covers so many different things.  It's stamped with Gorgeous Grape ink onto Basic White cardstock, then die cut.  They are attached with several Mini Dimensionals to pop it up.  And that's it.  These cards are being used for Valentines, but with that sentiment could be used for so many other reasons.


Oh, my goodness!  I almost forgot!!  I need to remind you that the Heart Shaped Bundle is a Sale-a-bration free item choice when you purchase $120 or more.  This set is so worth every penny.  I use it so often I tend to forget that it's not a regular catalog item.  Forgive me, please.  And if you're looking for a demonstrator, I'd love that opportunity.

Thanks for stopping by today to see what's new around here.  I love the look of these cards.  They remind me of one of my grandmothers who was just so delicate, and prim and proper.  This seems to have a sort of an old-fashion vibe to the card in my humble opinion, and I just love it.  Hope you do too!  Make sure you find time for yourself to create and have fun.  Especially with friends!!

Happy stamping and creating,
Sharon

Friday, February 7, 2025

Another Side Box Fun Fold Card

 Hey there!  Hope you're having a great day today.  Wouldn't you know it?  As soon as I gave up on making more of the fun fold cards that I shared yesterday, I went downstairs today and quickly put together another one with some of those leftover parts.  I was just stuck on the stamp set I wanted to use.  Once that idea changed, finishing it was a breeze.  So, what did I actually end up making?  So glad you asked!

Didn't this work out nicely?  I love the mix of Bubble Bath with the Lost Lagoon.  As you can see, the basic card is totally identical to the Friendly Seagulls I posted yesterday.  I had cut two of everything at the time because I was planning on making two seagulls cards the same.  But plans change, you know?  I decided I wanted to try something else instead.

I won't go over the directions for the card base again here.  Please check yesterday's post for the dimensions and directions.

Today the Mixed Florals set came to mind and I checked to see how the stamp would fit on the Deckled Circle die-cut.  Enough of the design fit to make it work.  The stamp was inked up with Pebbled Path ink to give the design a slightly softer color.


The images were colored with Stampin' Blends:  Bubble Bath Light & Dark, Lost Lagoon Light, Daffodil Delight Light & Dark, Copper Clay Light, and Soft Seafoam Light & Dark.

Because the image was so small it only took about 10 minutes or so to color.  After coloring it was attached to the Lost Lagoon Everyday Details circle die-cut using adhesive.

It was attached to the card base the same way as before by carefully marking the size of the circle on that 1/2" strip with a pencil.  Then adding Tear & Tape within that space.  Peel off the backing on the tape and attach the circles so they are in the center of the card front.

The sentiment comes from the Hugs For Love stamp set.  It's stamped on a Basic White strip that is about 5/8" wide and is stamped with Lost Lagoon ink.  It's carefully trimmed on the sides to fit.  A small piece of In Color Glimmer Specialty Paper in the Bubble Bath color was used to frame the sentiment.  The piece measures 7/8" x 1 7/8".  Guess it pays to hang on to all those skinny strips.  You never know when you'll need just that little bit.  This has two Mini Glue Dots on the top left area of the label to adhere to the circle.

The circles inside the card match the front ones in size and color.  The sentiment I chose for this is from the Grateful Blessing stamp set.  This will be a perfect "just because" card to send out to a friend or family member.  It's stamped with Lost Lagoon ink to match.  

There was a small flower left over from a huge batch of valentines that I made.  I added it here with a Mini Glue Dot.  I liked that little pop of pink inside the card.

I tried several different gems for that little touch of glitz.  I was surprised that these little pearls were such a good match!  They are the Adhesive-backed Pearl Trio.  I thought they would be too big and purply for the card, but I really like them.

Thank you for coming by today.  Hope you enjoyed another look at this cute Left Side Box Fun Fold card.  Whew!  That's a mouthful.  But I just love how cute this little fun fold is when you want to send a special card.  Hope you give this fun fold a try.  It's not as hard as it looks.  I always try the measurements and scoring out on a piece of computer paper to get the hang of what I'm trying to make.  I am absolutely, definitely not an engineer! 

There's only several more weeks to go until Sale-a-bration will be over and done.  Did you see that a good number of new items have been added to the freebie list?  Don't miss out on something you've been wanting and wait til it's too late.  I'd be happy to be your demonstrator if you're looking for one.  Be sure to use the new Host Code at the top of the page.

Happy stamping and creating,
Sharon

Thursday, February 6, 2025

Fun Fold Card Ideas

Hello friends.  I've been working on a new-to-me fun fold idea.  The first one I made just flew together with ease.  I wanted to share at least two ideas with the fun fold, so I started making the second one.  That was a real struggle, not looking the way I envisioned at all.  So on to the third card.  Hmmm, that's still sitting on my desk alongside the second try.  Ok, let's try the fourth card and see what happens.  And yes!  It worked and I'm happy with it.  Who knew it would be so hard to make two cards that were based on the same basic idea, but with enough changes that they didn't look like the very same card.  Part of my problem was wanting to stay with the same die-cut shapes.  As soon as I scratched that idea today, the card came together with no problem.  At least I have two ideas for you.

This is called a Left Side-Box Fun Fold.  This first picture shows you the card as it would look coming out of the envelope.  Cute right there, but it gets even better as you'll see.  They are so cool standing up and showing off.  Wish you could see this in person.

The materials for this card are Lost Lagoon cardstock, Basic White cardstock, and some of the Tartan Foil Specialty DSP in the Lost Lagoon color.  I thought this color would be a good backdrop for these Friendly Seagulls that are a cool pick during Sale-a-bration.  Isn't this just fun?

Start with a 8 1/2" x 5 1/2" piece of Lost Lagoon.  This is scored at 1/2", 2 1/8", 2 5/8", and 4 1/4".  Fold along these score lines inward to make the box.  Make sure you use a bone folder on the creases to make them sharp.   Open this up and lay flat to attach the two smaller pieces of DSP on the outside. 

Cut DSP 5 3/8" x 3 5/8" for one piece and cut two pieces at 5 3/8" x 1 1/2".  The two smaller pieces are attached to the matching areas on the "box".  The larger piece is for the inside of the card.  For this card, these two prints are the two sides of the same piece of DSP.

I used "green glue" for attaching the DSP to make sure I had enough time to get the pieces totally even top and bottom.  I didn't attach the inside piece of DSP until the "box" was put together.

While the card is lying flat with the DSP showing, add a strip of Tear & Tape to the 1/2" scored area at the side edge.  Fold into the box shape to make sure it all fits correctly.  Then open again and take off the backing on the tape.  Fold the 1/2" area in, then fold in on the 2 5/8" score line so the edge of the card lands right near the center score line.  Make sure it's adhered well.  Then add the larger piece of DSP to the inside of the card.  Are you with me so far?

Now it's time to make the focal piece and the inner sentiment areas.  I chose to use the Everyday Details Dies to make the two Lost Lagoon layers.  The Deckled Circles Dies fit in nicely so that's what was used here to die-cut two Basic White focal areas.  

On the front piece, a light area of Lost Lagoon was added with a Blending Brush to the sky area.  And a small amount of Crumb Cake was added to the sandy area with another Blending Brush.

The seagulls were stamped with Memento Tuxedo Black ink on Basic White cardstock.  Color was added with Stampin' Blends:  Daffodil Delight Dark, Gray Granite Light & Dark.  The birds were fussy cut and placement was decided.

The sentiment is from the Friendly Seagulls and was stamped with Memento Tuxedo Black ink.  The pebbly sand was stamped lightly and randomly with Crumb Cake ink.  The seagulls were attach using a Mini Glue Dot on the feet and Dimensionals on the body.

For the inside of the card, I used a sentiment from the Latte Love stamp set (which is a Last Chance item).  This is stamped with Memento Tuxedo Black ink.  There is both the Lost Lagoon and Crumb Cake ink lightly blended onto this piece just like the front.  Just a few of the pebbly sand pieces were added.  The school of fish was stamped to the side in black, then colored with Lost Lagoon Blends.  Several more fish were stamped onto a scrap of the Tartan Plaid DSP and cut out to use on the card front.

To put the card together, close the card with the box lying flat.  I held the front circles in place in the center of the card and used a pencil to lightly mark behind the circle onto the 1/2" strip.  Add a strip of Tear & Tape inside these marks.  Remove backing and lay the circles onto the tape on the card front.  When you open the card, the box will form, and the circles will stand out.  Next attach the inner circles to hide behind the front so they aren't visible when the card is closed.

The last step for this card was adding the Pebbles in the sand.  And don't forget the fish that were fussy cut and tucked in his mouth.  He's guarding his stash of fish down by his feet.

Ok, I did say there was another card with the same Left Side Box fun fold.  This one took several days, but you tell me what you think.

For this card, Petal Pink was the card base color.  The pink striped print paper is from the Wildflower Birthday DSP that is just so pretty and girlie.  I paired it with Basic White and Calypso Coral cardstocks.

Instead of the circles for the focal point, I went with heart dies from the Hearts of Elegance Bundle.  I love all those sizes of hearts to play with.  The third largest heart cut two Calypso Coral hearts.  The fourth largest cut two Basic White hearts. The smallest heart die cut one each of Petal Pink and Calypso Coral.  There's a tiny heart punched from a mini punch from my retired stash.  The flower was die-cut using the Country Birdhouse dies.

The card is put together in the same way as the first card with all the sizes and scoring measurements the same.

The sentiments both outside and inside the card are from the Hugs for Love stamp set.  If you haven't noticed, I just love the sentiments in this set!  Both sentiments were stamped with Calypso Coral ink.  The hearts on the card front were attached the same way with a strip of Tear & Tape on the 1/2" box fold.  

The extra small hearts were attached inside the card where they peek out when the card is closed.  I'm still debating whether I want to go back and add a few more of the tiny punched hearts for accents.

Lastly are the gems that were added.  These are the pink ones from the 2024-2026 In Color Shimmer Gems.  Aren't they pretty?  They're not quite the exact shade of pink, but they blend so nicely.

Well, that's it.  Now I've got to figure out what to do with the piles of partial card pieces that are sitting on my table.  Who knows just where those pieces will end up next?!

Thanks for sharing your time with me today.  I look forward to sharing another creation or two with you soon.  If you'd like to place an order, I would be happy to be your demonstrator.  If you'd like to order, please consider using the Host Code shown at the top of this blog.  Thanks so much for your kindness.  And please go ahead and post a comment and let me know what you think about this new-to-me fun fold.

Happy stamping and creating,
Sharon