Friday, January 7, 2022

More Rain Boots

Oh, my goodness.  Here I am with another Flowering Rain Boots idea for you.  Am I stuck on this set?  Well, maybe.  Do I enjoy making cards with this set?   You bet!  And if you read down to the bottom of this post, you'll see even more cards made with this set.  I really went overboard when stamping yesterday and made several cards.  Now it's time to get them posted.  Then I'll have to put that stamp set away for a little bit and find something else to obsess over!  😄 

This card is much bolder and brighter than the last card I shared.  It starts with a Crushed Curry card base that's cut to 11" x 4 1/4" then scored at 5 1/2" and folded in half. I used the Pattern Party Designer Series Paper that is a Hostess Rewards item from the 2021-2022 Annual Catalog.  There are so many fabulous patterns and color combos in the paper pack.  You can spend lots of hours just creating with this paper pack!  The colors for this card are taken directly taken from the print I chose to use.  The DSP was cut to a 5 1/4" x 2" strip.

I wanted to add a layer of the Granny Apple Green cardstock to accent the design and tried several different ideas.  The Brilliant Rainbows Dies has this lovely, scalloped edgework that reminds me of rainbows that is a perfect accent.  It's attached to the back of the flower print paper using adhesive.  Then it was attached to the left side of the card front.

The rain boots were stamped with Crushed Curry ink on Basic White cardstock.  The tulip leaves were stamped with Granny Apple Green ink and the flowers were stamped with Poppy Parade ink.  All the pieces were die-cut with the Rain Boots Dies.

A Basic White layer was cut to 3 3/4" x 2 3/4".  This will frame the boots and flowers to help them stand out.  The Granny Apple Green cardstock was cut at 4" x 3" to layer under the Basic White.  They are attached together with adhesive and then layered onto the card front with Dimensionals. 

The bottom edges of the tulip leaves are attached to the very top of the boots. All this was attached to the white layer with both regular and Mini Dimensionals.  The flowers were attached with Mini Dimensionals to the very tips of the stems.  I like the look of how the boots are slightly over the bottom edge, and the tulips are spread out over the top edge.  When stamping, many times I try to keep everything all tucked "inside the box".  Having these images creeping "out of the box" on this card is just aesthetically pleasing to me.

For adding a sentiment to the card, I chose the Special Moments for my sentiment.  This is one of the Level 2 Sale-a-bration items you can get for free when you've purchased $100 of regular merchandise from either the 2021-2022 Annual Catalog or the 2022 January - June Mini Catalog.  This is an awesome sentiment set that contains 21 sentiments that cover many every-day occasions.  Don't you love freebies are so versatile and useful?

The sentiment was stamped with Poppy Parade ink.  It was then die-cut using a small tag from the Ornate Frames Die set.  It was attached to the card front with adhesive by the leaves and a Mini Dimensional at the right end of it.

There is a double bow made from 2 strands of Linen Thread.  I kept it fairly small for this application.  It was attached to the tag with a Mini Glue Dot that was rolled into a small bar to hide under the bow.   That's the only 'bling' for this card.  It seemed happy enough already without anything more added.

The inside of the card needed a layer of Basic White for writing on.  This was cut to 5 1/4" x 4".   It looked way too boring as is, so a set of tulip leaves was stamped near the bottom right corner.  Granny Apple Green ink was used to coordinate with the front stamping and also the DSP print.  The tulip flowers were stamped again with Poppy Parade ink to finish it off.

So bright and pretty - it just makes me happy!

Are you ready for a few more ideas?  They're similar, and yet quite different.  There are different color choices used on each of them and slightly different layouts and die-cuts used too.  It's just so much fun coming up with different looks here.  You need to try these too.  Ready for more ideas???
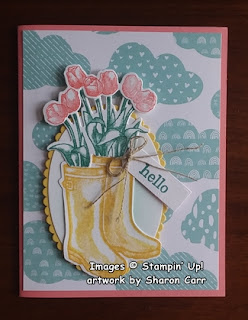
Colors:  Flirty Flamingo, Daffodil Delight, Just Jade and Pool Party
Sentiment:  Best Year Yet
DSP:  Sunshine & Rainbows (SAB)
Dies:  Rain Boots, Ornate Frames, and Layering Ovals (ret)
Extras:  Blending Brushes, Linen Thread


Colors:  Smoky Slate, Basic White, Misty Moonlight
Sentiment:  Flowering Rain Boots (only the top line of the stamp is used)
DSP:  Sunshine & Rainbows (SAB)
Dies:  Rain Boots, and Stitched So Sweetly
Blends:  So Saffron L & D, Daffodil Delight D
Extras:  2021-2023 In Color Jewels


Hope you enjoyed the post with the extra ideas added.  It really has been fun playing with the Flowering Rain Boots and Dies.  Yes, I really do love them!  Enjoy the ideas and let me know if you've gotten hooked with this bundle too.  I know I can't be the only person who loves this set.  Come on, let me know what your favorites are in the new 2022 January - June Mini Catalog.  If I have your favorite set already, I'll try to post an idea or two for you.  But I have to know what you'd like to see - so let me know.  Or I'll just continue to play around with anything that catches my fancy and that's what I'll post.  It's up to you...

Keep stamping and creating!
Sharon

Wednesday, January 5, 2022

Flowering Rain Boots

Good morning everyone!   Since it's been raining here, a lot, I thought I'd play with the Flowering Rain Boots stamp set and dies.  A while back, there was a Paper Pumpkin kit that was all about rain boots and spring.  I loved that kit so much that I even got refills for it, and I hardly ever do that!  When I saw this set in the new 2022 January - June Mini Catalog, it was the very first set on my shopping list.  I'm so tickled with this, so I know I'll be using it a lot for my own cards.  And of course, some of those will be shared with you too. 

Here's one of the cards I made yesterday.  Doesn't it look like we're all ready for spring?  I'm sure those of you in the northern climates definitely have had more than enough of the cold and snow.  Unfortunately, I think there's still a lot more of that to come.

To make this card, I started with a piece of Thick White cardstock.  This was cut at 8 1/2" x 5 1/2", scored and folded in half.  Since I had already found the Friendly Hello Designer Series Paper print that I wanted to use, I took my color choices from there.  (The Friendly Hello DSP is part of a stamp and paper bundle in the Sale-a-bration Mini Catalog!  You can get it free when you spend $100 on merchandise from the Annual Catalog or the new Mini Catalog!)

I love the softness of the DSP print, and all the lines of squiggles in the pastel colors.  It reminded me of raindrops sliding down a window, so I just had to use it!  I chose to use Fresh Freesia as my accent color on the card.  This was cut to 5 1/4" x 4".  Because I wanted the Fresh Freesia color to stand out, the DSP was cut a little smaller at only 4 3/4" x 3 1/2". This is attached to the Fresh Freesia cardstock piece using adhesive.  A length of Fresh Freesia Open Weave Ribbon was wrapped around and tied into a square knot off to the side.

The rain boots were stamped with Misty Moonlight ink on Basic White cardstock.  The daisies were stamped with Basic Gray ink on the white cardstock also.  The daisies were colored using Stampin' Blends - Fresh Freesia L & D, So Saffron Dark, and Highland Heather Light.   After coloring with the Blends, the boots and daisies were die-cut with the matching Rain Boots Dies.

I used a die from the Tasteful Labels Die set to cut a label for the sentiment.  The sentiment is from the Flowering Rain Boots set.  It's stamped with Misty Moonlight ink.  A little Fresh Freesia color was added to the edges of the label with a Blending Brush.  Love that small bit of added color!  

The boots were attached with adhesive over the ribbon.  The daisies were positioned above the boots and attached with Dimenionals.  The sentiment label was attached near the top right corner with Dimensionals also.  After going through my stash of bling, the Loose Flower Flourishes were picked as an accent for the card front.  Don't they match up perfectly?  They are attached with Mini Glue Dots.

The inside of the card got a bit of special treatment too.  The sentiment here is from the Sunny Sentiments set in the 2021-2022 Annual Catalog.  I thought the font semi-matched the font on the front, and it really said what I wanted.  

To dress it up more, I used a skinny strip of the Friendly Hello DSP that had been cut off the front piece to make it smaller.  I just couldn't let that cute little bit go to waste now, could I?  It's layered onto a 1/2" strip of Fresh Freesia to bring all the fun to the inside of the card.

There you have it, a fresh, spring-themed card to get you ready for blue skies and warmer weather.    Hope this inspires you, and I hope you love the Flowering Rain Boots Bundle as much as I do.  I promise you I'll be making and sharing more ideas and projects using this bundle, because I think it's adorable!

Keep on creating and stamping.  And don't forget to share all your beautiful creations with others.  Get them in the mail!  Or just hand them out when you can.  Whatever works for you.

Blessings and Hugs,
Sharon

Monday, January 3, 2022

A Friendly Hello Bundle

Oh, my goodness!  I've been having so much fun with a new Sale-a-bration bundle.  Yes, you heard correctly there.  After you spend $100 in regular merchandise, you can choose to get this bundle.  It has an awesome stamp set with 13 photopolymer stamps to start with that includes 3 sentiments.  And it has a gorgeous 12 x 12 set of Designer Paper that coordinates with it!  They're my sort of colors too - more on the brighter pastel side.  Woo Hoo!!  Can you tell I'm just a little excited? 

Here's the first one I made with both the Friendly Hello stamp set and the Friendly Hello matching Designer Paper.  It's turned out such a bright cheerful green as the main color on the print I used is Granny Apple Green.  It just screams 'spring!' to me.  To make this card, I started with a card base of Garden Green for some contrast.  This was cut 11" x 4 1/4", scored at 5 1/2" and folded in half to make a top fold card.  The layer of DSP is cut 5 1/4" x 4".  It's attached to the card front with adhesive.  I wanted as much of this to show as possible, so I looked for a die that wouldn't be too small for the sentiment.  But it shouldn't cover the whole card front either.  The die from the Tasteful Labels Dies was just the right size and a pretty shape with a little outline detailing too.

The hello friend sentiment from the set was stamped with Garden Green ink more to the right side of the label.  That left lots of room on the left side for the pretty flowers that are part of the set too.  These were stamped with Garden Green ink onto a scrap of Basic White cardstock.  I also stamped 5 solid leaves with the Garden Green ink on the scrap of white.  

The flowers were just lightly accented with some water and a Water Painter brush to soften the shading lines inside each flower.  It actually makes the centers look like Granny Apple Green.  Who knew...?   

The flowers and leave were all fussy cut because there are no dies or punches.  Surprisingly, it took almost no time at all to cut the 6 pieces.  It was time to position all the pieces around the sentiment.  The flowers were attached only on the edge of the label die-cut.  Several of the leaves were tucked underneath the flowers.  The label and flowers were attached to the card front using Dimensionals.  The last two leaves were attached flat to the card front with adhesive.  This gave the flowers cluster more depth.


Looking to finish off the card front, I added a length of the new 3/4" wide Frayed Ribbon wrapped across the top of the card and tied into a square knot.  There is a bit of extra fraying going on with the ribbon edges on purpose.  I liked the shabby chic look of the fraying. This ribbon is pretty thick though, so I'll probably need to add extra postage when I mail it.

The flower centers looked really bare, so I added some Genial Gems which are found in the 2021-2022 Annual Catalog.  There are some green gems, but they didn't look nice with the greens already going on here.  So I used the Pale Papaya ones instead.  These added just a bit of color without being overpowering.  The two flower centers are the larger gems.  Then I couldn't stop myself and added 3 of the smaller gems to highlight the sentiment.


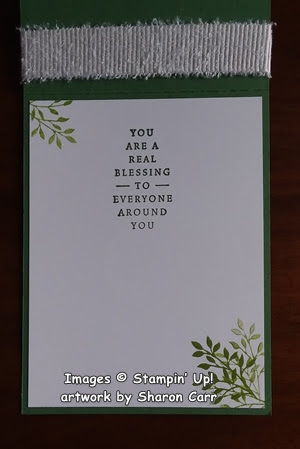
The inside of the card got some special treatment too.  The sentiment is from the new Blessings of Home stamp set.  It is stamped on a layer of Basic White cardstock with Garden Green ink to match the front.

The Friendly Hello stamp set has a leafy branch that I thought would be a good accent.  It was stamped with Granny Apple Green in the top left corner and the opposite bottom right corner.  On the bottom corner, it was stamped once at full strength and then off-stamped two more times to fill it in.  I also like the look of the frayed ribbon wrapping around on the inside of the card.  Just an added benefit.

Thanks for stopping in today to see what's happening.  I'm enjoying playing with the new stamp sets I've already purchased from the 2022 January - June Mini Catalog and the Sale-a-bration bundle I received free.  It's always interesting to see how people interpret using the new sets.  Yes, I've been hanging out at Pinterest to see what others are doing.  It seems to jump-start my own creativity to see what's out there.  If you're like me and need a little push to get going, I hope my ideas will jump-start your creativity!  If there are any questions you have, feel free to contact me.  I'm here to help you be the very best stamper you can be - and have fun doing it!!

Happy creating and stamping!
Sharon

Sunday, January 2, 2022

Sending Rainbows to You

Here it is already, 2022!  We have a fresh new year ahead of us.  Have you made any new year's resolutions?  My big one is to make a greater effort to stay in touch with my family and friends.  Sometimes I get off in my own little world and kind of shut the door behind me.  Well, I'll be working on doing a better job of staying connected and being there for my family and friends.  If you find me slipping, remind me.  OK?  One of my favorite ways to stay in touch is with sending cards.  Duh, as if you didn't know that already!  Today's card was made with that in mind.  It uses one of the new 2022 January - June stamp sets and a Sale-a-bration stamp set and a Designer Paper freebie too.  Lots of new goodies to play with.  Ready to have a Sneak Peek two days early?  Both of these catalogs go live on January 4th so you don't have a very long wait at all.

I figured this card would be perfect for letting someone know you were thinking of them and brightening their day.  What do you think?  The card uses a new set called Rainbows of Happiness.  I've always been partial to rainbows as they are a symbol from God to mankind that He would never destroy all of mankind again in a world-wide flood.  When still living in Michigan and having our basement flooding - not yearly, but way more often than I wanted, I always loved seeing rainbows.  They were a beautiful symbol of hope to me.
For this card, I didn't want a traditional fold, so I started with a Basic White base that was cut at 4 1/4" x 11".  It was then scored at 4", and at 9 1/2".  This gave me an asymmetrical gate-fold card to work with.  The designer paper is one of the free items from the Sale-a-bration catalog.  It's a perfect match for the Rainbow of Happiness stamp set and is called Sunshine & Rainbows.  This is a 6" x 6" paper pack with 48 sheets of playful prints that are bright and sassy.  Don't you just love these sassy prints?  It has both big, bold prints and some lovely, bright pastels too.  For this card I chose two different prints to coordinate.  The bolder, Misty Moonlight print is cut at 4" x 3 3/4" to fit the left side of the gate-fold.  The Mango Melody print is 4" x 1 1/4" for the right flap.  
TIP - When you're cutting this DSP, you need to be very aware of the direction of print.  For this card, you wouldn't want them going side-ways and looking weird.  Check twice before cutting!

Of course, I had to stamp a rainbow for the card.  Checking the size of the rainbow to the different dies, it fit nicely on the 2nd largest rectangle die in the Stitched So Sweetly Dies.  That was cut from Basic White cardstock for the focal point.

I decided to use the colors of the rainbows on the DSP print for my rainbow.  These aren't traditional colors at all, but they are fun (and matched too).  The largest color band is So Saffron.  Next up comes Pool Party.  This one also has the sentiment stamped over it in Misty Moonlight ink.  The 3rd band is Magenta Madness and the smallest is Petal Pink.  I added a few Magenta Madness teensy hearts over the rainbow to make it happy.  This was attached to a cut-to-fit rectangle of Magenta Madness cardstock using adhesive.  

When attaching the images to the card front of a gate-fold card, figure out where the left edge of the front flap is.  Do NOT attach your adhesive beyond this point.  I used four Dimensionals under the images only on the left side to attach this. 
After finishing the front, I felt it needed just a little bling.  There are three of the new Iridescent Rhinestone Basic Jewels added.  You can really see from this picture how pretty those rhinestones are.  Just gorgeous!

When I got to the inside of the card, I might have gotten just a little carried away.  The sentiment comes from the Special Moments stamp set in the Sale-a-bration catalog that you can get free.   Lots of great sentiments in there!

Then I decided I wanted some sunshine inside the card.  This cute sunshiny guy is from the Sharing Sunshine set in the 2021-2022 Annual Catalog.  Love how cute it is, especially with that smiley face.
There were two little strips of DSP left over, so why not add them to the card?  And of course, there just had to be more of those teensy little hearts added too.

That's it for today.  I hope you're inspired to try making a gate-fold card again.  Don't know why it's been a while since I've made one.  They're just so cute.  I need to make them more often.  (Along with all the other stuff I need to do!)  Stay happy and healthy.  And keep stamping and creating!

Sharon

Friday, December 31, 2021

Blue Butterfly Birthday Card

 Happy New Year!

Rick and I wish you the very best new year yet, filled with family and friends, laughter and contentment.  Hope you will take time to stay creative in the days ahead, and not get too busy to take time for yourself.   I find my whole outlook on life is much brighter when I've been creating something.  Now I'm not saying everything I make is share-worthy, but it still brightens my day when I've been puttering in my craft room.  And if I can get someone to play with me, that's even better!  Anybody ready to make the trip south for a visit?  I'm ready for some stamp therapy with my friends.  Until you can get here, I'll just keep on keeping on.

Today I have a pair of cards that are similar and use many of the same products.  They are just put together a little differently.  They both start with a Misty Moonlight card base cut at 8 1/2" x 5 1/2", scored and folded in half. The first layer is Basic White cardstock cut at 5 1/4" x 4".  Cut two of these so you're all set for the inside of the card when you're ready.

When it comes to the next layers, this is where the changes come in.  For this design, the next layer of Misty Moonlight is cut at 3 1/2" square.  The Beauty of the Earth Designer Series Paper is cut at 3 1/4" square.  I love this print with its water-color droplets of pale Misty Moonlight through out.  The colors are perfect together, and the leafy print can be used for so many reasons.  They are attached together with adhesive, then attached to the card front with adhesive also.

TIP:  Before I layered the pieces together, I die-cut a butterfly from the Misty Moonlight layer.  This is a great way to cut a little bulk from your cards while conserving some of your cardstock.  Win-win there!

The butterfly die is part of the Brilliant Wings Dies.  If you look close, you'll see a solid butterfly underneath that's die-cut from Vellum Cardstock.  I wanted to have more of a division between the DSP and the butterfly.  (It was interesting trying to take pictures of this.  The vellum underneath had a tendency to make it look out of focus.)  The butterfly is attached to the vellum with Mini Glue Dots, then attached to the card front with Mini Dimensionals.

The sentiment is from last fall's Sale-a-bration.  I debated about using it, but it really was exactly what I wanted for this card.  Something that was more out there instead of a simple happy birthday.  So, bear with me while I use some retired stuff.  OK?  It was stamped with Misty Moonlight ink on Basic White.  The Basic White piece is 2 1/2" x 1 1/4" and is attached to a layer of Misty Moonlight cardstock that is 2 3/4" x 1 1/2".  This was attached to the card front using Dimensionals to give it a little extra lift.

Can you see the tiny little brass butterflies on the card?  They are new in the upcoming mini catalog.  They have adhesive on the back so they're just too simple to pop on your card wherever you want!  Just too cute!

Here's the other version of the card.  I had a smaller piece of the Designer Paper on hand that I decided to use.  I mean, I always need birthday cards, so why not make another one since everything is already out and ready to use.  The DSP is only 2 3/4" square and the Misty Moonlight piece is 3" square.  On this card, this layer was put on with Dimensionals too.  The butterfly was treated the same way as the first card.

The sentiment layers are also the same size as the first card.  I just moved the layers around a little to fill out the card in a pleasing way.  In that big white area near the bottom, I added 3 Rhinestone Basic Jewels to give it some balance.  The jewels were colored with a Misty Moonlight Stampin' Blends for color to match.

There you have it - the same products but still a different look.  Sometimes you just have to make adjustments to your plans depending on what you've got to work with.  And just because you start out with one idea, nothing says you can't go off in another direction to see where it takes you.  Just have FUN!

I want to wish you a very blessed new year ahead.  Each year the slate is wiped clean and you are starting out fresh again.  Set different goals for yourself - realistic goals.  Then sit down and figure out all the little steps needed to reach your new goals.  Work on those first little steps, and don't get overwhelmed by the big picture.  And yes, I'm talking to myself here!  This is what I need to do too.  Boy, I've sure spent a bunch of time pontificating today.  Guess that's what happens at the end of one year and the beginning of another.  Ok, I'll get off my soapbox now and just wish you a

Happy New Year!!!!

Blessings,
Sharon

Thursday, December 30, 2021

Blessings of Home Card

Hello again!  Glad to see you stopped by.  With yesterday's card, I had one strip of the Harvest Meadow Designer Series Paper left over after I had the stack of cards finished.  And that pack of Soft Succulent cardstock was still sitting out, and the Basic White cardstock was just sitting there too.  So, since everything is out already, why not design a different card to use up those items.  I've got some friend's birthdays coming up that I'll need cards for in January and thought it would be a good place to start.

This card uses the Soft Succulent cardstock for the base with a layer of Basic White on top.  Before the white is attached though, I stamped the largest floral stamp in the new Blessings of Home stamp set as a soft, mono chromatic background.  The stamp was inked, then off-stamped for a softer, 'sketchier' look to the background.  That left-over 1" strip of the DSP was attached to the left side again to anchor the design.  Then it was all attached to the Soft Succulent card base using Multi Purpose Liquid Glue.

The next part of the design was stamping the smaller floral image onto a Basic White layer.  The Stitched So Sweetly Dies have a pretty scalloped and stitched rectangle die that looked to be the perfect size for this.  After die-cutting the white, the floral image was stamped using Memento Tuxedo Black ink.  
For coloring, I chose to use my Stampin' Blends.  I have a couple friends that love purple - any shade will do to make them happy!  So of course, this card has a mix of purple shades for the flowers:  Purple Posy L&D, Highland Heather L, Fresh Freesia L&D.  The leaves are Soft Succulent L&D.  And the flower centers are So Saffron L&D and Cinnamon Cider L.  The pictures really don't do the small flowers justice.  They are the ones colored with Fresh Freesia ink and are so cute in real life.  Much pinkier-purple than they look in the photos.
After coloring, the die-cut was attached to the card front using Dimensionals for some interest.  

The sentiment is the same one from the Inspiring Thoughts set that I shared yesterday, except today the full stamp was used.  It's stamped on Basic White with Soft Succulent ink, trimmed, then layered on a Soft Succulent cardstock piece.  This is attached with adhesive to lay flat on the left and a Dimensional on the right to keep it level.

Hopefully you can see some of the layered Stampin' Blend colors on this close-up of the image.  It was fun using so many layers of color on each flower to get the look I wanted.  Yes, I do love my Blends!!

Underneath the sentiment I added a small knot of Fresh Freesia 3/8" Open Weave Ribbon.  It's attached with a Mini Glue Dot.  

For this card, I felt I needed to add some bling.  The 2021-2023 In Color Jewels just called out to me, so I gave them a try.  I could have used the Fresh Freesia ones, but finally decided on the Soft Succulent gems.  Either color would have worked out well, but since I have more of the Soft Succulent gems I used them for this card.  I love the iridescent look of these gems!  It actually makes them blend in with so many more colors than just the In Colors they should match.  In my humble opinion, these are a must have in your "bling box".


Hope you enjoyed today's post.  I'm having a great time playing around with my newest stamps.  I might have to start branching out to other colors though.  I've been stuck on the Soft Succulent for awhile now.  What color should I play with next?

Happy stamping and creating!  It's a great way to finish out the old year. Of course, it's also the perfect way to start fresh in the new year!  Have fun...

Blessings and many hugs,
Sharon

Wednesday, December 29, 2021

Amazing Silhouettes Sneak Peek

Wow, the time has been really flying by this past week.  I managed to design two cards and thought I'd have them posted already.  But alas, my planning isn't quite lining up with reality.  Today I'm sharing a card that I made to enclose with all the catalogs that I put in the mail today.  Yes, that's running slower than I had planned too.  But at least there are a whole pile of catalogs that were taken to the Post Office earlier today.  Now it's up to the Post Office to see how long it's going to take to get them to all my customers.  If you don't have one in the next ten days, please give me a call and I'll see what I can do.  Anyway, back to the card... 

As a demonstrator, I signed up for the Stampin' Up! Onstage event last November. One of the many fun things I received is this Amazing Silhouettes stamp set which will be available January 4th in the new January - June 2022 Mini Catalog.  It's so much fun getting stamps early!  There are three stamps in this set and they all look like this one with just a silhouette image.  I love the look of these stamps.   And I'm amazed at the amount of detail that shows from just having the image in silhouette like this.  They are really gorgeous.  This is the largest stamp, and after using it on these cards, I'm going to have to try out the other two stamps to see what I come up with.

Because I was making a whole pile of these cards, I was looking for a simple layout that wouldn't take too much time.  I set up the stamp on my Stampa-a-ratus and just stamped away on card after card.  What did I ever do before the Stamp-a-ratus?  It makes stamping multiples so quick and easy, and you always get the image exactly where you want it.  Some of the cards I stamped with Soft Succulent and some with Mint Macaron ink for a slightly softer look.

The color for the card base is the Soft Succulent cardstock cut at 8 1/2" x 5 1/2", scored and folded in half.  This seems to be my favorite color lately.  Out of the last three cards I've designed, all of them use Soft Succulent for the main color.  Hmmm, guess I really like it!  The next layer was Basic White cardstock cut 4"x 5 1/4".  The image was stamped over to the right side.  A 1" x 5 1/4" strip of Harvest Meadow Designer Series Paper was cut and attached to the left side on the Basic White cardstock piece using MultiPurpose Liquid Glue.  Then the Basic White layer was attached to the Soft Succulent base using the MultiPurpose Liquid Glue again.

I used the sentiment from the Inspired Thoughts stamp set that's found in the 2021-2022 Annual Catalog.  I like the way the font skips between all caps and all small letters.  Just something a little different.  I couldn't find a plain Thinking of You in the set, so I used a Soft Succulent marker and just inked the words I wanted.  This is actually a birthday sentiment, but you'd never know.  

TIP:  Make sure you really look at your sentiment stamps to see if you can use just a portion of the stamp to say what you want.  It's so easy to ink up only the words you need using a marker.

The sentiment was stamped on a Basic White strip and then backed with a slightly larger piece of Soft Succulent cardstock.  It was attached to the card front using several Dimensionals.  A tiny knot of Soft Succulent 3/8" Open Weave Ribbon was attached to the left side of the sentiment using a Mini Glue Dot.

As you can see on this last picture, I splatter-tapped some Wink of Stella on the front of this card.  Some cards I left simply plain.  After giving it a lot of thought, I decided to keep the card 'bling-less' this time around.  I really liked the nice, clean look of this card.  Hope you do too.

Well, that's it for today's installment.  Please continue to keep checking in with me.  I'll try my hardest to get more consistent with my posts.  You know, the best laid plans of mice and men oft times go astray.  And I seem to be having a lot of that 'astray' going on!  😁 

Happy creating and stamping!
Sharon