Thursday, September 28, 2023

Stack, Cut & Shuffle Christmas

Hi all!  Are you enjoying some lovely autumn weather where you are?  It might not a perfect day here, but it's running a close second.  I just love it when the high heat dissipates, and the cooler weather comes stealing in.  Waking up to sunshine and cool temps is a real blessing!  Ok, let's get on with today's card.  When it comes to making huge numbers of Christmas cards, I'm always looking for a shortcut.  This Stack, Cut & Shuffle card technique let's you easily make 3 cards in the same amount of time as one.

As you can see, just because the cards are quick, does not mean they're boring.  And each pairing of DSP makes a different batch of cards.  These cards were made using the Walk in the Forest DSP that I used yesterday, but they have a totally different look to them.  Remember, the purchase of this DSP gives back to the community to help others.

Here's a close up of the card in the middle.  To make this batch of three cards, start with the choice of DSP that you want to use.  Like I mentioned, these are made using the Walk in the Forest DSP.  After choosing the DSP prints, choose which cardstock will you use for the base and layer.  I chose Basic White for the base (cut 8 1/2" x 5 1/2") and Pretty Peacock for the layer (cut at 5 1/4" x 4").

Then three designs were chosen from the DSP, and each was cut to 5" x 3 3/4".   Make sure you pay attention to any directional prints when doing this. Carefully stacking them up, two cuts were made through all of them together.  The first cut I made was the diagonal cut about 1" down from the top left to about 1" in from the bottom right.  The second cut is from the top right corner to the center of the part that is left.  This gives you three sections that are approximately 1/3 each.  I usually don't bother measuring these cuts.  As long as you hold all three pieces together when cutting, they will fit together when you shuffle them.

Taking the three top pieces, you lay out one piece each for three cards.  Go through the other two layers of cut DSP and add one to each new card until all the pieces are used and ready to put together.  At this point, start attaching the pieces to the Pretty Peacock layers.  I use "green glue" for this step, so you have a little wiggle time to get the pieces attached snuggly together along the seams.

After getting all the DSP pieces in place, the Peacock layer was attached to the Basic White card with adhesive.

The sentiment layers were die-cut using the Stylish Shapes circle dies.  The smaller one was Basic White, and the framing circle is Pretty Peacock.  After cutting the white circle, a sentiment from the Wishes All Around stamp set was stamped with Pretty Peacock ink.  The two circles were attached with adhesive.  This was attached to the card front using Dimensionals.

This is where I decided to use some retired products to dress it up.  Remember the White Velvet Specialty Paper we had last year?  I throught that would be a nice touch for the snowflakes.  The snowflake dies from the Wishes All Around set were used to cut three of them for each card.  They were attached with Mini Glue Dots.  An Iridescent Pearl was added to the center of each snowflake.

I also thought the retired Polka Dot Tulle Ribbon would add to the wintry look.  The bows each took about 8" to make.  They are attached with Mini Glue Dots also.

I had fun with the first batch of cards, so I changed up the DSP prints a bit and made another three cards.  These really don't take much time to make once you have your prints chosen.  In case you're wondering, the cuts were changed around on these so the largest corner piece was on the top right instead of the bottom left.  Like I said, I usually don't measure the cuts on this type of card.  As long as you hold the layers together carefully while cutting them, they will fit together nicely.

Enjoy making your own Stack, Cut & Shuffle cards and let me know how it turns out.  Just because I used a Christmas DSP doesn't mean you can't change it up to whatever you'd like.  I'd love to hear from you when you make your creations.  Thanks for sharing your time with me.  Check out the Online Store with all the Online Exclusives, Clearance Rack, Kit Store and all the other goodies.  There's always something new and exciting for you to try.  Happy shopping.  And please use the Host Code at the top of this post.  It's much appreciated.

Happy stamping and creating,
Sharon

Wednesday, September 27, 2023

Retro Christmas Card

Hello stamping friends.  Today's card totally reminds me of cards I received as a child.   My own children received cards similar to this one through the years also.  It's just an easy fun card to make that should bring a smile to someone's face.  Hope you enjoy the idea and are surprised by how easy it is to make.

This card has a lighthearted feel to it that reminds me how much children enjoy the winter weather and look forward to Christmas.  This card is almost totally made from the Walk in the Forest Designer Series Paper that's found in the Mini Catalog.  The purchase of this DSP is a way to reach out and help others too.  Stampin'Up! will donate $3 from each purchase of this paper to support the organizations that help those in need at this time of year.  So, it's a win for you and a win for others when this DSP is purchased.  Thank you for your help!

Now on to making the card.  I started with a regular card base of Basic White measuring 8 1/2" x 5 1/2".  It's scored and folded in half as usual.  Then comes the fun of using this Walk in the Forest DSP!  The snowy dots on the Balmy Blue background is the first layer.  It's cut at 5 1/4" x 4".  It's embossed with the Snowflake Sky Embossing Folder to add extra snowflake texture to the sky.  This is attached to the folded white card base with adhesive.

Can you see all the texture on the background?  I think that step really adds to the total look.  

A piece of Basic White cardstock that measures 2" x 4" was ripped in half lengthwise.  One of these pieces makes the snow along the bottom.  It's attached with adhesive.

The trees are on one of the sheets of Walk in the Forest DSP.  They match in size with the Merriest Trees Dies that are in the Mini Catalog on page 69.  After die-cutting a whole forest of trees 😉I chose two to go on this card.  The larger tree has adhesive mostly in the center of the tree, leaving the ends of the branches free to curl up a little.  The small tree overlaps the larger tree and is attached with Dimenisionals.  The trees are kept to the left side of the card to leave room for the bear.

The bear is also from that same sheet of DSP.  It coordinates with the Beary Cute Punch found in the Mini Catalog.  He was punched out and then attached to the card front using Dimensionals also.  

The sentiment comes from the Brightest Glow stamp set.  I love the word joy and tend to use it a lot for Christmas.  It's stamped on a strip of Basic White cardstock with Misty Moonlight ink then fussy cut to use here.  Small bits of Dimensionals are added under it to raise it from the card front.

Two of the new Adhesive-backed Snowflakes were added to the background.  These snowflakes are an Online Exclusive only and come in three sizes and three colors - copper, gold, and white.  They are a nice extra touch here.

The card was basically finished, but I wasn't quite happy with it.  Thinking back on all those Christmas cards ages ago, the one thing that really stands out in my memories is all the glitter.  Remember the raised glitter on all the detail?  I have some retired Star Dust glitter glue that is from years ago but is still useable.  So, on all the edges of the tree branches and on the snow underneath, scribble-y lines of this glitter glue were added to highlight the design.  Yes!  That's just the look I was going for and was perfect!

Hope you enjoyed my Christmas card that was a walk down memory lane for me.  It was fun to make and used almost no stamping, just the Walk in the Forest Designer Series Paper that provides all the materials.  If you don't have the punch or dies, you can always fussy cut these images.  Easy peasy.  Thanks for stopping by to see what's new.

Happy stamping and creating,
Sharon

Monday, September 25, 2023

Stars At Night Fun Fold

Hey y'all!  Having a great day.  Hubby is coming home from a trip to the farm.  That won't be happening too many more times.  Ahh, changes.  Life is an ongoing process, isn't it?  Finally getting around to posting this card in the Stars At Night series.  Hope you've enjoyed them so far.  Today's card is simple, but I think it's rather cool.  Give a look and tell me what you think.

It looks just like a regular card when it comes out of the envelope, but then it pops out a little and stands up really nice.   To get started, use a piece of Boho Blue cardstock measuring 8 1/2" x 5 1/2".  It's scored at 2 1/8" and 4 1/4" to get the fold back flap on the card front.  Cut another piece of Boho Blue that measures 3 7/8" x 5 1/8".

This smaller piece of Boho Blue was embossed with the Hybrid Embossing Folder that coordinates.  To help the stars show up a little better on the blue, I inked the embossing folder with Craft White ink.  The ink was only on the side of the embossing folder that has the Stampin' Up! logo on it.  I love how it softly defines all the stars both large and small.  This layer was then attached to a Basic White layer with "green glue".  The Basic White layer measures 5 1/4" x 4".  Cut two of these so you have one for the inside of the card.

The next step is folding the card base.  Fold in half, then fold the front flap back on itself.  Two strips of Tear & Tape were added to this as shown.  The Basic White layer was added to this trying to keep the edges all the same, so it has a frame of Boho Blue surrounding this.

I cut a piece of Vellum about 4" x 5".  I placed the coordinating hybrid die over the three large stars then added the Vellum piece.  Ran it through the embossing machine and set the stars aside.    There is a 1" x 4" strip of Vellum cut that was embossed with the edge of the embossing folder on that piece of Vellum.

The smaller star is attached over the larger star using a Mini Glue Dot in the middle.  This double star is then attached over the embossed star on the card front using a Dimensional in the middle only.  I prefer having the stars raised up without a lot of glue holding them together.

A small star die was used to cut some More Dazzle Specialty Paper.  This was attached in the center of the stars using one Mini Glue Dot only in the center like all the others.  This More Dazzle Paper star really gives it some lovely shine and sparkle.

The sentiment layer is Basic White cardstock stamped with the greeting that comes from the Brightest Glow stamp set.  Boho Blue ink was used.  The Labels Aglow die was used to cut this.  

The embossed strip of Vellum was attached about 1/2" from the bottom.  Adhesive was placed down the center behind where the label is attached.  The label is raised up on Dimensionals and placed in the center of the Vellum strip.  

The extra Basic White layer has one of the sentiments from the Brightest Glow set stamped in Boho Blue ink.  The stardust stamp is used to embellish each corner of the inside of the card using Boho Blue ink.  The white layer is attached inside the card making sure that it doesn't show from the front.  I had an extra star die-cut from the More Dazzle paper left-over, so that was attached in the top left corner near the sentiment.  A Mini Glue Dot was used for this.

Here's a quick view of the inside of the card.

The last little bit of bling on this card are the Rhinestone Basic Jewels.  I thought their clear shine was the best addition for this card.   I love how this card turned out.  I'm frustrated that I only used blue and silver for all three of the Stars At Night series cards.  I really will have to see what else I can design with this lovely set.  But I have to admit, I'm really partial to blue and silver together.  It's so elegant in my opinion, so what's not to like?

Thank you for sharing some time with me today.  Hope you give this card idea a try.  I truly think it's simply gorgeous and I'll be making a few more of these for own Christmas cards.

Many of the backordered items are in stock again.  If you've been waiting on something, keep checking back every day.  There's been an update of the Clearance items too.  If you do place an order, please use the Host Code shown at the top of this post.  A big thank you to all of you that do order.  It's so appreciated!  

Happy stamping and creating,
Sharon

Friday, September 22, 2023

All About Autumn Simple Card

 Good morning on this beautiful, sunshiny, fall morning!  Oh my goodness.  The weather has been so wonderful I hate to stay inside!  The squirrels around here have been very busy collecting the tiny acorns falling from our trees.  It's been so much fun watching their antics.  They are definitely great entertainment while drinking my coffee this morning!  I had planned on posting another Stars At Night card, but I've been overwhelmed with good feelings about autumn because it's been so gorgeous around here.  So I changed my mind at the very last minute to post these cards instead.  I made them a couple of weeks ago, but since the products were on backorder decided not to post them just yet.  You need to keep checking the site for availability.  I guess all of you liked this collection as much as I did, because it's been backordered for a while.  Let's get to the cards.

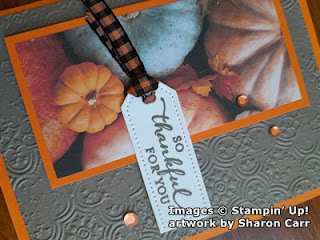
I said cards, because I took one sheet of the 6" x 6" DSP and made three cards with a 2" strip left over to make another card.  Isn't this paper design just gorgeous?  I've taken my grandsons to several different pumpkin patches through the years, and this brings back those special memories perfectly.  You know what I mean.  The sunshine and blue skies, the cooler air, the piles of all sizes and shapes and colors of pumpkins.  I always gravitated towards the odd colors and shapes myself.  The boys always thought I was kind of weird in that respect, but they would happily help me find the oddest pumpkins around!  It got to be a contest of who could find the weirdest pumpkins for me!  Ahh, those wonderful memories.  But I digress here.  Let's get back to making our own pumpkin patch.

I started with a card base of what else?  Pumpkin Pie cardstock, of course.  It measures 8 1/2" x 5 1/2" and is scored and folded at 4 1/4".

The layer here is Pebbled Path cardstock.  It is cut to 5 1/4" x 4".  It's run through the embossing machine with the new Distressed Tile 3D Embossing Folder.  Doesn't it have wonderful texture?  It's attached to the Pumpkin Pie card base with "green glue".  I have to mention here, the lighting around here is making the Pebbled Path cardstock look much grayer than it is.  The color is really more of a brown than gray to me.  Anyway, it's a beautiful color and perfect for this card.

Next, the pumpkin print from the All About Autumn DSP is cut.  There is a 2" strip cut from the bottom.  Then the remaining DSP is cut into 2" strips also.   This gives you three strips of 2" x 4" and one strip of 2" x 6" for later.  To frame the DSP, I cut a piece of Pumpkin Pie to measure 2 1/4" x 4 1/4".  These are attached together with adhesive then attached to the left side of the card front using Dimensionals.

The sentiment tag was die-cut from Basic White cardstock using the smallest Tailored Tag die.  The wording comes from the new So Sincere stamp set found on page 47 in the Mini Catalog.  Each of the sentiments in this set have different fonts and they cover most of your stamping needs.  The sentiment here is stamped with Pebbled Path ink.

The ribbon is the Black & Very Vanilla ribbon in the Mini Catalog.  I didn't like the vanilla color, but I did like the plaid.  So I used the Pumpkin Pie Dark Blends to color it to match.  About 4" of ribbon was used on each card.  The labels are attached with adhesive on the left side and Dimensionals on the right side to keep it flat.

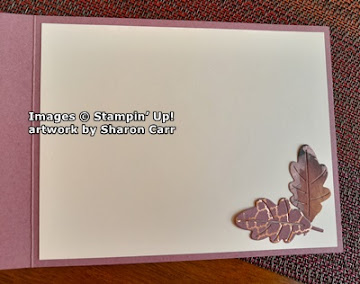
The inside of the card has a layer of Basic White cardstock.  Two of the Autumn Leaves were stamped in the bottom corner.  Pumpkin Pie ink was used after off-stamping it to get a softer color.  The veins were stamped in with Pebbled Path ink.   I have not decided on a sentiment for inside this card yet.  But when I do, it'll be stamped with Pebbled Path ink to match.

The final touch on the card front were the sequins.  The Neutrals Adhesive-backed Sequins from the main catalog were used.  I chose the orangey-copper color to use here.  I love how they work with the Pumpkin Pie color used on the card.  They have a subtle shine that seemed to enhance the fall colors used here.

Thank you for joining me on this trip to the pumpkin patch.  I hope you enjoyed yourself and consider giving this card a try.  It's very straightforward and almost sleek in design, but the colors and pumpkins give it the warmth of the fall season.  Kick back with a delicious cup of cider and start creating your own pumpkin patch.  Have fun!

Happy stamping and creating,
Sharon

Thursday, September 21, 2023

More Stars

Hello friends!  Sorry for the long wait between posts.  Life just takes a few twists and turns, and then my schedule seems to get totally out of control.  I don't know whether I'm coming or going sometimes!  Let's hope things quiet down around here and we get back to normal.  Whatever that is!  Today I'm sharing another card using the new Stars At Night stamp set with coordinating dies.   Oh yes, it showcases the Oh Holy Night Designer Series Paper for a lovely starry background.  Let's get started making this card.

Isn't this starry print just gorgeous?  I wish you could see it in person.  It's so rich looking!  Once I had this idea in my head, this card almost made itself!  It starts with a base of Night of Navy cardstock that measures 8 1/2" x 5 1/2".  It's scored at 4 1/4" and folded in half.  A layer of Basic White was cut at 4" x 5 1/4".  Cut two of the white layers so you have one for the inside of the card.  The starry DSP layer measures 3 7/8" x 5 1/8".  I only wanted a very small white frame around it, so you've got measurements in eighths.  Sometimes I think the tiny white frame actually gives the card more of a pop.  My preference.  You could always cut it a little smaller to have a bigger white frame.

To start, layer the DSP onto the Basic White layer.  I used "green glue" on the outer edges of the layers only because I wanted the die-cut area to be separate.  One of the dies in the set cut out the multi-pronged star and all the tiny dots of light surrounding it.  That is what was used through the two layers that were glued together.  Because the center wasn't glued, these die-cut sections have a tendency to rise up somewhat and don't lay totally flat.  

A 5 1/2" length of the Silver & White Sheer Ribbon was wrapped around to the back and taped down.  This is about 1" from the bottom edge.  After the ribbon was attached, the entire layer was attached to the folded navy card base.  I used "green glue" for this.  You can see the navy background shows through the card front.

Two of the stars from the Stars At Night die set were cut from the More Dazzle Specialty Designer Series Paper.  The smaller star is attached over the larger one with a Mini Glue Dot between them.  They are attached to the card front using cut pieces of Dimensionals to hold it up away from the card base.

The smallest label die from the Something Fancy dies set was used to cut a Basic White label.  The sentiment is from the Stars At Night stamp set and is stamped with Night of Navy ink.  The label is attached over the strip of ribbon using Dimensionals.  Another length of ribbon was used to make a bow which was attached right at the edge of the tag.  It's held on with Mini Glue Dots.

On the 2nd piece of Basic White cardstock that you already cut, stamp the sentiment for the inside of the card with Night of Navy ink.  This sentiment comes from the Brightest Glow set.  The sprinkle of stardust is from the Stars At Night set.  They are stamped with Night of Navy ink that has been off-stamped.  The white layer is attached inside the card with "green glue".
The final touch on the card is of course the bling.  Even with the More Dazzle stars and the silver edged ribbon, I decided to add just a little more bling to the card.  I thought the Rhinestone Basic Jewels would be just the right touch.  A larger one was added to the center of the star.  Three smaller ones were added around the card front.  Simple and subtle.

I really enjoyed making this card.  I fussed around with the die-cut star background trying to decide how I wanted it to look.  I originally wanted something sparkly because of the shining star, but I ended up with the dark to highlight the star instead.  

Hope you like this card.  I have one more to share with you using this set, then it's on to another set.  I figured this way I would actually use all the sets I have instead of forgetting one (or more) and being very unhappy with myself.  Hopefully it won't take me so long to get the next post done.  Sorry again for the delay.  Thanks for spending some crafty time with me.  Hope you give this Stars At Night Bundle a try.  I think it's well worth it.

Happy stamping and creating,
Sharon

Wednesday, September 13, 2023

Stars At Night

Hello friends!   Hope you're doing well today.  I figured it was time to abandon my Autumn Leaves series of posts for a while.  After the back-ordered items came in and promptly sold out again, it was time to focus on a different bundle.  So, today we'll start a new series of cards using the Stars At Night Bundle found on page 17 of the new September - December Mini Catalog as the main item.  It's really a lovely stamp set with a coordinating Hybrid Embossing Folder and Die set.  I think there's going to be many creative possibilities with this bundle, and I can't wait to try them.

Here's the first one I've made, and I love it.  It's a fairly simple Christmas card to make, but quite elegant.  My friend Ruth shared a photo of a similar card but gave me no instructions or details.  Thanks for the idea, Ruth.  This is my version of her card. 

I started with a card base of Basic White Thick cardstock that measures 8 1/2" x 5 1/2".  It's scored in half and folded.  Next a layer of Night of Navy cardstock was cut at 5 1/4" x 4" and a layer of Vellum was cut at 3 3/4" x 5".  The Vellum layer was embossed using only the Stars at Night Embossing Folder, not the dies at this time.  Doesn't the embossed vellum have absolutely beautiful detail?

To attach it to the Night of Navy cardstock layer, I put a strip of adhesive behind the area where the More Dazzle would be placed.  Then I used rolled up Mini Glue Dots behind the larger stars to hold in place.

Here's another look at the detail on the embossed Vellum.  

Next a strip of the silver More Dazzle Specialty Paper was cut to measure 1" x 3 3/4".  This was attached to the card front with Seal Adhesive across the back of the specialty paper to hold in place.  Two of the stars were die-cut from this paper also.  I'm not sure you can see the smaller star on top of the long skinny star.  The larger star was attached with Mini Glue Dots, but the small star has a Mini Dimensional behind it to define it better.

The sentiment from the Stars At Night set was stamped with Night of Navy ink onto a Basic White piece that measures about 1 1/2" x 2".  It's die-cut using the coordinating die.  Don't you love the interesting shape of this piece?  This is added over the More Dazzle strip using Dimensionals.

The last step was adding the Rhinestone Basic Jewels.  For this card, I thought the crystal clear gems were the best accent.  Two of the larger gems were added to the larger stars, and three of the smaller stars have the small rhinestones added.  With adding the rhinestones directly over the Mini Glue Dots holding the Vellum layer, they are completely hidden.  You could use different rhinestones or sequins if you prefer of course.

You've now seen the first installment of the Stars At Night series.  Hope you like this card and will come back for more inspiration using this set.  Thank you for stopping in.

Happy stamping and creating,
Sharon

Tuesday, September 12, 2023

All About Autumn in Moody Mauve

Hey there!  I don't know about you, but I am so ready for the weather to cool off a little.  I'd still like some sunny days mind you, but the heat has really been intense this summer and I've had enough.  So let's get on with the lovely, crisp fall weather here!  Trying to make my own fall weather, I've been making more fall cards with the All About Autumn 6" x 6" Designer Series Paper.  It also uses the Autumn Leaves Bundle for all the leaves decorating this focal point.  The Designer Paper is finally back in stock so make sure you order it soon in case it ends up on back-order again.  I've been holding off on posting a couple cards waiting for it to come back in stock, so let's get started with a super gorgeous fall card using Moody Mauve for the main color.  Yes, I know.  That isn't the color I think of for fall, but check this out and you might just change your mind!

Isn't this beautiful?  I just love it!!!  The mix of beiges, mauves, and grays is just fabulous!

Start with the card base of Moody Mauve that measures 11" x 4 1/4" and is scored at 5 1/2".  This makes the card a side fold which is a little different than usual. The middle layer for this card is Crumb Cake.  This measures 5 1/4" x 4".  It brings more definition between the DSP and the card base.  The DSP layer with all these gorgeous fall leaves measures 5" x 3 3/4" and is attached directly to the Crumb Cake with adhesive.  These layers are attached to the folded card base using Dimensionals.

Before I got started on the focal area, a 3" piece of natural ribbon from the Copper & Natural Ribbon Duo was added to the card front with adhesive.  Before attaching, a thread was pulled out from each end until there was about 1/2" fringe.

Now that the base is out of the way, on to the many parts of the focal point.  The sentiment is from the Autumn Leaves stamp set.  It's stamped with Moody Mauve ink onto a piece of Very Vanilla cardstock.  It's punched out with the 1 3/4" Scallop Circle Punch.  The layer behind it is Moody Mauve punched with the 2" Circle Punch.  They are attached using adhesive.

The leaves are a mixture of stamped and die-cut leaves from the set.  I stamped some with Moody Mauve both full strength and stamped off.  These were die-cut using the coordinating die from the set.  There are a couple leaves die-cut from the All About Autumn DSP - mauve with the copper design on them.  The small maple leaves and the larger oak(?) leaves are cut from the Oxidized Copper Specialty Paper.  (So gorgeous!!!)  The Crumb Cake branches are trees from the Horse & Sleigh Dies.  The small open-work stems are from the Darling Details Bundle and cut from Gold Shimmer Paper.  The leaves and branches were all built up and attached to the back of the sentiment layers.  After all the pieces were attached, the sentiment was attached over the ribbon using Dimenisonals.  At this time, the three little open-work stems in the gold shimmer were tucked in underneath the focal point and attached with adhesive.

The inside of the card is Very Vanilla to match the front.  I haven't decided on a sentiment in here yet.  Or I just might write a longer note instead.  We'll see...

The two oak(?) leaves attached in the corner were both die-cut from the same piece of DSP that had been used for the card front.  I added them so you can see both sides because I couldn't decide which way I wanted them to show.  Both of the designs together work out nicely and I like the mix.

Going back to the front of the card, I realized it could use a little more bling.  I guess the gorgeous Oxidized Copper leaves just weren't enough for me.  After trying all my different embellishments, I chose to use the Adhesive-backed Sparkle Gems in the Champagne (gold/copper) tone.  They seem to add enough extra sparkle without being too outrageous.  Yes, I like my glitz, but there is a limit as far as I'm concerned.  Yes, to each person his own tastes are the best.

Thanks so much for stopping in today to see what I have to share with you.  Feel free to leave a comment if you'd like.  It's always good to hear what you're thinking about my ideas.  I did mention that the All About Autumn Designer Series is back in stock.  I know several of you have been waiting patiently, so get it while it's available.  While shopping, check out the Online Exclusives, kits, and Clearance Rack that are available for you.  


And don't forget to look at the October Paper Pumpkin kit that you can pre-order until October 10th.  It looks like it's going to be adorable.  Create sparkling cards filled with warmth and light using the Home for the Holidays Paper Pumpkin Kit! 
Each kit comes with eight cards, four each of two designs, with festive coordinating envelopes. The shimmery details and traditional Christmas colors are sure to help you create cards that bring cheer and joy to any recipient. 
The kit this month also features special glitter glue! What a great way to add some extra twinkly details to your cards. And the best part? Your October Paper Pumpkin Kit will arrive in a beautiful box that coordinates with the theme and design of the cards in this kit. What a great way to bring inspiration to your crafting experience!  Subscribe by 10 October to get this cozy, Christmas village-themed kit!  Remember you can subscribe for just the one month or keep your subscription going until you're ready to take a break.   It's all about the ease of getting a crafting kit each month sent right to your door.  Ask me about information if you're interested.

Happy stamping and creating,
Sharon

Saturday, September 9, 2023

Joy of Noel Version 3

Hello friends!  I'm a day late here.  Thought I'd get this card posted on Friday.  But as you can see, that just didn't happen.  For not working at a full-time job, I certainly seem to be extra busy some days.  But not to fear, the post is finally getting done so you'll have the next installment using the Joy of Noel Bundle.  I knew as soon as I saw it in the new Mini Catalog this was a set I absolutely needed.  Well, to be honest, I didn't really need it, but I wanted it pretty badly!  😄 I've always liked the word noel and love the Christmas songs that use the word.  So why not cards too?

Today's card featured the lovely Joy of Christmas Designer Series Paper.  Isn't is just gorgeous?!  I love the different greens 'water-colored' onto this print.  I wish I could do painting like this.  But I can't, so I'm thrilled to have some lovely paper like this to use.  This card is also a new fun fold card for me.  I've made cards very similar, but this card has an extra score line that changes it a bit.

To start making this card, use a piece of Real Red cardstock that measures 8 1/2" x 5 1/2".  Cut off 1" from the end of the piece so it measures 7 1/2".  Score is at 3 1/4" and 6 1/2".  Fold in at the 3 1/4" line with the other score line on the right side of the card.

Cut your DSP at 5 1/4" x 3" and another piece at 5 1/4" x 3/4".  Attach the larger piece to the left side of your card front using adhesive.  The thin piece is attached near the right edge on the inside of the card, so it shows nicely lined up when the card is closed as shown here.

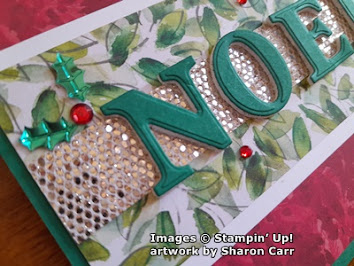
Next comes making the focal part of the card.  Stamp the noel onto Basic White cardstock using Real Red ink.  It was punched out with the 2 3/8" Circle Punch.  Next is a skinny framing layer of Real Red cardstock that was die-cut with the Deckled Circles Dies.  The next largest die cut a layer of the More Dazzle Specialty Paper for some sparkle and shine.  

The white layer is attached to the red circle layer with adhesive.  Then both are attached to the glittery layer with Dimensionals so it stays attached.

To attach this to the card front, I used Tear and Tape under the very right-hand side by the right edge underneath the O and L.  This is attached to the skinny layer of DSP only on the right of the card.  The other 3/4 of the circle just close over the card front without being attached.
To open the card, just fold back on the right-hand score line and it pops the focal piece upright to open the left flap and reveal the inside of the card.  Here's how the card looks when opened.

The inner piece of Basic White cardstock measures 5 1/4" x 3".  One of the sentiments from the Brightest Glow stamp set was used on the card.  It's stamped with Real Red ink.  Several holly leaves from the Joy of Noel set were stamped with Old Olive ink in two of the corners.  Berries from the same set were added with Real Red ink.  The holly leaves were colored with Old Olive Light and Dark Blends.

Closing the card, the Noel sentiment has three rhinestones added.  These are clear rhinestones that were colored with the Old Olive Dark Blends to match the card.  A double bow was made from two lengths of Parakeet Party Metallic Woven Ribbon.  It's attached with a Mini Glue Dot under the letters.  This gives it a little bit of subtle sheen.

I thought this picture from the top would give you a good idea of the fold and where the score lines go.  This back fold is a little bit different than anything I've done before, but it gives the card just a slightly different twist.

Thanks for visiting again and seeing the latest version of the Joy of Noel cards.  They've been fun to make and just given me more ideas to try with other cards too.   

If you ever have any questions about how my cards are made, feel free to call and ask.  I truly love helping others enjoy the art of stamping.  You can get more involved with your card designs than I do, or you can keep your them very simple and straight forward.  Either way, the idea is to have fun with your creating.  Then share them with someone else and spread the joy!

Happy stamping and creating,
Sharon 

Thursday, September 7, 2023

Joy of Noel Take 2

Ok my stamping friends, are you ready for the second in the series of Joy of Noel card ideas?  This one is more of the clean, crisp look I tend to prefer.  It's an idea that hit me as soon as I saw this stamp set and I couldn't wait to try it.  Tell me what you think...

Isn't it great?  I love how simple it is, but it's not boring at all in my humble opinion.  There's the layering, the texture, and the embellishments that all come together to make this crisp, holiday card.  To make the card, start with a card base of Shaded Spruce cardstock that measures 8 1/2" x 5 1/2".  It's scored and folded to make the basic card shape.  The next layer is Night of Navy.  I love these two colors together!  The layer measures 5 1/4" x 4".  Don't attach this just yet.

The Basic White layer is next and measures 5" x 3 3/4".  This is embossed with the new Snowflake Sky Embossing Folder found in the new Mini Catalog.  This is so cute with tiny snowflakes intermixed with random dots that are heavier on one side than the other.  This layer is attached to the Night of Navy layer using "green glue".  After that, the two layers are attached to the card base using a good number of Dimenisonals.

The Joy of Noel Bundle has the lettering for both stamping and die-cutting these letters.  I stamped it once on Basic White cardstock using Shaded Spruce ink then die-cut them.  Then I added a 2 1/2" square of the Adhesive Sheets to the back of a 2 1/2" square of Night of Navy cardstock before die-cutting.

After all the letters were cut, adhesive was added to the back of the stamped letters.  These were added off-set to the right and top of the solid letters.  This gives them a shadow look underneath and to the left side.  After spacing them onto the card, the backing was removed from each of the letters, and they were attached to the right side of the card front.  They are about 3/4" from the right edge of the white layer.

The 'joyous' sentiment used here is also from the Joy of Noel stamp set.  This was stamped with Shaded Spruce ink onto a Basic White strip.  After stamping, the sentiment was fussy cut.  Then it was attached to the card front with "green glue" off to the left side.

The last little finishing touch is the Loose Holly Gems and Sequins added near each of the letters.  One of the large red rhinestones was placed by each letter using a Mini Glue Dot to attach it.  Then two of the holly sequins were added by each red rhinestone.  A rolled Mini Glue Dot was added under each sequin to hold it to the card front.  The colors are a little different than the Shaded Spruce cardstock and ink that were used, but I think they make a great accent for the card.

A layer of Basic White is attached inside the card with a sentiment stamped with Night of Navy ink.  A couple of holly leaves from the same set were stamped in a corner or two using Shaded Spruce ink.  Then Shaded Spruce Light and Dark Blends were used to add some color to the holly.

Hope you enjoyed this second idea using the Joy of Noel Bundle.  Like I said earlier, I really love this new stamp bundle and all the little touches that make this card special.  When you try out some of these new products, hope you love them as much as I do.

Make sure you check out the Kits section, the Clearance Rack, and especially the Online Exclusives section when you visit the website.  There's just so many wonderful new things to try.  Have fun letting your creative energies have a go at it.  You never know what wonderful creation you'll come up with next!

Happy stamping and creating,
Sharon

Wednesday, September 6, 2023

Joy of Noel

Hey friends!  Are you ready to get a serious start on those Christmas cards?  I feel like I've been on an exciting and exhausting card marathon the last few days.  Whew boy!  Was it ever fun!  I've got so many new things to share with you.  Today is the start of a series of cards made with the new Joy of Noel stamp and die set.  This first one is a pretty straight forward card made in shades of red and green.  Just what you'd expect at Christmas time.  We'll see where we go from there.  Come on, let's create!

See, pretty basic but it does have a few extras to make it special.  There are a few layers, and as I look at it now, there are many variations that are already floating about in my brain.  This card starts with a Shaded Spruce base that's 8 1/2" x 5 1/2", then scored and folded in half.  

Next is a layer of the Joy of Christmas Designer Paper.  This print is a mottled mix of Real Red and Cherry Cobbler that's cut to measure 5 1/4" x 4".  It's not attached to the card base just yet. 

Another one of the prints in the DSP is this lovely water-color-y look of leaves.  I just fell in love with this print along with several other water-color prints in this paper pack.  You have to see them!  They almost look like painted vellum layers that are so sheer.  Just gorgeous!  This print was cut to measure 2" x 5 1/4".

There are a couple other layers also cut at this time.  A Basic White layer that measures 5 1/4" x 2 1/2".  And a strip of the silver More Dazzle 6" x 6" Specialty Paper.  It measures 5 1/4" x 3/4".  This may be just a small strip, but it really packs a wallop of glitz!  

These three layers were attached together with adhesive.  Then they were attached to the red DSP with adhesive.  If there are any uneven edges, now is the time to trim them straight.   Afterwards, attach them to the Shaded Spruce card base.  Everything is layered flat on the card.

Now on to making the NOEL.  I backed a piece of Shaded Spruce with Foam Adhesive Sheets found on page 138 in the Annual Catalog.  Both pieces measured 2 1/4" square.  After attaching together, the piece was die-cut with the Joy of Noel Dies.  Can you see the wonderful texture the die leaves on each letter?  It's almost like another layer of green cardstock there.  The backing was simply peeled from each letter, and they were placed on the More Dazzle strip in the center.  Easy Peasy.

Several Loose Holly Gems and Sequins were added to finish the design.  The top left and bottom right corners each have two holly leaves and a larger red gem.  There are a few of the smaller red gems tucked in around the design to finish.   These shiny leaves and gems make the perfect accent.

There you have it.  It's a pretty traditional style of Christmas card with the usual red and green colors, but I love the little extras that make it stand out like the awesome Joy of Christmas DSP, the More Dazzle Specialty Paper, the die-cut letters, and lastly the little sequins and gems to finish.  I don't know about you, but I love Christmas time whether you go traditional or more modern or even eclectic.  It just makes me happy.

Now, for something else that really makes me happy - the new September -December Mini Catalog is live and ready for business!  Woo Hoo!  I'm sure you've been waiting for the time to order and it's here now.  Let's go shopping.  I have to admit, I added another order for myself this morning.  I just couldn't resist!  And make sure you check out the Online Exclusives, the new Kit that's available, 5 new Designer Paper packs, and the Clearance Rack too.  Lots of new and old items available right now!  If you do order, I'd appreciate it if you would use the Host Code shown at the top of the blog post.  Thank you so much.  Come back to see the next installment using the Joy of Noel Bundle.  I think you'll like it.

Happy stamping and creating,
Sharon

Friday, September 1, 2023

Christmas Classics

Hello there.  I finally got around to working with the new Christmas Classics Bundle yesterday.  I just wasn't sure what I wanted to do with it, so I put it off until now.  Do you ever get something new and absolutely love it, but are stumped for an idea to sort of "break the ice"? It seems like that first try out of a new set is always the hardest for me.  Yes, there are some projects you'll never see.  Can't imagine why!  😂😉  My sister Connie sent me a package in the mail with lots of goodies in it.  One of the items was a retired bit of DSP named Delightful Daisy.  I don't know if you remember it, but it was always one of my favorites.  As soon as I saw the knitted DSP print, I knew what I wanted to make using the Christmas Classics Bundle.  Isn't it funny how a small thing will spark a new idea that you've been struggling and fretting over?  So here's the card...

So weird how the camera really accentuates one color and seem to change it and make it stand out.  On this picture the band of DSP looks more of a greyed green than in real life.  Oh well, I'm sticking with this idea anyway.

Start with a card base of Mossy Meadow that measures 8 1/2" x 5 1/2", scored and folded in half.  The 1 3/4" strip of DSP is layered across this attaching it with adhesive.  If you want more of a contrast between the DSP and card base, attach a 2" strip of Very Vanilla cardstock between the two pieces.

The die-cut greenery layer is from the Christmas Classics die set.  It's die-cut from Old Olive cardstock.  Run the die back and forth an extra time to make sure all the detail pieces just pop out.  There is a square die that fits in the piece just perfectly.  It's used to die-cut the Very Vanilla cardstock.  Two of the holly branches from the same set were stamped with Mossy Meadow ink and die-cut also.

The sentiment is from the Christmas Classics set and is my favorite.  It's stamped with Mossy Meadow ink.  The little design in the corners is from the same set.  They are stamped with Moody Mauve.  The three holly berries are also stamped with Moody Mauve and then die-cut.  The holly branches were colored with Old Olive Blends.

The two holly branches were attached behind the Very Vanilla sentiment piece.  The three holly berries were attached on top of this using a Mini Glue Dot behind each of them.  The Very Vanilla layer was attached to the Old Olive detail layer using adhesive.

The detailed Old Olive layer was attached to the card front using Dimensionals to hold it up.  This way the details really show up nicely because of the shadows.

For an accent, a double bow was made from the Metallic Woven Ribbon in Parakeet Party.  About 15" of ribbon was used to make the bow.  I really like the hint of shine from the Metallic Ribbon.  A couple of Mini Glue Dots were used to attached it to the card front.

As an added accent, a single one of the Festive Pearls was used in each corner of the sentiment layer.  A quick swipe of Wink of Stella was used on each of the holly berries to finish.

I love the idea of mixing the old and new together.  We all have retired items that we don't want to part with so it's worth the time and effort to incorporate them into our new projects.  Plus, this means I have one more card made for my Christmas stash.  This has given me a few more ideas for using this wonderful Christmas stamp set too.  You'll have to come back to see what I make next.

The countdown is happening.  Today is September 1st already!  Where has the summer gone?  But with September comes the new Mini Catalog.  Only a few more days to wait.  The 6th is the day you can start ordering from the new Mini Catalog.  Hope you've got your Wish List started.

Happy stamping and creating,
Sharon