Thursday, January 26, 2023

Dainty Flowers DSP Cards

Hello dear Friend!  Glad you stopped by today.  I planned on using one of the pieces of the Dainty Flowers Designer Series Paper to make my card for today.  It is one of the freebies available during Sale-a-Bration.  It will be available until the end of February or until it sells out.  So far, this has been the most popular item from the Sale-a-bration brochure by far.  If you've put off choosing this one so you can get something else first, please don't wait too long!  Anyway, back to my project.  I had cut the DSP at 5 1/4" across the 12" piece, then cut off one 4" piece from that.  So far, no problems.  Then I started trying to figure out what green I wanted to use for my layering color and/or card base.  Hmmm...  I tried the greens that were listed to match with the DSP.  That was fine, but then I went further afield.  I liked other greens that weren't listed to match so why not make several cards using the different greens and then decide what I liked the most.

After playing around all afternoon, I finally stopped after making three cards.  But I will revisit this little print again sometime soon.  It's a nice, quiet little print and quite my style. As I went along, more color was added to the card instead of just the greens and a neutral.  I'll have another picture of each one at the end of this post, but I wanted to focus on just one of these cards today.

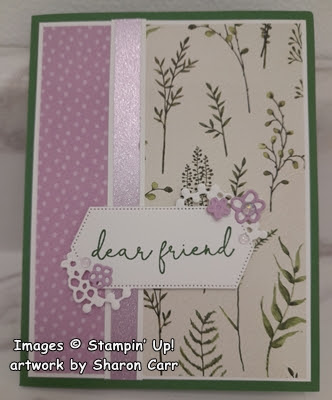
This is the card I chose for today.  It uses many of the dies from the Sentimental Park Bundle that I absolutely love!  The label dies are so much fun to use either singly or together.  And as you can see, they were used on each one of these cards.

To make this card, I started with a card base of Mossy Meadow cardstock that measures 11" x 4 1/4", scored at 5 1/2" and folded in half.  I cut a layer of Old Olive cardstock that measures 5 1/4" x 4".  To this a layer of the Dainty Designs DSP that measures 5 1/8" x 3 7/8" was attached with adhesive.  A strip of a different print (from another stamping session) that measures 4" x 1 1/2" was attached across the middle of the card.  This was attached to the folded card base using Dimensionals.  

For the focal point of the card, I die-cut Old Olive cardstock using the largest of label dies in the Sentimental Park die set.  Then the middle-sized die which is plain was used to cut a Very Vanilla label.  The really cool thing about these dies is that the smaller one tucks right under the flowers on the larger die-cut.  It lines up so nice and easily slides right into place.  Before attaching them together, the sentiment from the Blessings From Home set was stamped in the center with Mossy Meadow ink.  Then it was tucked in nice and neat with just a smidge of adhesive to hold it in place.

I cut an 11" length of Fresh Freesia 3/8" Open Weave Ribbon.  After putting adhesive on the back of the labels, I laid the ribbon back and forth at a diagonal, so it showed on both sides of the label.  This was a nice way to dress up the card with ribbon without trying to force a bow to fit in there somewhere.  At this point, I attached the beribboned label to the card front using Dimensionals.  So pretty!

There are multiple different small flower dies in the Sentimental Park set.  I used two of them to make the clusters of flowers.  Fresh Freesia was die-cut to make these detailed flowers.  They were scattered around until I was happy with the layout.  Then they're attached to the label with Mini Glue Dots. 

The tiny gold pearls (retired) were attached to the larger flowers.  I thought they were too big for the tiny flowers, so I added just a touch of Gold Wink of Stella which is also retired.  After looking at the card some more, I went back and added more of the gold pearls to the label to balance it out.

There's a layer of Very Vanilla cardstock inside the card.  It has a 1/8" strip of the same Old Olive DSP that is going across the card front attached down the side to finish it off.  

This is the 1st card that I made.  It's time to share the other two.

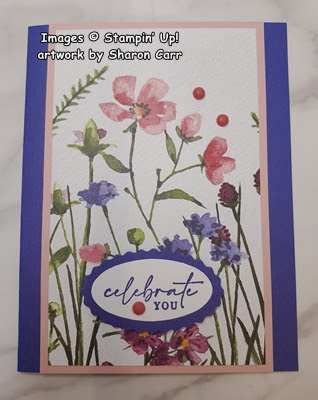
This card ended up being a very toned-down version of the last one.  The greens used are Soft Sea Foam for the card base and Mossy Meadow for the framing layer in between.
On this card, I used the smallest label in the die set.  This was cut from Mossy Meadow.  A skinny label from the Cracker & Treat Box Die Set found on page 170 in the Annual Catalog is used to cut Very Vanilla cardstock.  The sentiment is from the Sentimental Park set and is stamped with Mossy Meadow ink.
Extra flowers were cut from Very Vanilla and added to the label with Mini Glue Dots.  Tiny pearls are added to the flowers.
Two of the little wood elements were added for interest.  They are attached to the card base with rolled Mini Glue Dots.  And a double bow made from Linen Thread was added as the final touch.

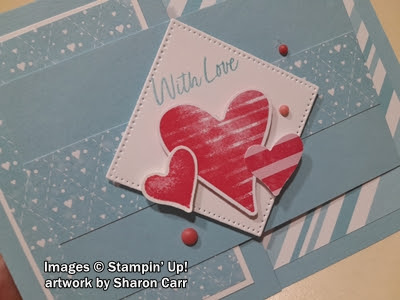
The last card was changed quite a bit.  The base card ended up being Garden Green with a framing layer of Basic White which brightened the card up a lot.  The size of the DSP is the same.  It was just cut to make a 1 1/4" strip along the side of the card.  The backside of Fresh Freesia polka dots also brightened the card immensely.  
I added a 5/8" strip of Basic White to cover the seam between the two colors.  Then I added a 3/8" strip of the Fine Shimmer Paper in the Fresh Freesia color over the white strip.  Wow, that really popped it!  It can be found on page 15 of the Mini Catalog, and it's gorgeous!
The label is the smallest in the Sentimental Park set.  It's die-cut from Basic White with the sentiment from the Sentimental Park set stamped with Garden Green ink.  Three of the tiny flowers were die-cut from Fresh Freesia cardstock and attached to the label.  Three Opal Rounds were added for bling.

There you have three different cards using the same piece of DSP but coming up fairly different looking.  It's amazing how a different color green cardstock started the whole process to make them different with minimal changes.  Yes, the last one was quite different because I used the backside of the DSP.  But still....  I'm thinking I want to go back and try some cards using Rich Razzleberry as a layer and see how they turn out.  I think it would be lovely, but I need to see it first.

Thanks for stopping in to check on what's new around here.  Hope you like today's post with the different versions of the same DSP.  That's really been fun for me.  Remember, if that Dainty Flowers DSP is one of the Sale-a-bration freebies you want to get your hands on, don't wait too long.  I'm thinking that it'll be the first one to sell out.

By the way, thanks to those of you that have been sending me cards in the mail.  I've received some really fabulous cards and I can tell you've put time, effort, and thought into making them.  Thank you so much for thinking of me.  They really brighten those dreary, rainy days we've had so many of lately.  I'm planning another Friendship Friday post to share all these cards with you.   Love you all so much and miss you!!!

Happy stamping and creating,
Sharon

Tuesday, January 24, 2023

Waterfall Fun Fold Card

Hello, hello!  Glad you stopped by today to see what's happening here.  I've been on a roll with my stamping and really cranking cards out.  I've worked myself into the role of sending cards out to all the shut-ins at church.  For Christmas, there were 19 cards I sent out.  I thought I'd get a head start on the valentines I needed to send in February, and 16 were already finished.  Last Sunday I received the updated list.  My goodness!  The list has expanded to 28 people needing cards sent to them.  So much for being ahead of the game.  I've got a bunch more valentines to make real soon.  I really needed a break from valentine cards though, so I tried my hand at making one of these waterfall cards.  I hadn't made any since November I think, so it was time to try another one with current stamps and paper.

Didn't this fun fold card turn out really cute?  And so very bright too!!  I guess I'm over-compensating for all the wet and dreary days we've been having lately.  Well, that's my excuse anyway.  You know, I much prefer pastels, but this card is pretty darn cute anyway.  I had to hold it closed for the picture because it kept wanting to pop open.

To make a waterfall card, start with cardstock that measures 11" x 4 1/4".  The cardstock I used is Mango Melody.  It's scored at 2 1/2", 3 3/4", 6 3/4", and 8 1/4" to make the cascading layers.  Starting with the left side, fold mountain, valley, mountain, and valley to make the card.  

For the layers on this card, I used the Dandy Designs Designer Series Paper that is one of the Sale-a-bration choices you have when you make a $100 purchase or more.  This is a huge pack of DSP that has four sheets of twelve different designs.  I thought the colors would be a little more pastel than they are, but still adorable.  


You can see I had no trouble switching to a brighter card.  Both of the prints measure 3 7/8" x 3 7/8" square.  To make cutting the DSP easier, I cut a 4" strip, cut off 4", then trimmed it to 3 7/8" on two sides.  For me that's easier than cutting it at 3 7/8" from the beginning.

There are two pieces of Basic White that measure 4" x 4" square.  These layer behind the two DSP prints.  There is a piece of Basic White that measures 3 1/4" x 2 1/4" for the sentiment on the last panel of the card.  And also a piece to cut the square for the front of the card using the Stylish Shapes Dies.  I almost forgot - scraps for stamping and die-cutting the two batches of flowers.

There are two pieces of Old Olive used on the card.  One is about 3" x 3" to cut the Stylish Shapes square to layer on the card front.  The other is 3 1/2" x 2 1/2" to layer the sentiment on the last panel.

Let's get the stamping done next.  The sentiment is from the Happy Thoughts set and is stamped with Memento Tuxedo Black ink near the top of the inside white piece.


The 'hey' is stamped on the very top right corner of the square white piece.  This is stamped with the same black ink.  The sentiment is from the Simply Fabulous set that you can find in the Annual Catalog on page 41.  I looked through all my sets to find a small 'hello-type' stamp that would fit in that area.

Don't forget to stamp the two flower patches on the white scrap of cardstock also.  After stamping, these were colored with Mango Melody, Calypso Coral, Old Olive, and Daffodil Delight markers before die-cutting.

Almost everything is stamped and die-cut now.  All except for the main attraction.  That little turtle from the Rain or Shine DSP is also die-cut with the die from the Playing if the Rain Bundle.  Isn't that awesome that you don't have to fussy cut him out?

Let's get things layered up and put together.  Attach each DSP print to a Basic White layer.  Adhere the floral print one to the front fold of the card base making sure the adhesive is only on the top half of the layer so it won't stick anywhere it shouldn't.  Adhere the geometric layer to the inside fold making sure it lines up with the top layer when the card is closed.  Again, pay attention to where you put the adhesive! Attach the two square die-cut pieces together.  Then adhere the turtle with adhesive.  And leave space, so there's room where the little add-ons will go.  Add this to the center of the card front with Dimensionals.

Attach one of the flower patches to the front of the card by the turtle using Mini Dimensionals.  Attach the second bunch to the center of the next layer using adhesive to keep it flat.

Attach the sentiment layer to the Old Olive cardstock for the last panel.  These are attached with adhesive right up near the fold so it can't be seen when the card is closed.

Final steps - those little Loose Daisy Embellishments.  They are so adorable and seem to be the perfect finish for the card.  You can find them in the January-April Mini Catalog on page 51.  I made a bouquet of them to cover the daisy the turtle is holding.  They are attached with a Mini Glue Dot for each of them.  I also added three of them on each of the other two panels.  Aren't they just the perfect touch?

I just wanted to add one more picture of a side view of the card so you can see the layering and folding a little better.  They say a picture is worth a thousand words, so hopefully this one says a lot!

Thanks for hanging out with me for a while.  Hope this post wasn't too long and gave you clear enough instructions for you to make your own waterfall card.  Once you've figured out the scoring, it's really quite easy to make.  If you're planning on placing an order anytime soon, please consider me as your demonstrator and use the Host Code at the top of this blog post.  And don't forget to choose the Dandy Designs Paper for one of your Sale-a-bration gifts.  Thank you!

Happy stamping and creating,
Sharon

Sunday, January 22, 2023

Another Valentine for You

Happy Sunday Friends!  Hope you're staying dry and warm today.  It's raining again and the temps are hovering just below 40!  Oh my goodness, it's chilly here!  At least it isn't snow.  Oops, I probably shouldn't have said that out loud.  😆  It really was nasty going out for church this morning, but it was worth it.  Great service and Paster Schuyler talked about Christian maturity.  Now tell me, who doesn't need to work on that?  I know I do!

Getting back to stamping, I needed to make another valentine or two (or more!), but I wanted to use stamps that weren't strictly for Valentine's Day.  I had fun going through my stash of cards and decided to use the Count on Me stamp set.  It's so cute, but I keep overlooking it for some of the flashier sets.  Time to show it some love!

This little bear is just the sweetest ever.  He's got his back turned and he's carrying a heart.  Doesn't that work for a valentine?  

I started with a card base of Sweet Sorbet measuring 8 1/2" x 5 1/2" that's scored in half and folded.  Next, I chose the heart print from the Country Floral Lane Designer Series Paper found on page 9 of the January-April Mini Catalog.  It measures 5" x 3 3/4.  I added a backing layer of Petal Pink to define it but kept it real skinny.  The Petal Pink layer measures 5 1/8" x 3 7/8".  The two layers are attached together, then attached to the card front with adhesive.  If you use this paper, make sure you pay attention to the direction of the pattern.

The Petal Pink strip with the hearts to accent this layer is the back side of the first print.  It's 1" wide and is attached with adhesive.

Next comes our little bear.  He's stamped with Memento Tuxedo Black ink on a Basic White piece of cardstock.  I colored him with Crumb Cake Blends in the Light tone first and went back to shade with the same color.  After he'd been finished and sitting aside for awhile, I felt he was too blah, so I went back and colored with the Crumb Cake Dark Blends.  It makes all the difference in the world!  I was surprised that he already looked shaded because I had shaded him already with the Light Blends.  Love his soft look!  His heart was colored with Real Red Light and Dark Blends.  The muzzle was colored with Ivory Blends.  When I was happy with his look, he was fussy cut and ready to go on the card.

I was looking for a die to cut a layer for my bear to reside on.  I checked the new Something Fancy Dies.  You can find these on page 17 of the January-April Mini Catalog.  The larger label seemed the perfect size for my little bear.  It's cut from Mossy Meadow cardstock which is one of the colors listed to match the DSP.  I used the smallest label die of the same shape from the set to die-cut some Basic White cardstock.  I stamped one of the sentiments from the coordinating Something Fancy set using Mossy Meadow ink.

The bear was attached to the Mossy Meadow label with Dimensionals.  The stamped label was attached partially underneath the right side of the Mossy Meadow label.  They were both attached to the card front using Dimensionals.  A double bow of 2022-2024 In Color Baker's Twine in the Sweet Sorbet color was attached near the corner of the label by using a Mini Glue Dot.  And another one of those retired Resin Hearts was attached to the sentiment label.

For the inside of the card, I stuck with a more geometric look.  There is a 1/8" strip of Mossy Meadow cardstock added to the bottom of a Basic White layer.  Then a 1/4" strip of Petal Pink was added to the side.  This way the colors from the front are brought inside the card, but it still leaves lots of room for writing your thoughts.

 Hope you're having fun making a few valentines for your favorite people.  It's a great way to let those special people know how much you care about them.  And don't forget to add chocolate - both for you while you're making the card and for your special someone too.  Stamping and chocolate - a perfect pairing!

Happy stamping and creating,
Sharon

Thursday, January 19, 2023

More Traditional Valentine for You

Hey there!  I'm still sort of stuck in Valentine mode.  There are more ideas out there to explore.  Today, I've used the Country Bouquet Bundle again to come up with a slightly more traditional valentine for you.  At least there are hearts on it this time!  And it is a fun fold, so that's always a bonus.  But wait!  There's more!  Just like those infomercials, I do have more for you today.  There is a second card that starts with the same color and fun fold and then goes on from there.  Hope you enjoy these cards and let me know what you think.

This card uses a very easy fun fold to get you started.  You need a piece of cardstock that measures 11" x 4 1/4" that is scored at 5 1/2".  For this card I used Balmy Blue. Then 2 3/4" is cut from the front flap.  This piece is then placed sideways across the front of the card.  Pretty quick and simple way to change the look of a card.

Let's start with the measurements on the DSP layers and get the base of the card finished before we move on.  Two different DSP's are used here - the Country Floral Lane DSP on page 9 in the 2023 January-April Mini Catalog and the Dandy Designs DSP found on page 14 in the 2023 January-February Sale-a-bration catalog.  They both have a base color of Balmy Blue to they work well together.

There are two pieces of the Country Floral Lane print.  The larger one measures 3 5/8" x 2 1/8", and smaller one 4 1/4" x 1".  If you're using this DSP, make sure you pay attention to the direction of the print.  The Dandy Designs print measures 5" x 3 3/4".

There are three pieces of Basic White cardstock used here.  The one for inside the card measures 4 1/8" x 2 5/8" to fit behind the cross piece on the front of the card. The next piece measures 3 3/4" x 2 1/4" and is for the left side of the card front.  The last piece needs to be big enough to die-cut the square and stamp the two hearts - approximately 2 1/4" x 5 1/2".

First attach the left-hand DSP to the Basic White layer and attach to the card front.  Next attach the striped DSP to the inside of the card.  Last, attach the 1" strip across the front piece of the card.  Use adhesive to attach all these layers flat to the card base.

The square was cut using the Stylish Shapes Dies.  It's the one that measures just less than 2" x 2".  After cutting, the sentiment was stamped with Balmy Blue ink diagonally in the top corner.  The sentiment comes from the Country Bouquet stamp set.  This is one of the new sets that are available in the 2023 January-April Mini Catalog.  On the left-over piece of Basic White cardstock, the large and small hearts were stamped with Sweet Sorbet ink and punched out with the coordinating punch.  The two hearts are on one stamp and punch out together making it easy for you.  Another small heart was punched from a scrap of the Country Floral Lane DSP.  Overlapping each other, they were all attached to the square using Dimesionals. 

Attach the cross-wise piece to the front of the card making sure you have adhesive only on the half that fits on the left side flap of the card!  After adding this, line up the corners of the square and attach to it with Dimesionals.

Just one more picture showing the inside of the card.  Before attaching the last Basic White piece, stamp the sentiment and the small heart accent using Sweet Sorbet ink.

Last touches on the card are the 2022-2024 In Color Matte Decorative Dots.  They come in two sizes and different shades of the same colors - so cool!  I used a large size in the 2nd darkest color and two tiny ones in the lightest and darkest colors.  I like the extra contrast they give and really match the hearts on the front of the card perfectly.


OK, are you still with me?  The next card is made exactly the same as the first, except for the stamp set and the DSP used.  The measurements are all the same.

The stamp set and dies are called Playing in the Rain.  The bunny is die-cut from a piece of the Rain or Shine DSP, which makes it so easy.  I did fussy cut the two umbrellas used on this card.  It didn't take but a couple of minutes.

I haven't decided on adding bling.  I know I'll add something, just haven't decided on what yet.  I have some retired "rain drops" from several years ago.  They might be just what I need here.

Here's a quick picture of the inside of this card.  Isn't it cute?  Each of the animals has some glossy areas on their clothes and so do all the umbrellas.  It really adds to the look.  I hated covering up those darling umbrellas though!

Ok, that is definitely enough for today.  Thanks for stopping in to see what's new today.  I feel like I've been typing all afternoon.  Hope you didn't think there was too much information to get through.  It was fun creating these two cards - so similar, but yet so different looking.

Happy stamping and creating,
Sharon

Wednesday, January 18, 2023

Carrots?

Ok, I've been thinking about Valentine cards lately.  You know, it's that time of year where everything is in pinks and reds with lace, hearts and flowers covering everything.  As I was going through my newer stamps, one of the sentiments on the Thanks A Bunch set caught my eye.  "Love you a bunch" sounded like it should be on a Valentine card, right?   While looking for a stamp with a bouquet of flowers, my eyes kept going back to that set.  Hmmm, what do you think of carrots for Valentine's Day?  Actually, with the colors I chose, you don't have to use this card for a valentine at all.  But the idea just makes me laugh and reminds me of those 'punny' valentines that were around when I was in grade school way back in the dark ages!  Do they still make those kinds of valentines anymore?  Or is everything superheroes or video game characters?  No matter, let's get on to those carrots!

Starting out, use a piece of Basic White Thick cardstock that's cut to 8 1/2" x 5 1/2".  It's scored at 4 1/4" and folded in half.  The largest Rectangle Stitched Die was used to cut a piece of So Saffron cardstock.  This piece is attached to the white card base using adhesive.

The bit of Designer Paper that's used is from the Dandy Designs DSP that is one of the freebies during Sale-a-bration right now.  With a $100 order, you can get this huge 48 sheet pack of Designer Paper.  There's a mix of bright and softer colors with multiple stripes and prints.  If you know me, you know this is one of the first items I had to have!  The piece here is Mango Melody and measures 4" x 2 1/8".  It's attached to the center of the card front by using adhesive.

Now comes the fun.  I used Stylish Shapes Dies next.  The two middle sizes of the circles were used - the smaller for the white layer and the larger for the Mango Melody layer.   After die-cutting, the carrots were stamped first, then the greenery.  The carrots were inked with a Mango Melody ink pad then darkened on the ends with Pumpkin Pie ink and a sponge dauber.  Then the carrot tops were stamped with Granny Apple Green ink twice.  You can find the carrots in the Thanks a Bunch set that is in the Sale-a-bration brochure on page 5.  Yes, this is a freebie item when you have a $50 purchase!  Woo hoo!

The white circle was attached to the Mango Melody layer with a Dimensional in the middle.  More Dimensionals were added under the Mango Melody layer then attached to the card front.

The banner was cut from Basic White cardstock using the Stylish Shapes also.  This is the largest banner.  The "love you" was stamped in Granny Apple Green ink and "a bunch" was stamped using Pumpkin Pie.  It's attached to the card front using Dimensionals also.

To dress up my carrot card, I used some of the twine in the 2022-2024 In Color Baker's Twine Pack in the Parakeet Party color.  Two lengths were tied into a sweet bow and attached to the banner under the "love you" stamping.  I used a rolled Mini Glue Dot to attach it.

Of course, the card needed a little bling if it's going to be a valentine, right?  I used three of the 2021-2023 In Color Opal Rounds in the Pale Papaya color.  Don't they fit right in with the Mango Melody colors?  It needed a couple carrots added inside the card to finish it off.

So, what do you think of carrots for a valentine?  Do you "carrot" all?     😁   Yeah, I know, that was really bad.

Don't forget to check out the Sale-s-bration options available to you.  I've shared two great items that I used today, and others that I've shared earlier.  You don't always have a chance to get something for free when you're out shopping, so it makes sense to take advantage when you can.  And thank you for doing your shopping with me.  It is so appreciated!

Happy stamping and creating!
Sharon

Monday, January 16, 2023

Copying Connie Again

Hello Friends!  Hope you're doing well and staying busy.  For today's post, I'm sharing my version of a card my sister sent me and then sharing her card.  I loved the look of her card and knew I had nothing that she used to make it.  Darn!  When talking with her, she challenged me to come up with something close using what I had.  It took me a lot of thinking before I decided to take up her challenge.  First, I'll show you what I've made, then share her idea that I copied and selectively edited.  Then you can let me know if I came up with a viable copied idea.

Here it is!  I love the crisp, clean look of just green and white.  All the lovely layering of leaves really makes this card special.  This is how it's made...

Start with a piece of Basic White Thick cardstock that measures 11" x 4 1/4", scored at 5 1/2".  There is some stamping directly onto this.  Both the Natures's Prints (page 91) and Botanical Layers (page 93) were used to stamp leaves.  The largest stem from the Nature's Prints set was used with Soft Succulent ink to stamp once on the top right side of the card and once on the left bottom of the card.  I used a scrap piece of paper to mask the area where I didn't want the stems to show in the middle of the card.  The thick leafy stem from Botanical Layers was stamped on the left top with Evening Evergreen ink.   The smaller leafy stem was stamped on the bottom right with the same ink.

Over the stamped images, a layer of the Vellum Layering Designs was placed.  I used a piece with subtle, tiny white writing all over it.  It measures 5 1/4" x 3".  It's attached only through the area that the wording will go using a strong adhesive.

Then come the die-cut leaves.  I used the Splendid Stems Dies from the July-December 2022 Mini Catalog.  (I don't know why I thought it was in the regular catalog and still current, sorry!)  Four of the open-work dies were used to cut Basic White, Soft Succulent, and Evening Evergreen cardstock. The leafy spray from Framed Florets Dies was used also.  Some of these needed the stems trimmed to fit.  Then they were attached to the vellum with adhesive making sure all the stem ends were hidden.

For the banner across the card, I started with a piece of Basic White that measured 4 1/2" x 1 1/2".  Using the Basic Borders Dies, a stitched zig-zag was cut to make it about 1 1/4" at the widest tips.  A sentiment from the Splendid Thoughts stamp set was stamped with Evening Evergreen ink close to the center.

A piece of Evening Evergreen cardstock was cut to frame the white piece top and bottom.  It measured 4 1/4" x 1 3/8".  They are attached together with adhesive.  Then it was attached to the card front using Dimensionals for a little height.

Five of the Opal Rounds were sprinkled on for some bling.  I just had to add them!

You know me and left-over strips of paper.  The left-over zig-zag piece was attached to a piece of Evening Evergreen that was only 5/8" wide.  These were attached to the bottom of the inside of the card to carry the design over.

Here's the original card.  If you look closely, you'll see that just about everything on the card has been changed.  Like I said, she used all the things I didn't have.  I love the look of those really big open leaves.  So pretty.  Plus, there's a touch of another color green in there.  Looks like it could be Old Olive.

Now if you want to make your version of this card, go right ahead.  If you'd like to send me a picture of the card to share here, be my guest.  I'd love to see what you're creating, and I'll try to add them to this post.  This could be fun!

Thanks for stopping by again today.  I'm working on more projects to share with you.  I miss you all and feel that this is a good way to stay in touch.  And I truly love to hear from you about not only what I'm sharing with you and what you're doing with the ideas, but life in general.  Love you!

Happy stamping and creating!
Sharon

Saturday, January 14, 2023

Pastel Count on Me Card

Hello there!  Back again with another idea for you.  The card I have would make a lovely card to welcome a new baby, but since I have no new babies to welcome, I chose different wording.  I think my friend might like this card since she's like me and loves pastels.  So here we go...

Isn't this just a sweet card?  The design is a mixture of old and new, so feel free to mix up your designs and use whatever you have on hand.  It's an easy fun fold too, so it's a win-win situation as far as I can see.  You could change up the sentiment, cardstock and DSP colors to use this for just about any occasion you please.  I wanted to use the Count on Me stamp set because I've neglected it badly.  You can find the set on page 61 of the Annual Catalog.  There are six different darling images to choose from and five sentiments to coordinate with them.  Of course, you don't have to use the sentiments just because it's a set.  I chose to use a sentiment from the Catch You Later stamp set from last year's catalog.  I had my friend in mind and thought this worked well.

Start with a card base of Pool Party that measures 11" x 4 1/4".  Score it at 1" and 5 1/2".  Next the Hive 3D Embossing Folder was used to give the front some texture.  After that, fold back the 1" part of the card front that you scored.  I added a piece of the Design a Daydream DSP that is a Host pick in the Annual Catalog.  The little piece was a leftover from a different project and measures 3/4" x 4".  It's attached with adhesive.  Then 3 Dimensionals were placed behind the flap to hold it closed to the front of the card.

Next two rectangles were cut using the Stitched So Sweetly dies.  I used the 2nd largest to cut a Blushing Bride layer, and the 3rd largest die to cut a Basic White layer.  On the white layer, the little hugging koalas were stamped near the top using Gray Granite ink.  To balance them, the sentiment was stamped near the bottom with Gray Granite ink also.  I used watercolor pencils to color the koalas and a Blender Pen to lightly blend the colors.

The two die-cut layers were attached together with Dimensionals.  A length of Pool Party Grosgrain Ribbon was wrapped around the two layers and tied into a bow.  The Pool Party Ribbon is new in the January-April Mini Catalog on pages 15 & 87.  This was attached to the card front with Dimensionals also.  

Three Iridescent Rhinestone Basic Jewels were added to the card front for a little bling.  They were a perfect match for the pastel colors used on this card.

Here's the inside of the card.  A piece of Basic White cardstock was cut to 5 1/4" x 4".  I had a skinny 1/4" strip of Blushing Bride in my scraps that I added to the edge of the card.  I thought it was a nice accent both when the card was closed or open.  It's attached with a bit of adhesive.

I used a stamp from the new Country Bouquet set found on page 10 of the January-April Mini Catalog on the inside of the card.  Since I'll be using this card to send a note, I thought the words fit just right.  They are stamped with Gray Granite ink too.

That's it for today's card post.  If you make a card with this fun fold idea, please share your creation with me.  I'd love to see what you're making.  I'm sorry I used so many retired products today, but I know many of you have those exact things I used.  If you don't, please go through your stash of goodies and find something that will work just as well - or maybe even better.  If you don't have rectangle dies of some sort, try circles or ovals.  The sky is the limit when it comes to stamping!

I don't usually push Paper Pumpkin Kits to you, but there is what looks to be an adorable kit coming up next month.  You might want to think about getting a one-time order just for that kit.  It also coordinates with the Playing in the Rain suite of stamps and products that are so cute.  I've just been playing with them and trying to finish a card or two to share with you.  They really are cute!


SUBSCRIPTION INFORMATION

Subscribe to the February Paper Pumpkin Kit between 11 January 2023 and 10 February 2023 by clicking here!

Happy stamping and creating!

Sharon

Tuesday, January 10, 2023

Country Bouquet Happiness

Hello, hello!  Hope you're doing well, and life is running along smoothly.  Seems like we're having some bumps in the road all the time lately.  But I guess that's what life is all about, isn't it?  Today I have a card to share that's pulling all kinds of odds and ends together to make a whole.  I had fun making it and hope you like it.

This is so funny - I didn't realize how Christmas-y this card looked until just now.  All because I took the picture on a green tablecloth.  Go figure...  Anyway, I had fun pulling items together to make this card.

It started with the Country Bouquet stamp set.  This is a new set in the January-April Mini Catalog.  I love this floral heart with its two-step image stamps.  It's great getting all this detail on the heart with just two stamps.  I stamped the flowers and hearts with Real Red ink onto a piece of Very Vanilla cardstock just to get a feel for the stamp.  Then stamped the leaves and stems with Garden Green ink.  I was happy enough with the placement of the images that I decided to use the image for a card.

I had recently gotten the Split Card Textures Dies and wanted to try them out.  You can find them on page 86 and on page 174 in the 2022-2023 Annual Catalog.  I die-cut the side of a top-folded Very Vanilla card with the 'plaid pattern'.  I decided that I preferred the pattern on the other side of the card, so turned the card on its side and then inside out with the die-cut pattern along the top of the card.  With having the back-side of the pattern on the front of the card, you now have much more of a textured feel to the card.  I cut a piece of Real Red cardstock that measured 5 3/8" x 4 1/8" to place inside the card to show through.  It was attached to the left side of the card with Multi Purpose Liquid Glue.

The sentiment is from the Cheerful Basket stamp set in the 2022-2023 Annual Catalog on page 35.  I really like this sentiment and it's sure to be one of my favorites in the coming months.  It's stamped with Real Red ink.  A couple of small hearts from the Country Bouquet set were stamped above the sentiment with the same ink.

At this point, I thought some Wink of Stella would be a nice touch.  It's spattered on over the entire card front.  Unfortunately, it didn't show up as much as I thought it would.  But it still gives it a nice touch when the angle of the light is just right.

The original stamped heart that I had made needed to be fussy cut from the Very Vanilla piece as there are no dies for this set.  The heart was so easy to cut out, so that really wasn't a problem.  It did need something between the card front and the heart to make it stand out more though.  After trying several ideas and promptly rejecting all of them, I ran across a 3/8" Real Red organdy ribbon that's retired.  This seemed to be the perfect match for the card.  It gave the heart some definition but wasn't too 'heavy' for the design.  I put several stripes of adhesive across the back of the heart and 'swooshed' the ribbon back and forth.  This looked much better than a bow.  After getting the ribbon situated the way I liked it, the heart was attached to the card front using Dimensionals.  I thought about adding some sort of embellishment but decided against it.

So that's it for today's post.  This is such a fun Valentine set that really doesn't have to be used for Valentine's Day.  I figured if you changed the colors on this, it could be used any time you needed a card to cheer someone up.  After changing the sentiment, it would work nicely for an anniversary card too.  Just put on your creative thinking cap and get stamping!

Reminder - as if you need reminding - Sale-a-bration is going on right now and things are busy.  Many of you were smart enough to pick up the Dainty Flowers DSP for your first free choice.   I think that's an excellent choice.  I know I'll probably end up using all mine up and need to get some more.   😄

Happy stamping and creating,
Sharon

Wednesday, January 4, 2023

Sneak Peek Hearts

Hello there!  When I got up this morning, I was thinking we ought to consider building an ark.  It was pouring rain and had been raining for several hours.  The creek behind our house was really over the banks - more so than we've seen it since we moved here.  I'm so thankful we live up on a hill, so we don't have to worry about flooding anymore.  If this was going on in Michigan, I'd expect water up to my hips at least.  Thank God that isn't the case anymore!  Wow, the rain is just absolutely crazy right now.  Today's post shares a cute little card featuring the Country Bouquet Bundle shown on pages 9 & 10 in the new Mini Catalog and the pretty coordinating 12" x 12" Country Floral Lane Designer Series Paper.  It's just so sweet.  Hope you like it.

Isn't it cute?  The card starts out with Sweet Sorbet for the base that measures 8 1/2" x 5 1/2".  It's scored at 4 1/4" and folded in half.  Next there's a layer of Basic White that measures 5 1/8" x 3 7/8".  A layer of the sweet Country Floral Lane DSP in Sweet Sorbet with teensy white hearts is next.  It measures 5" x 3 3/4".  This layer is adhered to the Basic White layer to give a very thin frame of white showing all around just to separate the two Sweet Sorbet colors.  Sometimes that skinny little frame is more effective than the larger 1/4" frame.

Before going any further with this design, I spattered this with Wink of Stella.  It's very hard to see this in any of the pictures, but the sparkle it adds is subtle and just right.


Next, I stamped the two hearts with Sweet Sorbet ink and the two leaves with Mint Macaron ink.  They are both punched out with the coordinating Country Bouquet Punch that is part of the bundle. 

I thought a circle shape would look nice under the hearts.  I had a leftover 2 1/2" circle in Mint Macaron from some Christmas cards I made.  Then used the 2nd largest circle from the Stylish Shapes Dies set to cut a stitched circle from Basic White cardstock.  These are just about the same size, so there was no layering here.  Instead, the Mint Macaron circle is offset quite a bit to show it off more.  They are attached together in the overlap area, then attached to the card front with Dimensionals.  The two hearts and leaves were attached to the circles with Dimensionals too.

The sentiments are from the same Country Bouquet bundle.  They were stamped on Basic White with Mint Macaron ink.  The words were fussy-cut instead of using a punch or die-cut.  The first part of the sentiment was attached flat at the top of the card.  The 2nd half of the sentiment was popped up with Dimensionals on the white circle.

The design needed something else.  I tried several ribbons, but they were too much for the design.  I was thinking of using White Baker's Twine, but then I saw the 2022-2024 In Color Baker's Twine assortment.  Oh my, this was just what I needed.  I used two strands of the twine to make the bow.  It's attached to the card front with a Mini Glue Dot.

For bling on this card, I remembered some small red and white tiny hearts from a couple of years ago.  They were the perfect touch and almost the exact size of the hearts on the paper.  When they were added to the card, they were placed right over the existing hearts.  Too cute!

So that's my first Valentine for the year 2023.  My goodness, I'm still trying to remember that we're into another year, and now I'm jumping ahead to Valentine's Day already.  But the Country Bouquet bundle and DSP are darling, and I wanted to make sure you saw it stamped up.  Now I'll have to make something with the set that isn't for Valentine's Day.  I'm sure I can think of something if you give me enough time!  😄 
    
Are you ready?  Tomorrow morning - January 5th - the new Mini Catalog and Sale-a-bration start!   I'm so excited to see what you like.  Let me know what your favorites are, and if I have the sets, I'll try to post a project using them.  Have fun!  If you have any questions concerning any of the products or Sale-a-bration, please contact me.  I'd love to hear your thoughts and opinions.

Happy stamping and creating (and shopping!),
Sharon


Tuesday, January 3, 2023

Dainty Flowers Bouquet of Cards

 Hi Friend!  Glad you made it back here today.  I'm so excited to share an assortment of cards that are made using only one sheet of the new Dainty Flowers Designer Series Paper.  And guess what?  The DSP is free and only available during Sale-a-bration!  My suggestion is to make sure this is your first pick of Sale-a-bration items.  It's simply gorgeous and I'm thinking it probably won't be available for the full two months of Sale-a-bration.  In other words, it's gonna sell out sugah!  (That's said with a southern accent.)  Silliness aside, it is really a winner!  Let me show you my first session with this gorgeous paper.

This is using just one sheet only, and there's even a strip of DSP left over to make another card or two.   Love it!  The flowers are done with watercolors and have a nicely realistic look.  It feels just like walking through an English country garden.
I'll start out with the very easiest one to make.  The sheet of DSP was cut at 5 1/2" x 12" first.  Do this to cut both sides and you have a strip of DSP from the middle for other cards, or you could make smaller strips to go inside your card.  Then cut the large pieces into 4" sections.  Thus 6 card pieces ready to go as is or make a few adjustments as needed like I did with the other cards.  Let's create!  

The first two pieces I used seemed to have the largest amount of Rich Razzleberry in the flower colors.  I cut the Rich Razzleberry cardstock to measure 8 1/2" x 5 1/2" for each card, scored and folded in half.

The DSP was attached to the card base with adhesive.  The Double Oval Punch was used to punch both Basic White and Crushed Curry pieces for the sentiments.  Some of the sentiments used are from the coordinating stamp set Dainty Delight.  This one is not - it's from the Botanical Layers set found on page 93 of the Annual Catalog.  It's stamped in Rich Razzleberry ink.  The sentiment is popped up on the card with Dimensionals.  A sprinkle of Rhinestone Basic Jewels was added, and it was done. Ok, that's two cards made. Can't get too much quicker for card making than that, can you?

The next two cards have a base of Crushed Curry cardstock this time.  I added a 5 1/4" x 4" layer of Old Olive on these two cards.  That necessitated trimming the DSP 1/4" on one side and the bottom to fit.

Don't remember what set this sentiment comes from.  I was just looking for something long and very skinny here.  It's stamped on a 1/2" strip of Basic White with Mossy Meadow ink.  The one end was flagged with the Banner Pick a Punch.  A 3/4" strip of Vellum was also flagged on the end and attached under the sentiment to help it stand out more.  This time some of the Brushed Brass Butterflies were added to the card for interest.

The other Crushed Curry card used a different sentiment from the Dainty Delight set.  It was stamped on Basic White with Mossy Meadow ink and punched out with a retired ticket punch.  This is layered on a Crushed Curry scalloped oval that was punched with the Double Oval Punch.

For these last two cards, I changed up the cutting again.  I started with a card base of Orchid Oasis cut at 8 1/2" x 5 1/2".  A layer of Blushing Bride was cut at 5 1/2" x 3 1/2".  That means the DSP layer needed to be made smaller and now measures 5 1/4" x 3 1/4".  It's attached to the card base with adhesive.  On this card the Double Oval Punch was used again to punch out both the Basic White oval and Orchid Oasis scalloped oval.  The sentiment is from the Dainty Delight set and stamped with Orchid Oasis ink to match.

The bling on this card is the 2022-2024 In Color Matte Decorative Dots found on page 141 of the Annual Catalog.  These Dots have gradient colors, and I chose the lightest of the Sweet Sorbet colors.  They matched nicely with the rosy-hued flowers on this section of the DSP.

Ok, that's it.  All six cards made in one short afternoon.  I think they're all lovely and I will have no problem mailing these out when needed.  I love how the color changes with the cards and the sentiment changes too really make the cards interesting.  As I have them all sitting here in front of me, it's hard to remember they all came from one sheet of Designer Paper.  Like I said earlier, make sure you choose this for your Sale-a-bration freebie early on.  It only requires a $50 purchase and it's yours.  Happy shopping!  And when you shop, please consider using the Host Code shown at the top of the blog page.  I really appreciate that.  Everyone that places an order with me will be getting a card to thank you.  I'll leave the inside blank so you can use it yourself!  Thanks so much!

Happy stamping and creating,
Sharon

Monday, January 2, 2023

Landscape Three Panel Card

Hey!  Hope you're getting creative this year.  Yes, I know it's only January 2nd, but it's time to get stamping and creating.  Today's card idea came about because I wanted to make another card like yesterday but realized the pattern on the paper was going the wrong way.  So instead of just putting it aside or coming up with another idea to use the piece of DSP, I figured out the measurements for making the card this way.  I'm not a math person at all, so it was interesting to say the least.  You should see my craft table with the scraps of paper that I was using to measure scattered around.  Yikes, it's time for a clean-up.  But first, the post...

One of the first things I noticed on this card when it was finished and sitting next to yesterday's card was the difference the light color versus dark color on the layering piece.  The first card has very defined strips of DSP on it.  This second card is much softer looking.  I like them both, but there really is a marked difference.

For this card, start with a card base of Old Olive that's cut at 8 1/2" x 5 1/2", then scored at 4 1/4" and folded in half.  There is a layer of Old Olive cut at 5 1/4" x 4".  This was embossed with the Ferns Embossing Folder.  Then I used a Blending Brush and Old Olive ink to darken the edges a little.  Attach this to the folded card base using Tombow MultiPurpose Liquid Glue.

The yellow piece of cardstock for layering is So Saffron that measures 4 1/4" x 3".  The piece of Artistically Inked Designer Series Paper (sorry it's retired - just use something similar) was trimmed to 2 3/4" x 3 3/4".  This was cut at 1 3/4", 1 1/4", and 3/4" to fit across the piece of So Saffron.  I used the Liquid Glue to attach the pieces.  I find that for me the glue gives me a little bit extra wiggle time to get the pieces straight.  You could definitely use any adhesive you're comfortable with using.  This was attached to the center of the card front using Dimensionals to raise it up.

Next up was the sentiment.  I found this sentiment in the Potted Geraniums stamp set.  I love the wording and it fit with what I needed to send out for a friend.  It's stamped on a 1/2" wide strip of Basic White cardstock.  (Love those little strips that I save just for times like this!)  It's stamped with Old Olive ink.  The ends were flagged with the Banners Pick a Punch.  It was attached across the front of the card with Dimensionals underneath.  

I wanted a very subtle sort of bling on this card.  I found the 2022-2024 In Color Matte Dots were just right.  I used the lightest version of the Sweet Sorbet Dots on this card.  It matches quite well even though the colors of the DSP are different.

The inside of the card was finished with a layer of Basic White.  There was a 1/2" strip of the same DSP print just waiting to be used.  It was added to the left edge.  A retired sentiment was stamped on the white with Old Olive ink. Then it was adhered to the inside of the card to finish it.

Seems like I'm back to needing get well and sympathy cards again.  I think this one will work out great for that.  Thanks for stopping in today to see what's been going on.  I've got more cards ready to share with you tomorrow, so I hope you find the time to check back in then.  The cards are featuring the Dainty Flowers Designer Series Paper that is one of the Sale-a-bration freebies.  And it's gorgeous!  You just have to see this in person.

Sale-a-bration starts January 5th.  Are you ready?  I am!!  Woo Hoo!

Happy stamping and creating,
Sharon